Fast Tip Friday: PlagiarEYEs Me

Eyes Have It 5

The eyes have it, folks. Feel free to take this idea (rather poorly  executed on my part, after LongJohn was in bed) and run with it for your next greeting card.

Eyes Have It 2

Step one: acquire googly eyes. These came from the dollar store.

Eyes Have It 1

Step two: come up with a pun that can be properly appreciated by a one-year – old (or a fifty-one-year-old).

Eyes Have It 4

Step three: apply both to card stock. I hope you have better drawing skills than I do.

Eyes Have It 3

I have some bigger projects in the pipe for you – now that I’m getting a bit more sleep I can actually think up some stuff – but strangely, when you have a baby in the house these projects tend to take a bit longer than they should. So stay tuned!

Eyes Have It 6

Mini Glitter Tree

Glitter Tree

I saw a giant silver version of this on Curbly last week and thought that in our house, where we haven’t taken any Christmas stuff out (because we’ll just have to pack it all up again immediately), it could brighten up the place a wee bit – at least until I give it to someone else.

Glitter Tree

The whole project takes about an hour from start to finish, and that includes harvesting the sticks, so if there are any members of your household you’d like out of your hair for a while – child or adult – give them this task and tell them to have at ‘er. A warning, though, that this is a GLITTER project, so you might have a mess on your hands afterwards. I managed to keep most of mine contained, but that depends on your manual dexterity and how you store your glitter. So BEWARE.

Glitter Tree

Go out and grab yourself some relatively straight sticks, and cut them in decreasing size to form an elongated triangle when laid out (you know, like a Christmas tree).

Glitter Tree

Then grab a paintbrush and some glue and paint the end of your stick with some glue. Not a whole lot – just enough to adhere to glitter, and we all know it doesn’t take much to get glitter to stick to something.

Glitter Tree

Then take your glitter (mine is in a wee jar) and either sprinkle it over the gluey stick or dip your stick into the glitter. I found it tidier to dip the stick in but you can do as you wish.

Glitter Tree

Do the same to all the other sticks. The original version had the tips painted silver with silver glitter but I decided to forego the paint altogether and pick as many colours of glitter as I owned.

Glitter Tree

Make sure to get both sides done and then let them sit for a while to dry – if you didn’t go overboard on the glue then it won’t take long.

Glitter Tree

While that’s going on seal your glitter carefully up where it came from. That stuff should be a controlled substance.

Glitter Tree

Now find yourself a decent length of wire. I have this stuff that I pulled out of an old downed telephone pole many years back. It’s copper wire with various colours of wrapping. I picked gray as a neutral.

Glitter Tree

The wire should, doubled, be probably twice the length of your little tree diagram from top to bottom.

Glitter Tree

Take the bottom stick and fold the wire in half around the centre of it. Twist the wire several times to hold it in place, and keep twisting to create about 0.5 to 1cm of space between the first stick and the second one.

Glitter Tree

Twist on the second stick in the same way, twisting again to leave some space.

Glitter Tree

Keep going with all your sticks, leaving spaces in between.

Glitter Tree

When you’re done, you should have a large amount of wire coming off the top of the tree. You can use this to create a loop for hanging or whatever you like. I left mine long so the people I was giving it to would have room to work with. Twist and turn your sticks to make the “tree” more three-dimensional, and hang it somewhere pretty!

Glitter Tree

Matchbox Gifts

Matchbox Gifts 14

My mother is absolutely obsessed with match boxes and the things you can put in them, so I kind of had a lightbulb moment when trying to figure out a present for her birthday last week (normally I handle the cake but this year my dad insisted that he had it under control). If you have a mother with a similar fetish, maybe this will work out for you for a nice Mother’s Day present.

Matchbox Gifts 8

For my mother’s wee giftie, it was just a silly little thing: I decided to give her MAGIC BEANS. But instead of magic beans it was actual bean seeds that she could plant shortly in the garden. And then we could eat the beans. I also gave her some rosemary seeds because I killed her rosemary tree while she was in Florida.

Matchbox Gifts 1

I love these little tiny glass jars you can get at the dollar store.

Matchbox Gifts 2

Matchbox Gifts 4

Matchbox Gifts 5

Don’t worry, I DID label all the little jars.

Matchbox Gifts 6

I decided to make a matchbox from scratch so I could ensure it was the right size to fit my beans. In order to do that I downloaded a template from the internet. I cut it out and used scrapbook paper (it’s a decently stiff cardstock) for my boxes.

Matchbox Gifts 7

I used a craft knife to get things exact, but it’s a pretty easy template to cut out.

Matchbox Gifts 9

Then a little bit of strategic adhesion with craft glue.

Matchbox Gifts 10

And the beans, they fit! They’re a little loose though.

Matchbox Gifts 11

So I padded the bottoms of the boxes with a bit of felt.

Matchbox Gifts 12
I broke this photo. It’s okay, though, because it wasn’t a very good one anyway.


Then tied up both boxes with pretty ribbon to give to my favourite mother!

Matchbox Gifts 13

Match boxes (even custom-made ones) are a great creative way to package up smaller gifts of jewelry or what-have-you. Keep that in mind the next time you’re doing some complex wrapping and you don’t have a perfect box to hand.

Glitter *may* be involved.

Lite Brite Dandelions 44

I saw this little bit of neat a while back and I’ve always wanted to recreate it for someone special. But of course by recreate I mean do it in a completely different way. Nevertheless.

Lite Brite Dandelions 38

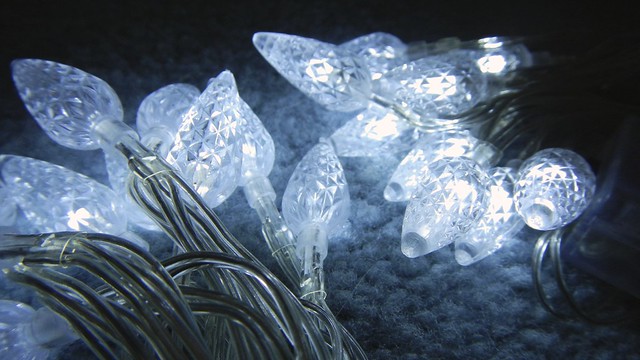
What you need for this, however you decide to do it, is an artist’s canvas, some paint, some electric or battery-powered lights (LEDs are safer), a knife for cutting, a brush for painting, and some glue for, well, gluing. In this particular project, there was also glitter involved.

Lite Brite Dandelions 1

First, check and make sure your lights are working. Yes? Good.

Lite Brite Dandelions 5

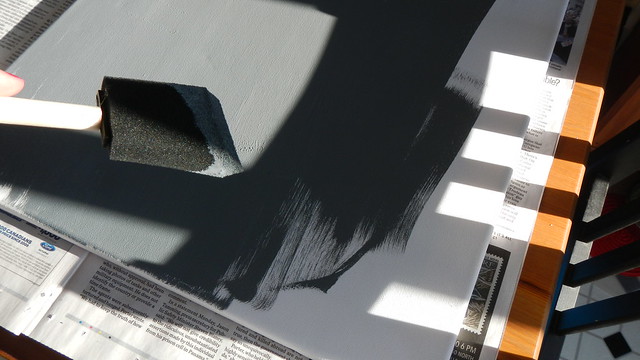
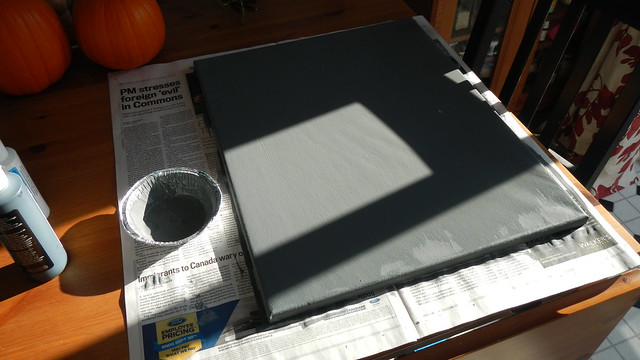
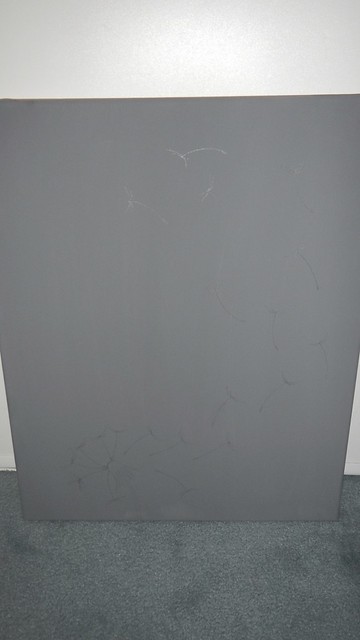
Now, paint your canvas however you like. I was going to do mine a nice metallic, but then I thought better of it and went with a soft matte gray instead. Because I didn’t want to distract from the glitter.

Lite Brite Dandelions 7

Lite Brite Dandelions 8

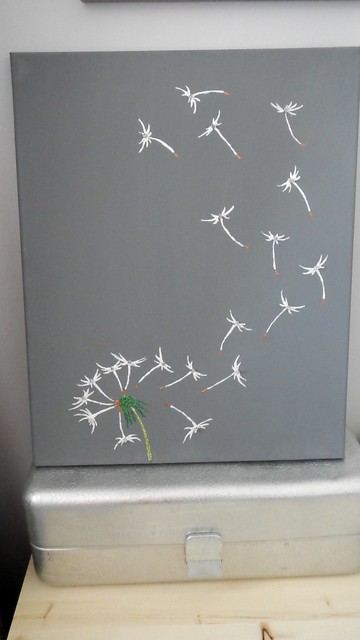
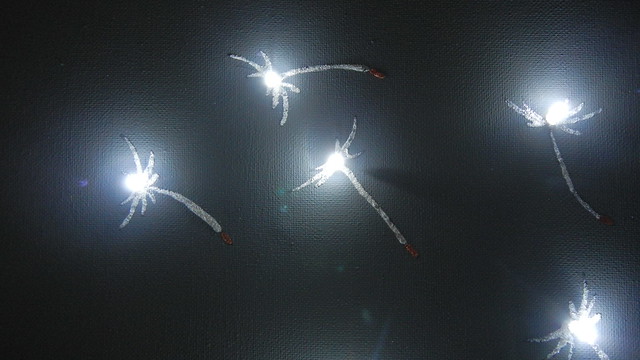
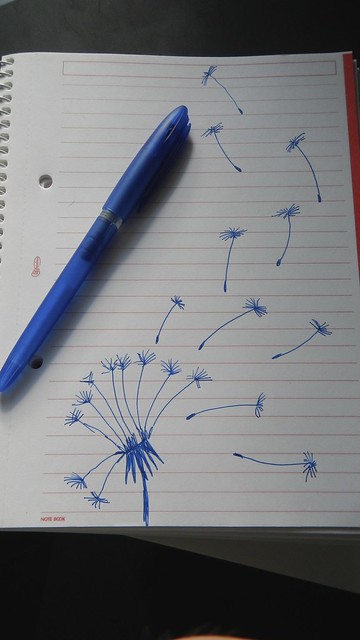
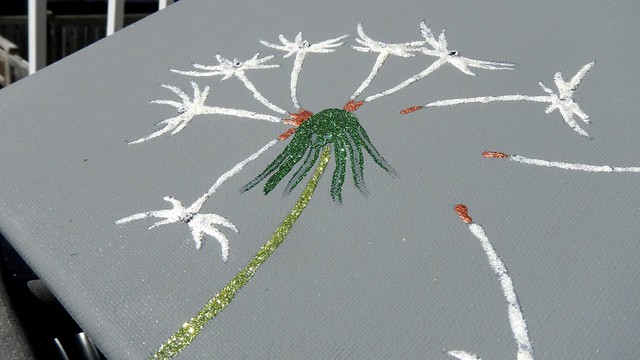
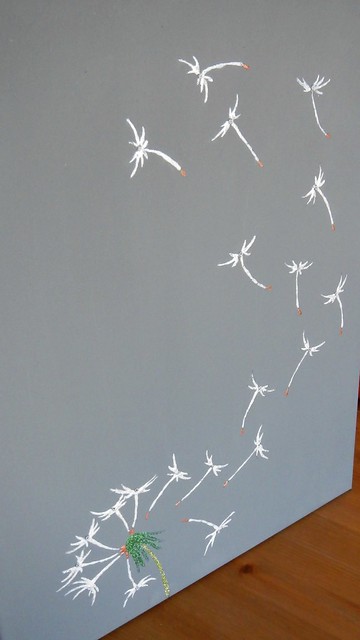
As for your design, well, that’s up to you. The original idea was just sort of abstract, like fireworks. But you could do constellations (like someone’s Zodiac sign), or something more Lite-Brite-y. Or a marquee. Whatever you want. For mine, I decided on a dandelion, where each seed of my favourite flower (and I’m not ashamed to admit that I love that plucky weed) corresponded to a light.

Lite Brite Dandelions 10

Here’s a quick sketch I did once I figured out my idea, just for proof of concept.

Lite Brite Dandelions 6

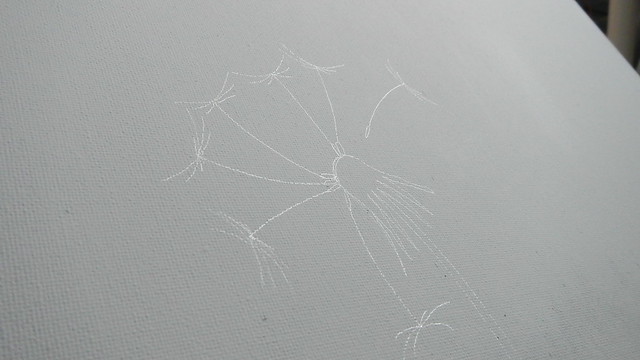
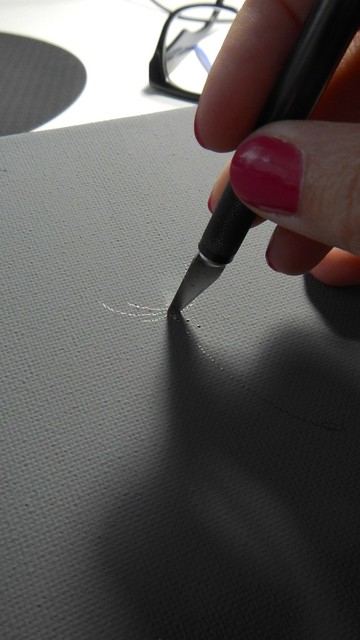
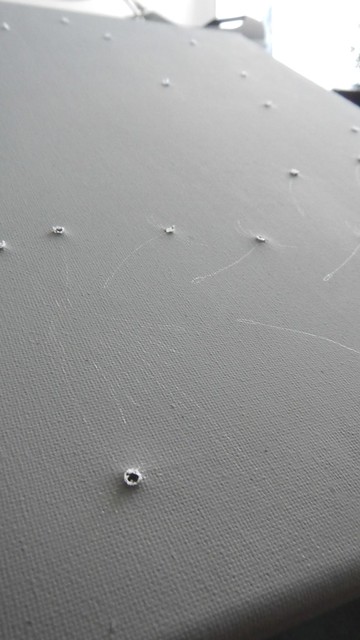
I lightly marked out the design on the painted canvas with a pencil. I had to make sure that the design was big enough to accommodate the size of the lights I had purchased.

Lite Brite Dandelions 13

Lite Brite Dandelions 14

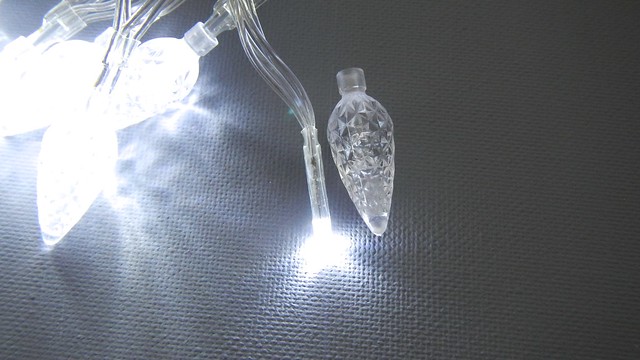
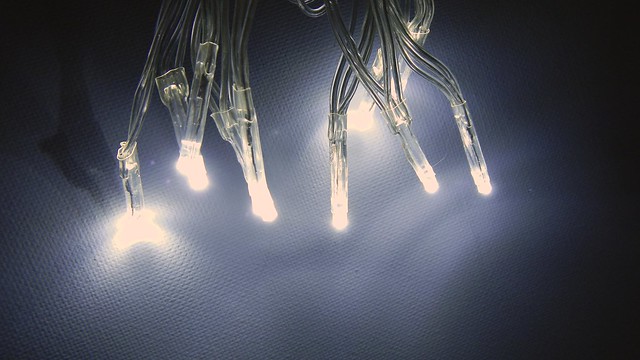
Then I discovered that the ugly deflectors on my Dollarama lights weren’t glued on and I could pull them off, meaning I was just left with the pretty little diode!

Lite Brite Dandelions 11

Lite Brite Dandelions 12

Then I cut out holes big enough for the lights to poke through.

Lite Brite Dandelions 15

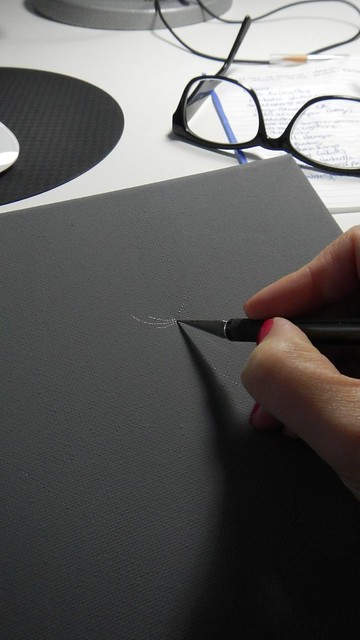
I basically just needed to poke a hole with the Xacto and twist it a bit. While I was doing this the Pie started trying to make me mess up, which I did, on the very last hole. Then he started giggling and saying he shouldn’t tease me when I have a knife in my hand. How well he knows me by now.

Lite Brite Dandelions 16

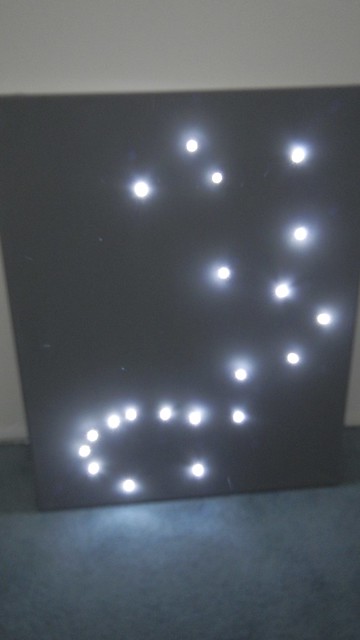
Then I poked through the lights. Make sure to test them and see how they look! Of course my camera plus low light equals blurry photo, but you get the idea.

Lite Brite Dandelions 17

Lite Brite Dandelions 18

Lite Brite Dandelions 19

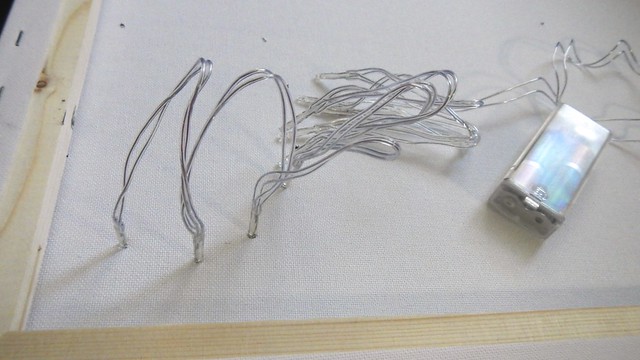
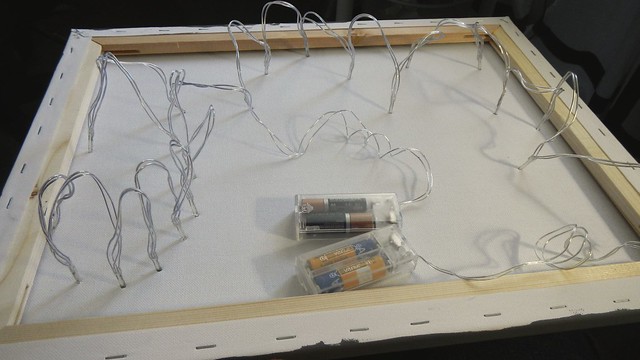
Then, if you want, you can secure them in place with a bit of hot glue around the back, but I’ll do that later. I don’t want the lights to get all glittered up.

Lite Brite Dandelions 20

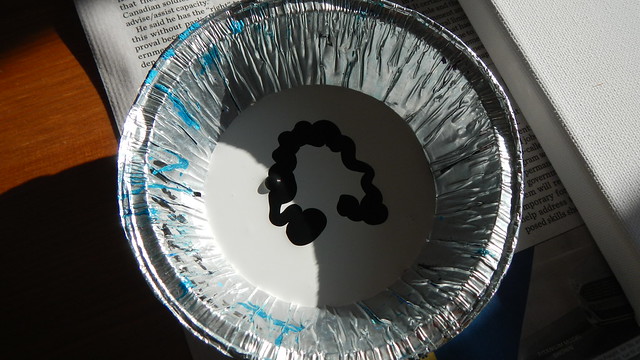
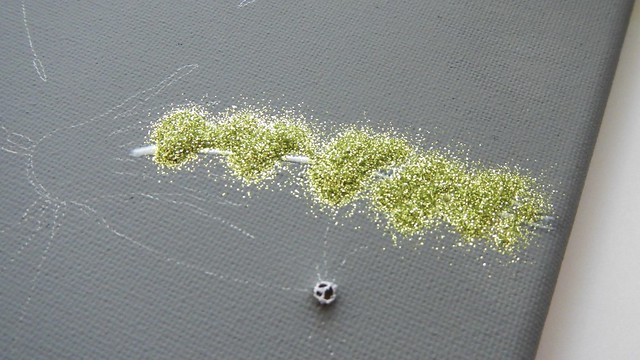
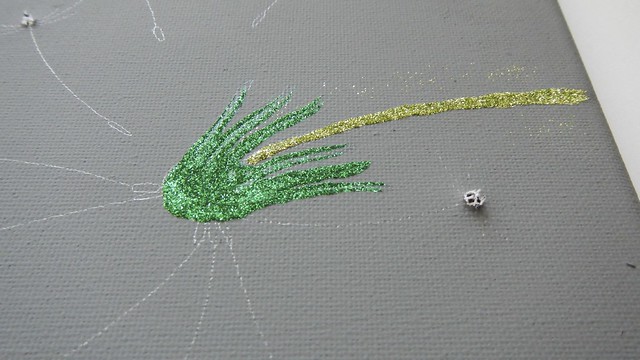
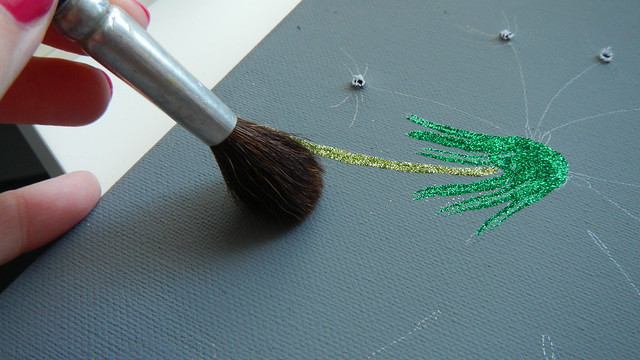
Now, for the front, I had to fill in the rest of my design. With glitter. I used regular school glue to fill in the parts of the dandelion seeds and stalk.

Lite Brite Dandelions 21

Then dusted them with appropriately-coloured glitter.

Lite Brite Dandelions 22

Then let it dry.

Lite Brite Dandelions 24

You can dust away loose glitter with a soft fluffy brush and some compressed air. I did most of this outside.

Lite Brite Dandelions 26

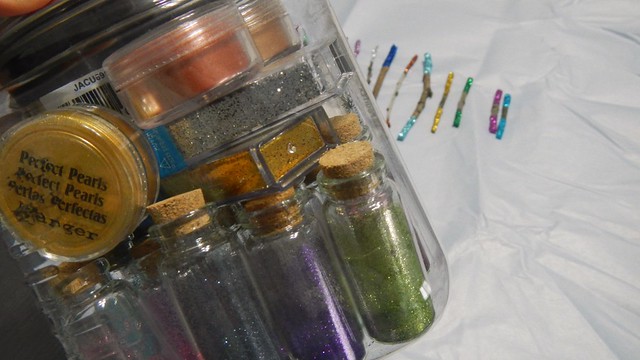
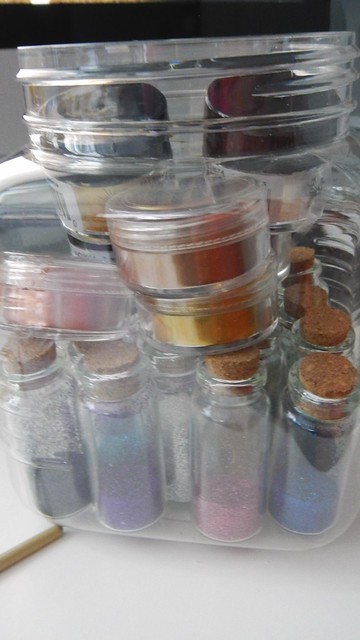
And sealed up my glitter again. Yes, I have a jar full of jars of glitter. That stuff is dangerous.

Lite Brite Dandelions 27

The seeds took forever because I did the little actual seed part first.

Lite Brite Dandelions 28

By the time I was done with all the white fluffy bits I was so done with glitter in general.

Lite Brite Dandelions 29

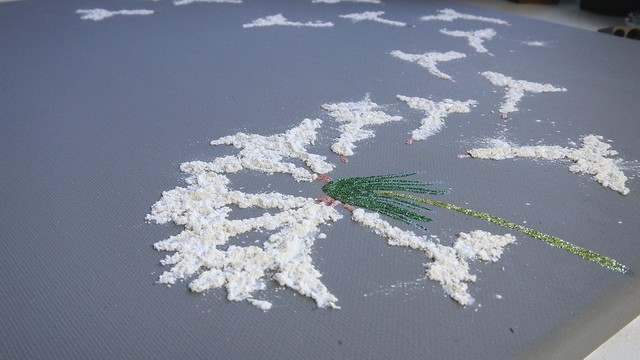
Here it is after I went at it with compressed air for a bit. It seems to work best on the superfine metallic powder.

Lite Brite Dandelions 31

It looks pretty good just on its own.

Lite Brite Dandelions 32

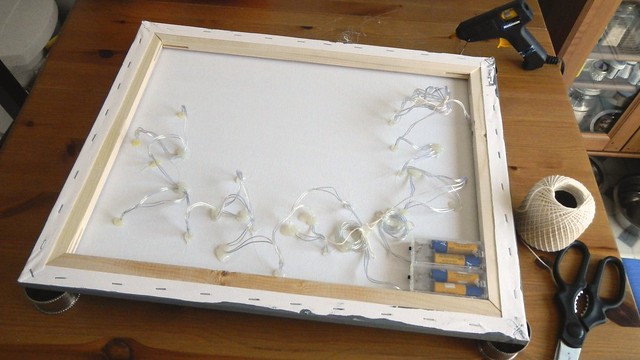
Then I added back in the lights and secured each with a drop of hot glue. This is where I discovered that if you don’t use glue sticks for a while they yellow. Fortunately you can’t see this on the front.

Lite Brite Dandelions 33

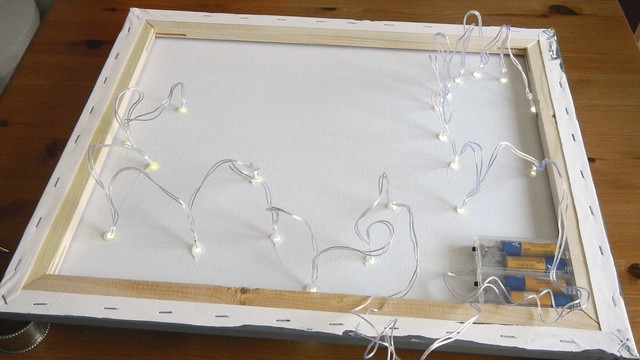
I also secured all the loose wires and the battery casings. It doesn’t look pretty but you can’t see it so who cares?

Lite Brite Dandelions 34

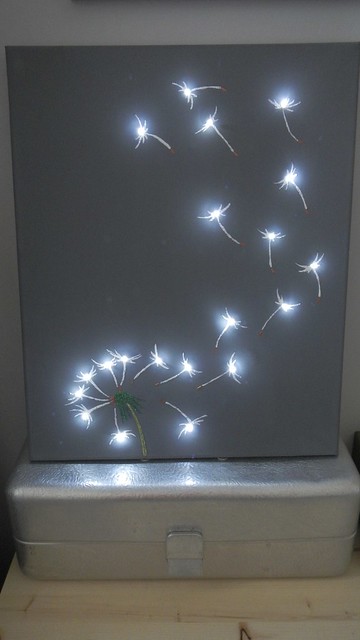
I like it. I like that it looks neat during the day, with the contrast in gray and glitter, and then when you turn it on at night the light sparkles off everything but the background (except for the few stray bits of glitter embedded in the canvas). I also like how the seeds kind of look like dragonflies. NEAT!

Lite Brite Dandelions 46

Lite Brite Dandelions 47

Bulletin Board Beautification

I think I’ve had this bulletin board for twenty-five years, and someone else had it before me.  It’s held up pretty well, I think, but its age is starting to show.

Bulletin Board Beautification 1

There are certainly a large number of holes in it.

Bulletin Board Beautification 2

It’s not even made of cork: it’s like burlap and some sponge-y/fibre-y stuff.

Bulletin Board Beautification 4

And there are weird scraps of whatnot on the frame.

Bulletin Board Beautification 3

But why buy a new one when I can make this one new again?

I had this pretty fabric stuffed in my crafty closet.  It’s actually a stretch cotton, which will help me to get it very tightly attached to the bulletin board.

Bulletin Board Beautification 5

I cut it to vaguely fit the size of the board.

Bulletin Board Beautification 6

Then I pulled out these metal staples with a pair of needle-nosed pliers.  So I’m left with the frame and the board.

Bulletin Board Beautification 7

I stretched the fabric across the board and used a staple gun to fasten the fabric into place.  You could probably use a hot glue gun as well.

Bulletin Board Beautification 8

Then I quickly sanded down the frame with fine sandpaper and removed the hanging hardware temporarily. I painted it with this cute metallic teal craft paint.

Bulletin Board Beautification 9

I reattached the hanging hardware to the top of the frame, and then fit the board back into place with glue.  It’s a tighter squeeze with the fabric covering it.

Bulletin Board Beautification 11

Tada!  I’m glad I didn’t have to replace something that was still functional, and that I could add a personal touch to my office organization!

Bulletin Board Beautification 12

Bulletin Board Beautification 13

It’s hard for me to be artistic in arranging a bulletin board to appeal to the tastes of the internet, and really there’s only so much you can do with license plate renewals, energy cost charts, and a pair of scissors.  Though I did dress it up with a super cute pic of me and Cait that I found while I was looking for something else.  So that’s something.

Bulletin Board Beautification 14

Animal Magnetism

Animal Magnetism 4

By now I’m sure you’re familiar with my odd addiction to rare earth magnets.  I just love how STRONG they are.  These I made up for Rusty’s babymama and I think that both she and baby-to-come will enjoy them.

I had a handful of small plastic animal figurines I’d picked up in a bag from a thrift store.  I sprayed half of them silver and half of them gold with spray paint.

Animal Magnetism 1

Then I laid them out and used GOOP to affix the rare earth magnets to the animals.

Animal Magnetism 2

I lined a small box with scrap book paper …

Animal Magnetism 3

And then used tiny pieces of tape to stick the dried magnets to it.

Animal Magnetism 5

The dinosaurs are my favourite.

Animal Magnetism 6

Though I do love how the magnet is stuck to this gorilla’s butt.  It makes me giggle.

Animal Magnetism 7

Safari Bookends

Safari Bookends 20

These are all over the internet, but I think they’re totally badass anyway.  They’re quite cute, if you make them right, but it was late and we were tired so we made them a little wrong.  But I like ’em even so.

We start with some plastic animals I got at Target, and which I sprayed copper because I thought we were going to do this differently than we did.

Safari Bookends 1

Then you take your animals, clamp them solidly to a surface, and saw those kitties in half.  This ain’t no magic trick.

Safari Bookends 4

Use a file to smooth out the rough edges.

Safari Bookends 5

Then you measure your podiums.  We made our bookends out of this nice solid, heavy piece of wood, so it would actually hold books up and stuff when stuck together in an L shape.  Remember: measure twice, cut once.

Safari Bookends 6

The Pie is afraid of table saws, so he stood at the other end of the garage while I risked life and limb to get these pieces of wood cut.

Safari Bookends 7

But the only thing I cut was the wood, which is a bonus. We used a fine sandpaper to smooth off the rough corners.

Safari Bookends 8

Here we are checking to see if we measured correctly.  Turns out that we didn’t, and the tiger ones were a total failure.  No matter: let’s press on.

Safari Bookends 9

Here’s what they will sort of look like when they’re done.

Safari Bookends 10

Using a drill press to start off the screw holes.  I’m wearing mittens because it was like -29°C outside and my garage isn’t heated.

Safari Bookends 11

Screwing in the screws.  Because the wood was so thick we used decking screws, which are super long.

Safari Bookends 12

Spraying.  I decided I wanted gold animals, not copper, so they got another coat of spray paint.

Safari Bookends 13

Ready to glue.  I used GOOP, an all-purpose adhesive that dries clear and is super strong.

Safari Bookends 15

You lay the glue on and give it 2 minutes to cure before attaching it to the other surface.

Safari Bookends 16

I left these overnight to dry.

Safari Bookends 17

The next day I cut little felt squares for the bottoms so they didn’t scratch any surfaces.

Safari Bookends 18

And here it is completed.  Please ignore the fact that the one side is taller than the other. And that they’re currently not holding up any books.  Late.  Tired.  Cold.

Safari Bookends 19

Alphabet Trays

Alphabet Trays 13

The only problem I have about hand crafting all my Christmas gifts and then putting them on the blog is that my whole darned family reads it. So it’s kind of hard to keep things under wraps. I try my best, but in this particular case it’s pretty obvious who these are for (because they’re monogrammed, geez).

Alphabet Trays 9

Anyway, I picked up some air dry clay at DeSerres and thought I’d have a little fun with it.  These little trays are easy to make and a nice little element of home-made personalization for any home.  They’re great gifts for teachers, too, and your kids can make them all by themselves.  They can be hung on the wall or, depending on the size, used as actual trays for non-food items.

Alphabet Trays 1

Start by working the clay with your hands and rolling it out to be about 1/4″ thick.  With a knife, cut the base of your initial out.  I freehanded this, but measuring with rulers and such would probably help.

Alphabet Trays 2

Then work on cutting out your sides, making sure they fit the dimensions of your little tray.

Alphabet Trays 3

You may need to use little snakes of clay, etc., to get the sides to stick on properly.

Alphabet Trays 4

Use a spoon or a clay smoothing tool to flatten out any cracks at the seams.

Alphabet Trays 5

Then leave your clay dishes to dry for a while.  These took about three days to dry completely.

Alphabet Trays 6

There was a little bit of shrinkage at the seams on parts of mine so I just reinforced them with some white glue.

Alphabet Trays 8

Then I painted them with regular craft paint, and I went with a lighter colour on the inside with the outside edges being a darker version.

Alphabet Trays 10

The bottoms I painted black with a giant red heart in the middle, because Mags and the Flying Dutchman are such lovebirds.  These are also coated with a spray sealant for longevity. I think it’s pretty cute.

Alphabet Trays 11

So Long Sucker! Creepy Hallowe’en Sucker Stand

Sucker Stand 34

I actually made this project LAST year, but because I never get my holiday stuff organized in time to publish it any time before the holiday it’s for, I decided to set this up so I would look timely and well-prepared this year.

MUGS Mixer 6

Anyway, last year, back when the Pie and I were still in St. John’s (weird that we’re not there anymore), Fussellette organized a mixer for the geographical society at MUN and she decided on having a candy bar for everyone to snack on while they got jiggy (do people even say that in the far-off future of 2013?  Better question: do people even say that NOW?).  I volunteered to make a stand for the suckers Fussellette insisted on having, along with our FORTY POUNDS of other candy that we bought.

Sucker Stand 2

You might like to make something like this for your own Hallowe’en party.

Sucker Stand 32

At first I thought I would just do something plain, like a store display, but maybe with some sparkly skulls we’d picked up from Dollarama.  But then, I was looking at a shoe box and I was struck dumb with inspiration (not true: I immediately texted Fussellette about my genius and then told the Pie all about it, despite him not wanting to know).  So here’s what I came up with.

Sucker Stand 5

I’m going to make a grave yard — well, part of one.  It will have a freshly covered grave with headstone and some nice grass all about, and little holes for holding all the suckers.  That will be the top of the box.  Then the extra suckers (there were 100 in the bag) can be stored inside the box itself.

So first, on the shoe box I drew where I wanted the grave to go.

Sucker Stand 6

Then I used a punch to make some evenly spaced holes where the suckers would eventually fit.

Sucker Stand 7

In order to make it so the suckers didn’t just slide all the way through the holes until they were stopped by their candy tops, I had to construct a little hanging platform on the underside of the box lid that would prevent their sliding around and also not interfere with the opening and closing of the box itself.  I just taped a few pieces of spare cardboard in strategic places and there we go.

Sucker Stand 8

Sucker Stand 10

Now I got to do the fun stuff.

Sucker Stand 4

I had a package of Model Magic lying around that I didn’t yet have a project connected to, so I figured its lightweight nature would be perfect to make a gravestone.  A bit of shaping (not too much, as I wanted the stone to look old and cracked) and some choice words (stamped in with the same punch I used for the holes) and I set that aside for the requisite 72 hours to dry.  I’m going to paint it later.

Sucker Stand 13

To ensure that the surface of my gravesite didn’t end up accidentally filling in the holes I punched, I marked their places with wooden skewers.

Sucker Stand 11

Then I went outside.  This moss I hauled up from the path next door and the dirt is from my garden. This explains why I can’t grow anything.  I keep taking all the dirt.

Sucker Stand 3

Spread some Mod Podge.  Attach some moss (I snipped off only the tops of the moss, and replanted it when I was done).  Repeat.

Sucker Stand 14

For the grave dirt, I mixed my garden dirt with some Mod Podge to make mud of sorts, and spooned it onto the area.  I added a few rocks for visual interest, and then sprinkled some un-glued dirt on top to get the colour right.  Then I left THAT for 48 hours to dry.  You can still see the box through some of the moss but honestly, I don’t think anyone else would look this closely at a candy dispenser.  Mostly they are probably just thinking “Free candy!  Gimme!”

Sucker Stand 16

Sucker Stand 17

Sucker Stand 18

Once you’ve got all the stuff glued and set, you can take away the skewers.

Sucker Stand 19

While it was drying I tacked on some black construction paper with tape as a sort of border to the whole thing, and to cover the shoe box-ness of the shoe box.  Then I used craft paint to freehand a picket fence all around (you can see it in the finished shots).

Then, much later, I painted the headstone, filling in the text with black craft paint and adding a bit of texture here and there.

Sucker Stand 24

Sucker Stand 25

Sucker Stand 28

Hot glue that sucker (ha) onto the dried Mod Podge mud and we’re good to go.

Sucker Stand 29

Sucker Stand 30

Insert suckers. You can store extras underneath, inside the box.

Sucker Stand 31

EAT SUCKERS. MWAHAHAHAHAHA.

Sucker Stand 35

Pre-Spring Paper Tree

Paper Tree 23

It may be spring where you are.  Here in St. John’s, however, we don’t put away our snow shovels until after the Victoria Day long weekend at the end of May.  It’s kind of the rule.

Paper Tree 21

So in the absence of spring, I’ve decided to make my own.

Paper Tree 25
Interfering a bit with my marine mobile while it’s at it.

This branch fell victim to yet another of our vicious wind storms last night and managed to scare the crap out of the dog by moving along the sidewalk just as he was about to sniff it this morning.  In retribution we captured it and will torture it into submission.

Paper Tree 1

In actual fact one of the major branches on it was broken.  This branch was walking wounded.

Paper Tree 3

So I fixed that up with some floral tape.

Paper Tree 4

For this project you will need some paper.  It can be scrap booking paper, origami, magazine paper, whatever you want.  I picked a spring-themed magazine because I thought I could get the best colours from it.  I should have really cut out the paper in the shapes of leaves, but I’m super lazy so I used my 2″ circle punch instead.

Paper Tree 2

Some floral wire, a pair of scissors, a paint brush, and some glue would also be handy.

Paper Tree 8

So you start by cutting out your shapes. Whatever they’re gonna be. Us lazy people like our circles. It’s “modern”. Deal with it.

Paper Tree 5

Then you put some glue on one side of a shape. Then you take a leaf-stem length of floral wire, bend it a bit so it won’t just slide right out again, and slap it on there, with another shape on top. BAM.

Paper Tree 9

And then you do that a bunch more times. Until you run out of shapes. Or until you get bored and don’t want to make any more shapes.

Paper Tree 14

Then you take your branch and anchor it in a sturdy vase.

Paper Tree 11

And then you start winding the shapes onto the branches, following the line of the branch, bending them a little bit for depth. It ain’t that hard.

Paper Tree 12

And you keep going.

Paper Tree 15

Make sure to spread them out as you add them so that when you run out of shapes and don’t want to make any more you don’t end up with bare branches.

Paper Tree 16

And then you put it somewhere and admire your handiwork!

Paper Tree 17

Here it is on my mantle.

Paper Tree 27