Pseudo-Peonies

IMAG0834-1

While the weather might be warmer than it was before, and while I pulled these lovely daffodils out of my garden last week …

Pseudo Peony 3

… my garden still looks like this.  Which means that my peonies haven’t bloomed yet.  If they’re going to bloom at all.  And I like peonies.  They’re one of my favourites.

Pseudo Peony 4

So I’m going to make my own here.  It’s not that hard.  I found a quick tutorial at Two Shades of Pink and had at it.

Pseudo Peony 52

Start with a bunch of coffee filters.  I don’t know how many.  A bunch.

Pseudo Peony 7

And some warm water.  And some food colouring.  Or watercolour paint.

Pseudo Peony 8

Dissolve some of your paint/dye in the water. This is some Crayola stuff I broke off and stirred in.

Pseudo Peony 17

I tried this craft paint but it wasn’t water soluble, not really.

Pseudo Peony 9

Pseudo Peony 10

Then dip your filters into the coloured water.  You can do a bunch at once. And they don’t need to sit in the water for more than a few seconds.

Pseudo Peony 14

Experiment with the outer edges.

Pseudo Peony 19

Versus the inside. Or the whole thing.

Pseudo Peony 15

Squeeze out the excess dye with your hands.

Pseudo Peony 23

I totally dyed my hand pink.

Pseudo Peony 26

Spread out the filters to dry completely.

Pseudo Peony 24

Mine took a few hours, less when I fully separated the layers and put them in a place with lots of air flow.

Pseudo Peony 27

This is the full stack next day.

Pseudo Peony 30

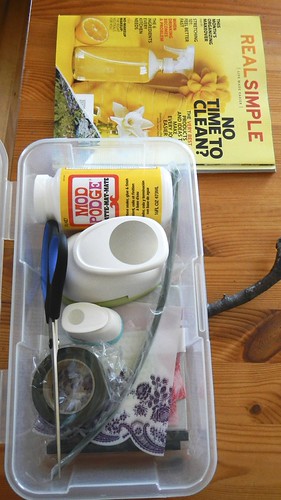
Now, in addition to the filters, you will need scissors, a stapler (with staples), and then some tape or wire (I have floral wire here).

Pseudo Peony 31

Grab between 6 and 8 of the filters and stack them up.  Flatten them a bit with your hands.

Pseudo Peony 32

Fold the filters in half, then half again so you have a little cone.

Pseudo Peony 33

Take your scissors and scallop the rounded edge of the cone — don’t worry about perfection, it’s all good.

Pseudo Peony 34

Now unfold the thing and ruffle it up a bit.  Pinch that spot at the very centre where you made your folds.

Pseudo Peony 35

Flip the filters over and you can see what I mean by that pinch.

Pseudo Peony 36

Staple over that pinched spot to hold things in place.

Pseudo Peony 37

Now flip it back over and smooth it out a bit.

Pseudo Peony 38

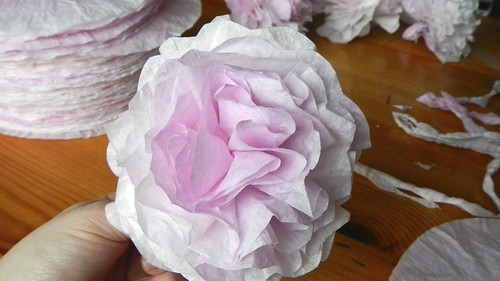
Pull up the edges of the topmost (innermost) filter and, working from the bottom, squish the filter in on itself, leaving a nice fluffy gathering on top.

Pseudo Peony 39

Keep going with each successive layer.

Pseudo Peony 40

Make sure to keep the top nice and fluffy, while still jamming the paper against itself.

Pseudo Peony 41

Gather up the bottom layer and push it upwards, squeezing into the little handle you’ve created for yourself.

Pseudo Peony 42

The paper will hold its shape for a short time, but you want to fix it more permanently.  You can use tape around the little nub here or floral wire, which is what I used.

Pseudo Peony 43

I attached one flower to one end of the wire and another to the bottom.  What am I going to do with it?  I’m getting to that.

Pseudo Peony 45

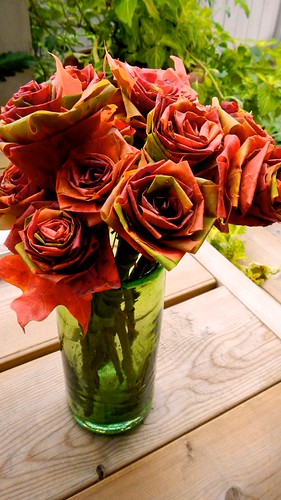
Because of the variation in the way I dyed the filters, you can see different colour gradations in the finished flowers.

Pseudo Peony 44

On this one I put the darker filters in the middle.

Pseudo Peony 46

This was the resulting bloom.

Pseudo Peony 48

I used 8 filters per bloom and ended up with 18 flowers finished, which means I had 144 filters dyed.

Pseudo Peony 51

When I was finished I gathered some of the blossoms that were tied together and I used an additional piece of floral wire to wind their stems together.

Pseudo Peony 53

And it made two lovely little bouquets of 9 flowers each.

Pseudo Peony 55

I don’t even want to talk about that horrible plaster job in the background.  The landlord took our chimney away and now I have no place to display my work.

Pseudo Peony 56

So until I figure out how to compensate for my lack of a fireplace, I’ve put my pseudo peonies flanking my television.  Because I’m classy like that.

Pseudo Peony 59

Pseudo Peony 63

Pre-Spring Paper Tree

Paper Tree 23

It may be spring where you are.  Here in St. John’s, however, we don’t put away our snow shovels until after the Victoria Day long weekend at the end of May.  It’s kind of the rule.

Paper Tree 21

So in the absence of spring, I’ve decided to make my own.

Paper Tree 25
Interfering a bit with my marine mobile while it’s at it.

This branch fell victim to yet another of our vicious wind storms last night and managed to scare the crap out of the dog by moving along the sidewalk just as he was about to sniff it this morning.  In retribution we captured it and will torture it into submission.

Paper Tree 1

In actual fact one of the major branches on it was broken.  This branch was walking wounded.

Paper Tree 3

So I fixed that up with some floral tape.

Paper Tree 4

For this project you will need some paper.  It can be scrap booking paper, origami, magazine paper, whatever you want.  I picked a spring-themed magazine because I thought I could get the best colours from it.  I should have really cut out the paper in the shapes of leaves, but I’m super lazy so I used my 2″ circle punch instead.

Paper Tree 2

Some floral wire, a pair of scissors, a paint brush, and some glue would also be handy.

Paper Tree 8

So you start by cutting out your shapes. Whatever they’re gonna be. Us lazy people like our circles. It’s “modern”. Deal with it.

Paper Tree 5

Then you put some glue on one side of a shape. Then you take a leaf-stem length of floral wire, bend it a bit so it won’t just slide right out again, and slap it on there, with another shape on top. BAM.

Paper Tree 9

And then you do that a bunch more times. Until you run out of shapes. Or until you get bored and don’t want to make any more shapes.

Paper Tree 14

Then you take your branch and anchor it in a sturdy vase.

Paper Tree 11

And then you start winding the shapes onto the branches, following the line of the branch, bending them a little bit for depth. It ain’t that hard.

Paper Tree 12

And you keep going.

Paper Tree 15

Make sure to spread them out as you add them so that when you run out of shapes and don’t want to make any more you don’t end up with bare branches.

Paper Tree 16

And then you put it somewhere and admire your handiwork!

Paper Tree 17

Here it is on my mantle.

Paper Tree 27

Autumn Leaves Bouquet

068

When I saw this post on Design*Sponge last fall I absolutely itched to try it out.  I love autumn, and having grown up near Gatineau Park, I have learned to appreciate the beauty of watching a large forest slowly turn from green to a million shades of yellow, orange, and red.  Unfortunately, that doesn’t really happen in St. John’s.  In the autumn here, we have green leaves on the trees, and then we get storms like Leslie, and all the leaves fall to the ground and go dry and crunchy and brown almost immediately.

053

So when I knew I was flying back to Ottawa for a weekend in September, I came determined to carry out this simple project.  The problem is that even in Ontario it’s too early for most of the trees to have made the change.  Cait kept me updated with leaf reports leading up to my flight, and her reports all said the same thing: the leaves are all green, dude, it’s not going to work out for you.  As I flew into town, however, I could see a few orange and yellow trees dotting the Greenbelt, so I knew that with a bit of searching, this thing could happen, despite Cait’s protests.

050

So one afternoon, after Teedz and Tego had made it to town, Tego and I took a stroll in the nearby park to see what we could come  up with.  Lo and behold, there were two big old maple trees whose leaves had just started to turn and fall to the ground.  They weren’t totally orange or red, but the splashes of green I think added to the character of the thing.

046

We started gathering, picking up maple leaves of different sizes and shapes.  You need probably 10-12 maple leaves with stems for each flower, plus a variety of thin, relatively straight sticks to use as stems.  And floral tape, which you can buy at any craft store.

047

You start with smaller leaves at the centre and get bigger as you move outwards.  Take a relatively small leaf and fold down the centre and two outside points towards the middle of the leaf.

056

This gives you the basic shape for a petal.

057

Roll that tightly up to form your “bud”.

058

Now take another leaf, fold down the points, and wrap it around your bud.

059

Keep repeating that, rotating the flower the whole time so it looks natural, until you get something that is a size you like.

060

Tego and I found that if we weren’t careful our buds started to stick out past the reaches of the other petals, so you want to make sure to keep that sucker tamped down inside.

054

When you get something you like, pinch the bottom of the leaf where the stems are and start wrapping it up with floral tape.  Take one of your sticks and lay it at the base of the flower and keep wrapping, taping the stems to the stick.

051

We learned that floral tape is not actually sticky.  It sort of relies on tension to stay stuck to stuff, so make sure that you pull it tight.  We found that once we got to the end, if we wrapped the tape several times around itself tightly enough it wouldn’t unravel on us.

052

We kept on until we had a full dozen, then Tego trimmed the sticks so they were approximately the same length — you don’t want them exactly the same or the bouquet will look weird, but you don’t want them to be radically different either.

055

Then we tied it up with ribbon and gave it to our cousin as a hostess gift.  Everyone thought we had bought them at some fancy craft fair, and were super astonished when they found out that we’d made them ourselves during a walk in the park!

071

As they are, I think the leaf bouquet will last about a week or two, depending on the freshness of the leaves themselves.  If you want them to last longer (if, as Cait suggests, you have an autumn wedding coming up and you need time to make a large quantity of these suckers), then you can dip each flower individually in gel medium (which you can get at art or craft stores) or even spray the bejeezus out of them with hair spray or another form of lacquer and they should last you several months.

067

I’m also interested to try this with non-maple leaves to see if I come up with a different shape.  I will let you know if anything comes of that.

073

***EDIT, 30 January 2013***

The florist who supplies the flowers at work did this to dress up a bouquet. Very nice, don’t you think?

IMAG0726