I love me some Granola

Granola 26

My morning meal usually consists of coffee, juice, yogurt, and granola.  Like I could eat that stuff every single day.

Granola 30

Until now, I’ve been buying our granola, but it’s quite expensive for the amount you get and it’s full of all sorts of weird additives and the like that I don’t really want to put in my system.

Granola 28

My mother used to make granola for us sometimes when we were kids, so I figured that I could probably do it myself if I tried.  And it’s easy.  And you can use what you’ve got in your cupboards, or what you can scoop up at the bulk food store.  Which means you can customize each batch.

Granola 6

So preheat your oven to 350°F and get out a large rimmed baking sheet.  I took the precaution of lining mine with parchment paper, so stuff wouldn’t stick.

The majority of granolas start with a base of oats, about 4 cups.  I used four double handfuls, because I measured my tiny hands once and put together that’s about what they hold.  And thus ends my list of measurements for this recipe.  Because you can do whatever you want.  So what else have I got going on here?  In addition to the oats, I have bran, ground flax, shredded coconut, sliced almonds, nutmeg, cinnamon, sesame seeds, poppy seeds, lavender flowers (yes), and then a selection of dried fruits: apricots, mango, and raisins.

Granola 3

Take all your happy dry ingredients (minus the fruits) and plop them in a bowl.

Granola 9

Mix ’em up.

Granola 8

In another bowl, add about 1/2 cup runny honey,

Granola 11

about 1/2 cup maple syrup,

Granola 12

and about 1/2 cup melted butter.

Granola 13

*** EDIT: If you’d like granola that forms clumps (and that’s my favourite kind), whisk 1 or 2 egg whites into a froth and add them to the mixture as well.  The protein in the whites will stick everything together during the baking process.  Just use caution when stirring mid-bake, as the amount you stir will affect the size of the clumps you create. ***

Pour that golden loveliness into the dry mixture and stir until all the dry ingredients are coated.

Granola 14

Spread that stuff out on your baking sheet and chuck that in the oven for about 40 minutes.

Granola 16

Make sure to stir with a spatula every 10-15 minutes or so to keep the stuff on the bottom from burning.

Granola 18

While that’s on the go, get your dried fruit ready. I chopped up the apricots and mango slices a little to make them easier to get on a spoon.

Granola 21

Remove from the oven and let it cool in the pan, stirring it occasionally to break up the chunks.  The finer grained your ingredients are, and the more sticky wet ingredients you use, the chunkier your granola will be.

Granola 19

While it’s still a little warm, stir in your dried fruit.

Granola 22

Store in an airtight container for up to 3 weeks, and enjoy whenever you want!

Granola 27

Root Beer Bundt Cake

Potluck
Potluck insanity. Too many tall friends.

Every year during the winter holidays we get together with our Ottawa friends and have a potluck.  We started doing this when we were all students because it was the one day we could guarantee that we were all in town at the same time and we could spend some time together.  We even get fancy with the planning, starting with a Doodle scheduler to pick the right date (if you’ve never used their free software to make an appointment, check it out).  Then we set up a Google spreadsheet to figure out who is bringing what, to ensure that not everyone arrives with chips and dip and that the people who are bringing appetizers don’t show up just as we’re starting dessert.  Inevitably the spreadsheet gets hacked by someone (or everyone) and chaos ensues.  Graphs and pie charts and graffiti abound.  It’s madness.  But fun.  This year the Pie and I decided to host, and as each person brings a dish, this was the Pie’s contribution to the festivities: Baked’s Root Beer Bundt Cake.

Root Beer Bundt Cake

He’s made it before, for my birthday, and it’s always a favourite.  Anything Baked does is a favourite with us.  The problem is that because I was busy doing my own thing and making a superb leek and leftover turkey pie (which I will save as a post until the next turkey-related holiday), I didn’t actually get a chance to photograph the finished product.  So you’ll just have to guess as to what it looked like.  Sorry.

Now, the recipe calls for 2 cups root beer to go into the batter.  Don’t you dare use diet root beer — you’ll regret it enormously.  Use a stronger-tasting brew like Dad’s or Stewart’s or even Barq’s to get the best flavour, and feel free to replace some of the liquid with a root beer schnapps or even a tablespoon or two of root beer extract.  Not having any of these things, however, the Pie decided to make himself a root beer concentrate.

Root Beer Bundt Cake

He started by pouring two cans of root beer into a pot. Then he simmered it for about half an hour to boil off the water and reduce the liquid.

Root Beer Bundt Cake

The resulting fluid is dark and opaque, and we hoped it would enhance the flavour of the cake when added to the regular root beer.

Root Beer Bundt Cake

While you’re doing that, preheat your oven to 325°F.  Generously butter a large bundt cake pan.  Dust the inside with flour and knock out the excess.  If you don’t have a bundt pan you can make this in an angel food pan.  If you have to make it in a pan that doesn’t have a hole in the middle you will need to cook it a bit longer and keep an eye on it so the bottom doesn’t burn.

Root Beer Bundt Cake

In a small saucepan, melt together 2 cups root beer, 1 cup cocoa, and 1/2 cup butter and stir until the mixture is smooth.

Root Beer Bundt Cake

Add in 1 1/4 cups granulated sugar and 1/2 cup firmly packed brown sugar and whisk that until the sugar is dissolved and the mixture is smooth.

Root Beer Bundt Cake

Root Beer Bundt Cake

Remove that from the heat and allow to cool a little bit. You want it to cool a bit (enough that you can poke your finger in it and it will be nice and warm but not hot) because you’re about to add in 2 lightly beaten eggs. And if you add the eggs in while it’s still hot they will cook on their own and that will be super gross.

Root Beer Bundt Cake

Add the eggs in and whisk thoroughly.

Root Beer Bundt Cake

In a big bowl, whisk together 2 cups flour with 1 1/4 teaspoons baking soda.

Root Beer Bundt Cake

Gently pour the chocolate mixture into the flour mixture and fold with a spatula until just combined.

Root Beer Bundt Cake

You don’t want pockets of flour or anything but you want the batter to still be a mite lumpy.

Root Beer Bundt Cake

Pour that into your prepared bundt pan and bake for 35-40 minutes, rotating the pan halfway through, until you can stick a skewer into it and it comes out clean.

Root Beer Bundt Cake

Set that puppy on a rack to cool completely.

Root Beer Bundt Cake

In the meantime, you can make your root beer fudge frosting. In another bowl, whisk together 2oz melted dark chocolate and 1/2 cup room temperature butter. Add in as well 1/4 cup root beer, 2/3 cup cocoa, and 2 1/2 cups confectioner’s (icing) sugar and beat until smooth.

Root Beer Bundt Cake

When you cake is cooled, plaster on that icing in a haphazardly charming manner and eat it all up. Cover what’s left over in plastic wrap and keep up to a week at room temperature.  Sorry again that I have no pictures.  It disappeared! Instead you can have a picture of Gren in the Christmas hat that he hates.

Gren on Couch

Snow Day Dinner: Gluten-Free Linguini

Snow Day Dinner

Fussellette has recently discovered that she is a celiac and can no longer digest wheat gluten.  So now when we have her for dinner we have to take that into account, and can no longer offer the very dough-heavy meals that are traditional favourites for our Newfoundland friends.

Friday here in St. John’s was a snow day.  The whole city, including the court systems, the municipal and provincial governments, were shut down due to a sudden snow squall.  Fussellette decided to brave the winter weather, however, and made it to our house for dinner.  In honour of the weather, I decided on some form of comfort food, and in my mind that usually equals pasta.  For Fussellette, that means gluten-free pasta. This recipe makes enough for four servings.

Fortunately Sobeys has a large selection of gluten-free flours to choose from.  Just remember, however, when you’re baking with gluten-free flour, such as a rice flour, you still need a thickener, such as a starch, and a binding agent to replace the gluten.  Usually the binding agent is something called xanthan gum.

Snow Day Dinner

So to make this pasta, I had to do some mixing.

In a bowl, mix 1 1/3 cup brown rice flour, 2/3 cup arrowroot starch, 1 teaspoon xanthan gum, and 1 teaspoon fine sea salt.  Whisk that together thoroughly.

Snow Day Dinner

In a smaller bowl, whisk together 2 large eggs and 2 large egg yolks.  Save the whites for an omlette or meringue or something.  Add in 2 tablespoons olive oil and 2 tablespoons water and mix again until it’s fully combined.

Snow Day Dinner

Now comes the fun part.  You can simply pour the wet ingredients into the dry ingredient bowl and stir, or you can do it on the counter in the old fashioned way.  Dump the dry stuff carefully out on your work surface.  Using a scraper, make a deep well in the centre.

Snow Day Dinner

Carefully pour in the egg mixture.

Snow Day Dinner

Using the scraper again, and your hands, start mixing the flour into the egg.  Work quickly, or your egg may form a river that will wind its way off your counter top.  The scraper, I found, is handy for cutting through the dough to make sure it mixes properly.

Snow Day Dinner

It should be cohesive but not tacky. Feel free to add more flour or water if you’re not getting the right consistency. Form the finished dough into a long cylinder and cut it into four sections.

Snow Day Dinner

Flatten those sections, wrap them tightly in plastic, and refrigerate them until you’re ready to make pasta.

Snow Day Dinner

You have a few options in how to make your pasta.  You could roll it out by hand and then cut it into long strips, but there is so much room for error in that, especially if you are working with a gluten-free pasta that barely sticks together on its own.

Snow Day Dinner

I opted to use a pasta maker.  This one here seems to be the standard one.  My parents own the same one so I know how to use it.  Most people who have a pasta maker own this one.  You can find them pretty cheap in second-hand stores.  I guess people get them as wedding presents and then never use them.  That’s where this one came from, and it had never been used before we busted it out.

Snow Day Dinner

So we used our awesome machine to thin out and cut our pasta into linguini.  We were originally going to go with spaghetti but we were concerned the pasta wouldn’t hold together all that well if it were smaller.  I recommend using two people to operate a pasta maker.  It may be awkward trying to figure out whose arms go where, but it’s handy to have one person operate the crank while the other feeds the dough through the machine and pulls it out the bottom to prevent tangling.

Snow Day Dinner

We laid the cut pasta out for a few hours to dry a bit, just to make sure it wouldn’t completely dissolve when we cooked it.

Snow Day Dinner

To cook, add a pinch of salt and a few drops of olive oil to your water before you boil it.

Fussellette said that this pasta was better than the stuff she finds at the store, because once the gluten-free pasta is dried it is hard to cook it all the way through and she says it’s often chewy on the inside.  Because this stuff is fresh it takes only about 6 minutes to cook and you know it will be nice and tender throughout.

Snow Day Dinner

Stay tuned on Wednesday to see what we did with it!

Tofu Feature Month: Tofu-Spinach Calzones

Tofu Spinach Calzone

[Note from Photographer’s Ego: Yes, I know these pictures fail to follow that number one rule of food photography: use natural light!  I will be building myself a light box soon, not to fret.]

This will be our final tofu recipe for you folks for a while.  Our digestive systems are not used to so much soy and they have unequivocally had enough.  The Pie especially so.  Poor man.  Pity him that his wife cooks new things for him on a regular basis.  Tsk.

The last time the Pie and I attempted calzones, we ended up with floor pizza.  I was determined to get it right this time.  The recipe below, with some modifications, comes from the Savvy Vegetarian, and it’s pretty easy.  The dough is nice and stretchy, and I could definitely use it again for a calzone with a different filling, which is exciting!  The yield for this is 10 hand-hold-able calzones, and I halved it (because there’s only the Pie and myself — Gren doesn’t get people food).

For the dough:

In a small bowl, dissolve 1 teaspoon granulated sugar in 1 1/4 cups warm water.  Stir in 2 teaspoons active dry yeast and allow that to sit for 10 minutes.

Tofu Spinach Calzone

Or until it gets all foamy.

Tofu Spinach Calzone

In a larger bowl, add 1/2 teaspoon salt to 3 cups flour and mix well.

Rub in (exactly how it sounds) 1 tablespoon olive oil.  Rub it between your fingers until there are no large clumps left.

Tofu Spinach Calzone

Stir the water/yeast mixture into the flour until it forms a shaggy ball.  Make sure to get all the floury goodness at the bottom of the bowl.

Tofu Spinach Calzone

On a floured surface, knead the ball for about 10 minutes.  The more you knead it, the tackier it will get, so you will need to add more flour on occasion.  Also, keep in mind that the more you knead it, the more elastic it will be (because you worked all the gluten together).  You want your dough to be nice and stretchy.

Tofu Spinach Calzone

Place the dough in an oiled bowl, cover it with a clean cloth and set it in a warm place to rise for about an hour.

Tofu Spinach Calzone

For the filling:

Dice up 1/4 cup onion, and about 8 mushrooms and toss them in a frying pan with 2 tablespoons olive oil and 2 tablespoons minced garlic.  Sauté until soft.

Tofu Spinach Calzone

In a small bowl, mix up 1 tablespoon flour, 1 tablespoon powdered vegetable stock, 1/2 teaspoon dried marjoram, 1/2 teaspoon dried oregano, 1 teaspoon dried basil, a pinch of cayenne, 1 teaspoon salt, and 1/2 teaspoon ground black pepper.

Tofu Spinach Calzone

Toss that on the vegetables in the pan and stir it around.

Tofu Spinach Calzone

Plop in 16 ounces fresh baby spinach (you can use frozen spinach, if you thaw it and drain it first), as well as 2 12-ounce packages of firm silken tofu and a dash of soy sauce.  You can break up the tofu before you toss it in, but it gave me something to do while I waited for the spinach to wilt.

Tofu Spinach Calzone

I had some leftover chèvre, 8 ounces worth, so I tossed that in as well.  So if you’d like to add that to this recipe, chuck in 8-16 ounces goat’s cheese and stir it around until well-incorporated and completely melted.

Tofu Spinach Calzone

Remove the mixture from the heat.

Tofu Spinach Calzone

Calzone Assembly and Baking:

Preheat your oven to 425°F.

Tofu Spinach Calzone

Punch down your dough.  Literally.

Tofu Spinach Calzone

Divide it into 10 equal parts, rolled into balls (remember, my recipe is halved, that’s why you only see five).

Tofu Spinach Calzone

On a floured surface, roll each ball out into a 6″ round.

Tofu Spinach Calzone

Divide the filling into 10 equal parts and place each portion on a round, slightly to one side.

Tofu Spinach Calzone

Wet the edges of the dough with your finger and fold over each round to make a half circle.

Squish down the edges with your finger and crimp with a fork to seal them.

Tofu Spinach Calzone

Place the calzones on a baking sheet.  You can brush them with oil and sprinkle them with salt if you like, for a crusty, salty top.  I chose to cook ours on our pizza stone, which I put in the oven when I turned it on. Cut two diagonal slices in the top of each calzone to let the steam escape.

Tofu Spinach Calzone

Bake for 15-25 minutes, until the dough is golden brown and the filling bubbles up through the holes.

Tofu Spinach Calzone

Be careful, they’re HOT!

The Perfect Pop

The Perfect Pop

One of my research participants told me about this method of popping corn.  It was a cold night in January and we would both rather be elsewhere — in this particular situation, we would both rather be home in front of the fire, digging into a book we’d both started reading at the same time, and stuffing our faces with popcorn.  She told me about this new/old method she’d re-discovered: the art of cooking popcorn on the stove top.

We’d had an air-popper growing up, which was fun to watch, but noisy, and when you poured the melted butter over the popcorn you often ended up with soggy popcorn in some places and no butter at all in others.  The flavour-distribution method needed work.

Then of course there are the microwave popcorns, which always seem to leave a weird film on my teeth and which all taste (to me) faintly of chemicals.  I’m also not a huge fan of using the microwave, unless it’s to melt butter for baking or heat up my tea.

Everyone has their own method for making popcorn on the stove, and I tried a bunch of them (including the method prescribed by my research participant).  The best and simplest method I came up with was a combination of her recipe, this one, and this one.  You should definitely test out different approaches to see which works best for you, your stove, and your pots and pans.

So.  Take yourself a large saucepan with a lid (the amounts below will give you about 12 cups of popcorn).

Add 1/4 cup vegetable oil to the bottom (anything with a high smoke point will do, like canola, sunflower, peanut, or grapeseed.  I like to use peanut oil because I think it tastes better on the popcorn).  Place over medium heat and let it get nice and toasty.

The Perfect Pop

Plop 3 or 4 kernels of popping corn (my research participant tells me that No-Name brand kernels are terrible for popping this way, so use another brand if you can) into the pan and cover with a lid.  When you hear the kernels pop (you use more than one in case that one is a dud), you know the oil is hot enough for popping.

The Perfect Pop

Pour in 1/2 cup popping corn.  For a sweet treat, add 1/4 cup sugar as well (if you use white sugar it tastes like candy corn, and if you use brown sugar, it’s like caramel corn).  For a salty taste, add in 2 tablespoons salt instead.

The Perfect Pop

Stir it all really well, cover, and remove it from the heat.  Wait for 30 seconds.  This brings all the kernels up to the same, almost-popping temperature.

The Perfect Pop

Put the pan back on the heat.  Very shortly thereafter the corn should start popping like crazy, and all at once.  Keep the pan covered but leave the lid slightly ajar to let the steam escape, and every few seconds, give the pan a shake back and forth on the burner to keep the popped kernels from burning.  When you get to the point where there are about 2-3 seconds between pops, it’s time to take the pan off the heat.

The Perfect Pop

Pour the popped corn into a large bowl.  If you used sugar, allow the corn to cool slightly (so you don’t burn your tongue), and break up the large clumps with a spoon.   Then feel free to gorge yourself silly.  I did find that the sugar version has a slightly smaller yield, and I think that has something to do with the stickiness of the sugar tamping down the explosive properties of the corn.

The Perfect Pop

Some of the kernels got caramelized before they’d reached their full potential.  But perhaps I just didn’t stir it well enough.

The Perfect Pop

Cleaning Your Dishwasher

Cleaning the Dishwasher

Before we get started, I will have you know that cleaning your dishwasher isn’t something that only germaphobes with a free hour get into.  It’s actually a really good idea.  Seriously.  I’m not crazy.

Regularly cleaning your dishwasher (say, every six months or so) can make for a more efficient dishwasher, cleaner dishes, a nicer-smelling kitchen, and money saved on repair costs.  You may think that cleaning something that constantly runs soapy water through itself seems strange, but all that food residue it takes off your cutlery and plates has to go somewhere, and it doesn’t all make it down the drain.  Which, when I took the time to clean my own dishwasher, I found out, to my continuing disgust.

Many websites offering how-to tips on cleaning your dishwasher advise against using gel detergents in your machine, as many contain bleach, which can break down your rubber seals over time and damage stainless steel interiors.  While using a powdered detergent works, keep in mind that the powders don’t always dissolve completely in the wash, which can block your drains and such.  We use a gel detergent that is made up of natural ingredients, and which contains no parabens, petroleum products, or bleach.  They’re easy to find.  Even Martha Stewart makes a decent version.

Cleaning the Dishwasher

Another important thing to remember when using your dishwasher is to use the hottest water possible.  The manual on my dishwasher recommends a temperature of around 120°F (about 49°C).  Unlike clothes washing machines, most dishwashers are not designed for cold-water washing.  If you want to save energy, select the air dry setting at the end, if you have one, instead of the heated dry setting.

Now while I say it’s a good idea to clean your dishwasher every six months, I have had this dishwasher since August 2008 (it was the Pie and my “negative-first” anniversary present to each other, how romantic) and I have never cleaned it.  Until now.  We did buy the cheapest model available, so we never expected magic performance, but lately (probably the past year or two, if I’m honest), we’ve been pulling more and more “casualties” out of the dishwasher.  These casualties are the Pie’s name for any dishes with food stuck to them.  Which he then leaves on the counter for someone (usually me) to wash by hand.  Personally, I don’t really care.  I figure if the food has been in water that hot for that long, it’s probably sterilized and will only add flavour to whatever I am eating next.  But sometimes you have to take one for the team.  Plus it would be nice to have all the glasses sparkling again.

So.  Cleaning the dishwasher.  Let’s get down to it.  Using a gentle cleaner, such as dish soap, and a soft cloth (don’t use abrasives in your dishwasher), get to cleaning the outside and all the goo left on the sides of the dishwasher doors.

Cleaning the Dishwasher

These are the parts that you don’t see when the dishwasher door is closed, but which don’t get exposed to the inside of the washer when it is in operation.  Make sure to thoroughly wipe down any gaskets and seals as well.  Crusty food on seals makes for crusty seals that don’t seal properly.

Cleaning the Dishwasher

If you have a dishwasher with a stainless steel interior/exterior, you should use a mild steel cleaner.  Method makes a good one.  I used this one by Seventh Generation on my plastic interior.  It’s a good grease cutter.

Cleaning the Dishwasher

Give the interior of the dishwasher a light scrub as well.  Make sure you get the spot under the dishwasher door.  It can get pretty gross down there too.

Cleaning the Dishwasher

Pull out your dish racks and clean them too.

Cleaning the Dishwasher

Pay close attention to the cutlery baskets, as they can trap food.

Cleaning the Dishwasher

Your bottom rack will come out easily, but the top one may have some stoppers in place that you will have to remove first.

Cleaning the Dishwasher

Now, that nifty propeller thing is the part that sprays hot water all over your dishes.  It also gets clogged with food.

Cleaning the Dishwasher

Using a pair of needle-nosed pliers, a piece of bent wire, or a toothpick, carefully remove any debris from the holes on top without scratching the apparatus.

Cleaning the Dishwasher

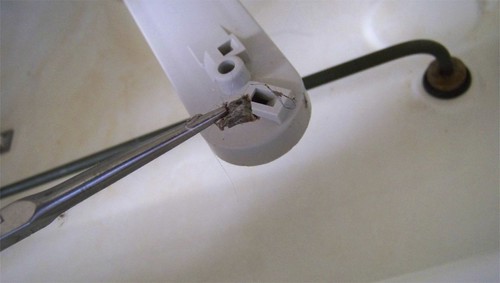
I actually removed a small stick from one of the holes.  And quite a lot of my own hair.  Ew.

Cleaning the Dishwasher

Now for the drain.  Depending on your dishwasher, this could be under your washing arm or at the back of the machine.  First, remove any food that is stuck on top of the drain.

Cleaning the Dishwasher

Now pop that sucker out.  There might be screws holding it in place.  I wasn’t sure with mine (and didn’t want to break it by manhandling it out), so I looked up the model number (I have a Kenmore 665.17702K600 Portable Dishwasher) on the internet and found that you can just pop up the long side of it.

Cleaning the Dishwasher

Then I just gave it a bit of a counter-clockwise twist and it popped right off.

Cleaning the Dishwasher

And then I had this to contend with.  Feel free to gag and shudder.  I definitely did.

Cleaning the Dishwasher

There was probably a litre of stagnant water lying in there.  I have never wanted a shop-vac as much as I did at that moment.  I tried scooping out the water in a shot glass but the glass was too wide for the wee hole.

Cleaning the Dishwasher

In the end I took the lid from a laundry-detergent bottle in the recycling.

Cleaning the Dishwasher

With a hefty knife and some swearing, I cut off the sticky-outy bit so it was narrow enough to fit through the hole.

Cleaning the Dishwasher

Tada.  Gross water drained.

Cleaning the Dishwasher

I don’t want to know what this black stuff is, so please don’t tell me.  But I scrubbed at it with a dish brush.

Cleaning the Dishwasher

And a tooth brush.  And wiped up the majority of its slimy substance.  Good thing I didn’t bother to shower before doing this.

Cleaning the Dishwasher

Now you can take a deep breath because all the gross stuff is at an end.

Gren is notably relieved.  Or confused.  It’s hard to tell with him.

Cleaning the Dishwasher

Now you have to put your racks back in and run the dishwasher on two empty cycles.

Cleaning the Dishwasher

For the first, put two cups white vinegar upright in the top rack of your dishwasher.  Run the machine on the shortest setting at the hottest temperature.  When that cycle is complete, remove the cups of water and sprinkle the bottom of the dishwasher (just sprinkle, mind you, we don’t want to clog our newly cleaned drain) with baking soda, and run it again.  Now you are officially done.

Cleaning the Dishwasher

Also I bet you are thinking more about what you put in your dishwasher than you were before, right?

To see where I got my know-how, check these places out:

WikiHow

Apartment Therapy

Wisebread

House Cleaning Central

Dog Digestion and Pumpkin

Gren has been living a chaotic life these past few weeks, adjusting to new people, new places, and new food.  He’s also been eating a lot of random objects on the side of the road, and that can wreak havoc with a puppy’s digestive system.

If your dog has a bit of a traveler’s gut, diarrhea, or is constipated, there is a quick and easy solution, and I will let you in on the secret.

Ready?

It’s pumpkin.

I’m serious.  It has all this lovely fibre in it to help ease a dog’s digestion, without the sugar of your regular fruits.  I’m sure it works on people as well.

You can give your dog up to a tablespoon of pumpkin purée a day.  Just plop it in the dog’s food and all will be well.  I give Gren a teaspoon in the morning and one at night and he’s good to go.

I also add a teaspoon each time of plain yogurt, to make sure his little tummy has all the good bacteria in it that it needs.

Make sure when you’re buying pumpkin in a can that you get the plain stuff, not the pumpkin pie filling.  Your dog doesn’t need the spices and the sugar.

And because you probably won’t need to go through a whole can before your dog’s gut is back to normal, you can freeze the pumpkin in individual serving sizes (like I did here in ice-cube trays) for the next time you need them.

Gluten-Free Dog Treats

In honour of Ruby’s first birthday, Cait and I got together and concocted some fabulous dog biscuits for her and Gren.  Being a corgi and therefore very food-obsessed and prone to obesity, Gren only took home a few to try, but they were still enjoyed by all.  I even had one, as I won’t feed my dog anything I wouldn’t eat myself.

Ruby murders Gren

Fortunately, we were able to easily find a dog treat recipe online that conformed to our philosophy of feeding our dogs biologically appropriate food.  That means most definitely no corn, no wheat, and no soy, and none of those other things that people seem to think dogs need, like salt, sugar, and artificial flavours or colours.  This recipe from Sandra over at dog-nutrition-naturally.com totally fit the bill and was easy to do.  We tripled the recipe so that there would be plenty of birthday treats for everyone.

First, peel yourself a large sweet potato.  And I mean LARGE.  Cut that sucker up.

Plop the potato pieces in a pot and boil them silly until they’re mashable.  Then of course mash them.

Preheat your oven to 350°F and lightly brush a rimmed baking sheet with olive oil.

In a large bowl, plop in 1lb ground meat.  We used extra lean ground beef, but you can use turkey, chicken, pork, or lamb — or really, whatever you want.

Add to that 1/4 teaspoon garlic powder (not garlic salt) and a large egg.  Drop in 5 tablespoons large flake rolled oats as well, just for cohesion purposes.

Chuck in the mashed sweet potato and mix it well.

Spread it flat on the prepared cookie sheet and smooth the top.

Bake for about an hour.  The cookie will shrink and pull away from the sides.  Now you can score the cookie into smaller pieces, or use a cookie cutter to make fun shapes.  A pizza cutter is handy about now too.

Reduce the oven heat to 250°F and pop the cookies back into the oven for another hour or so to dry out.  Keep an eye on them so they don’t burn.

Tada!  That’s it.  Now SIT.

Good dog.Make sure to store your treats in an airtight container, and of course remember that treats should never be used as a substitute for your dog’s regular diet.  Yum yum!

Dolmades

I’m not sure when exactly my mother and I started making these Greek/Lebanese lamb-stuffed grape leaves, but dolmades (dolma is the singular) have been a staple of ours for potlucks and gatherings for ages and ages.  Feel free to experiment with yours.

First you need a jar of pickled grape leaves.  I’m sure there are different kinds of leaves that are good for different things, but we usually pick the jar that has the largest leaves with the greenest colour.  You need to drain and rinse these suckers a couple of times to get the brine off.You also want to cook up some rice.

Two cups cooked rice should be sufficient.

You can always freeze whatever you don’t use in a freezer bag for chucking into soups later on.

Defrost about 2lbs ground lamb.

A large onion.  You want to practically mince that sucker.

Parsley.  Lots of it.  Chopped up, probably about a cup.

Ditto thyme, though less so, probably a few tablespoons.

Don’t forget what I told you about freezing herbs.

You probably also want to add some dill, but we didn’t have any.

A handful of pine nuts.

Mix all those ingredients up in a bowl.  Use your hands, don’t be afraid.

Now take a grape leaf and lay it flat on a plate, vein side up. 

Take a tablespoon or so of your lamb filling and plop it on the leaf, near where the stem should be.

Tuck in the sides of the leaf.

Roll the rest of it up like a cigar.

Here is your completed dolma.  Now do that another 40-50 times until you run out of lamb.

Now, take the small and broken grape leaves and line the bottom of a large pot with them.  Place your rolled dolmades on top, close together, double-stacked, until you run out.

Drizzle your completed dolmades with a bit of olive oil.  Layer more grape leaves on top.

Fill the pot to the edge of the dolmades with chicken broth and bring to a boil before lowering the heat and simmering for about 45 minutes.

Serve them hot, serve them cold.  I prefer them nice and warm, as I think they have more taste that way.  They’re really good with yogurt.

Lemon Roasted Potatoes

This is pretty much the same recipe as the Roasted Fingerling Potatoes with Rosemary and Sea Salt, but with lemon rind and herbes de provence instead of rosemary.  Easy peasy.

So you take your potatoes.  We used baby white ones.  A couple pounds’ worth.

Parboil them. 

Remove the rind from two lemons.  I used a zester designed to take off long threads of peel, for visual stimulus.  Also if you’re going to roast it for a while it’s going to shrink and get all black, so you might as well make sure that you have lots of it to start with.

Toss your parboiled potatoes with olive oil, then add the lemon rind and herbes du provence.  Add in a bit of sea salt as well.

Roast at 350°F for about 45 minutes until wrinkled and crispy.  You can also roast them at the same time as other things at lower temperatures (such as a Thanksgiving turkey) — just roast them for longer.

They’re also wicked good cold the next day, or sliced up and tossed into scrambled eggs.