Pumpkin Cake with Cream Cheese Frosting

Pumpkin Cake 10

I think this wee cake is the easiest and quickest way to enjoy this season of pumpkiny goodness, and is adapted from Disney’s Spoonful (Yeah.  Disney.  Who knew?).  Spray a 9″ x 13″ pan with cooking spray or line it with parchment paper (the spray actually works better in this particular case) and preheat your oven to 350°F.

In a large bowl, mix together 4 eggs, 1 15oz can pumpkin purée (that’s half of one of those giant E.D. Smith cans, FYI), 1 1/3 cups sugar, and 1 cup vegetable oil.

Pumpkin Cake 1

In a measuring cup or small bowl, whisk together 2 cups flour, 2 teaspoons baking powder, 1 teaspoon baking soda, 2 teaspoons cinnamon, 1 teaspoon nutmeg, and a teaspoon each ground cloves and allspice, if you’re feeling adventurous and SPICY.

Pumpkin Cake 2

Add your floury ingredients to your pumpkiny ingredients and give that a good whisking.  TADA.  There’s your batter.  That was easy.

Pumpkin Cake 4

Spread the batter into the baking dish and bake for 25-35 minutes, until a toothpick inserted in the centre comes out clean.  Set that sucker on a wire rack to cool completely.  You can either tip it out onto another plate or leave it in there, your choice.

Pumpkin Cake 5

While that’s on the go, get out another bowl and chuck in 4oz plain cream cheese (that’s half the 250g-ish blocks you get in the store), 1/4 cup softened butter, and 2 teaspoons vanilla and beat the crap out of it with an electric mixer.

Pumpkin Cake 6

Sift in 2 cups icing sugar and beat more crap out of it until you get icing.  Such beauty from such violence.

Pumpkin Cake 7

Spread that luscious cream cheesiness on your cooled cake and cut that baby into squares.

Pumpkin Cake 8

So moist and fantastic.  If you don’t like your pumpkin cakes to be super sweet, then I’d cut the sugar to 1/2 or 3/4 of a cup.

Pumpkin Cake 12

There was none left before long, so make sure you get a taste before they’re all gone!

Pumpkin Cake 11

Carrot Zucchini Bran Muffins

Carrot Zucchini Muffins

I’ve been craving baked goods recently but with the food-heavy holidays coming up I don’t want to overdo it this early in the season.  The answer to my delicious dilemma?  These hearty food-filled muffins from Sweet Mama.

Preheat your oven to 400°F and spray a muffin tin with cooking spray.

Carrot Zucchini Muffins

Grate up 1 small zucchini and 1 medium carrot — you’re trying for 1 cup of each.

Mash up 2 small bananas with a fork — again, you’re looking for 1 cup banana.

Carrot Zucchini Muffins

In a medium-sized bowl, beat together 2 eggs, 1/2 cup brown sugar, 1/2 cup canola oil and 1 teaspoon vanilla.

Carrot Zucchini Muffins

Add in the mashed banana and the grated carrot and zucchini.  Add in as well 1 cup unsweetened shredded coconut.  Mix it up well.

Carrot Zucchini Muffins

In another bowl, mix together 3/4 cup all-purpose flour, 1/4 cup bran, 1 teaspoon baking powder, 1/2 teaspoon baking soda, and 1/2 teaspoons each ground cinnamon and ground nutmeg.

Carrot Zucchini Muffins

Add the dry ingredients to the wet mixture and stir until just combined.

Carrot Zucchini Muffins

Spoon into the muffin tins.  I sprinkled mine with a wee bit of cinnamon sugar that I had on hand.

Carrot Zucchini Muffins

Bake for 20-25 minutes, until the muffins are brown and a toothpick inserted in the centre of the centre muffin comes out clean.

Carrot Zucchini Muffins

Leave in the pan for a few minutes and then transfer to a wire rack to cool completely.

Or eat still hot with butter.  MMMMMMMM!

Carrot Zucchini Muffins

The Perfect Pop

The Perfect Pop

One of my research participants told me about this method of popping corn.  It was a cold night in January and we would both rather be elsewhere — in this particular situation, we would both rather be home in front of the fire, digging into a book we’d both started reading at the same time, and stuffing our faces with popcorn.  She told me about this new/old method she’d re-discovered: the art of cooking popcorn on the stove top.

We’d had an air-popper growing up, which was fun to watch, but noisy, and when you poured the melted butter over the popcorn you often ended up with soggy popcorn in some places and no butter at all in others.  The flavour-distribution method needed work.

Then of course there are the microwave popcorns, which always seem to leave a weird film on my teeth and which all taste (to me) faintly of chemicals.  I’m also not a huge fan of using the microwave, unless it’s to melt butter for baking or heat up my tea.

Everyone has their own method for making popcorn on the stove, and I tried a bunch of them (including the method prescribed by my research participant).  The best and simplest method I came up with was a combination of her recipe, this one, and this one.  You should definitely test out different approaches to see which works best for you, your stove, and your pots and pans.

So.  Take yourself a large saucepan with a lid (the amounts below will give you about 12 cups of popcorn).

Add 1/4 cup vegetable oil to the bottom (anything with a high smoke point will do, like canola, sunflower, peanut, or grapeseed.  I like to use peanut oil because I think it tastes better on the popcorn).  Place over medium heat and let it get nice and toasty.

The Perfect Pop

Plop 3 or 4 kernels of popping corn (my research participant tells me that No-Name brand kernels are terrible for popping this way, so use another brand if you can) into the pan and cover with a lid.  When you hear the kernels pop (you use more than one in case that one is a dud), you know the oil is hot enough for popping.

The Perfect Pop

Pour in 1/2 cup popping corn.  For a sweet treat, add 1/4 cup sugar as well (if you use white sugar it tastes like candy corn, and if you use brown sugar, it’s like caramel corn).  For a salty taste, add in 2 tablespoons salt instead.

The Perfect Pop

Stir it all really well, cover, and remove it from the heat.  Wait for 30 seconds.  This brings all the kernels up to the same, almost-popping temperature.

The Perfect Pop

Put the pan back on the heat.  Very shortly thereafter the corn should start popping like crazy, and all at once.  Keep the pan covered but leave the lid slightly ajar to let the steam escape, and every few seconds, give the pan a shake back and forth on the burner to keep the popped kernels from burning.  When you get to the point where there are about 2-3 seconds between pops, it’s time to take the pan off the heat.

The Perfect Pop

Pour the popped corn into a large bowl.  If you used sugar, allow the corn to cool slightly (so you don’t burn your tongue), and break up the large clumps with a spoon.   Then feel free to gorge yourself silly.  I did find that the sugar version has a slightly smaller yield, and I think that has something to do with the stickiness of the sugar tamping down the explosive properties of the corn.

The Perfect Pop

Some of the kernels got caramelized before they’d reached their full potential.  But perhaps I just didn’t stir it well enough.

The Perfect Pop

Deep-Fried Dinner

Deep-Fried Dinner

For the Pie’s birthday dinner, we decided to try deep-frying for the first time.  We’d been putting it off because, well, it’s incredibly unhealthy, it’s a dangerous fire risk, and our kitchen has no fume hood so we’d be dealing with the aromas of cooking oil for several days.

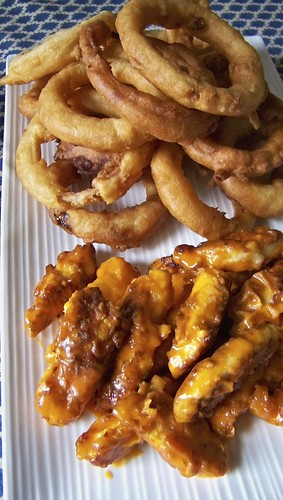
But we needed to learn (in the same way that we need to learn everything else we do here).  So we decided to try two different methods and make Buffalo chicken strips (with blue cheese dip) and some beer-battered onion rings.  Both recipes come from Martha Stewart’s Every Day Food magazine.  Both recipes involve buttermilk.

Now, though I’m presenting two different recipes here, I’m going to give the instructions to you in the order I did them, because that makes the most sense to me.  In order for you to differentiate the two recipes, I’ll preface instructions for the chicken with BCS and use OR for the onions.

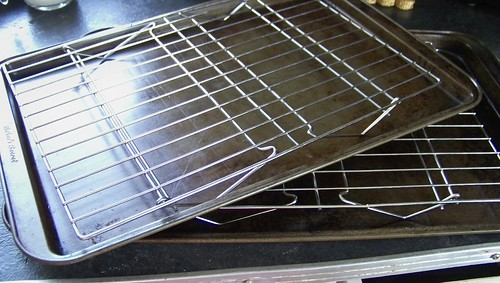
BCS/OR: Turn your oven to 250°F.  Put some cooling racks on top of rimmed baking sheets and put those in the oven.  Those will be your warming and draining trays for your chicken and onions.
Deep-Fried Dinner

OR: Slice 2lb onions into thick rounds and submerge them in 2 cups buttermilk for about an hour before cooking.  The buttermilk takes the acidic bite out of the onions, making them sweet and tender.  Just a warning: following this recipe results in a heckuva lotta onion rinks, so if you don’t want to fry up a million, I suggest halving it, or even quartering it.
Deep-Fried Dinner

BCS: Crumble up 1 cup blue cheese (I used 400g here and it crumbled to about a cup) and 1/2 cup buttermilk.
Deep-Fried Dinner

Stir that around and set it aside.
Deep-Fried Dinner

Cut up some vegetables while you’re at it, why don’t you?  You’re about to consume pure fat — you should probably add in some vitamins.
Deep-Fried Dinner

BCS/OR: Plop about 1 1/2 cups flour in a shallow dish and put that near your stove.  That’s for the batterin’.
Deep-Fried Dinner

OR: Crack two eggs into a bowl.  Whisk ’em.
Deep-Fried Dinner

Whisk in 1 bottle lager or pale ale.
Deep-Fried Dinner

Whisk in 1 1/2 cups flour and 2 teaspoons coarse salt.  Set that near the stove as well.
Deep-Fried Dinner

BCS: In yet another bowl, combine 1/3 cup hot sauce with 3 tablespoons butter.  Stir well and set that aside for now.
Deep-Fried Dinner

Slice up 3 boneless, skinless chicken breasts into finger-sized pieces.
Deep-Fried Dinner

Dip them in 1 cup buttermilk.
Deep-Fried Dinner

Then into that flour you have ready.
Deep-Fried Dinner

Lay them out on a baking sheet.
Deep-Fried Dinner

I think we’re about ready to start cooking.  While I’m sure you could do these two dishes at the same time, I am far from experienced with hot-oil cooking, rather prone to accidents, and I only have one large-sized element on my stove.  So I am going to cook the chicken first, as it doesn’t need to be crispy and can therefore sit in the oven for longer.

As a safety note, we had a box of baking soda handy at all times during this, in case of flareups.  Never leave hot oil unattended, and never, NEVER add additional oil of any kind or any temperature to oil that is already hot.

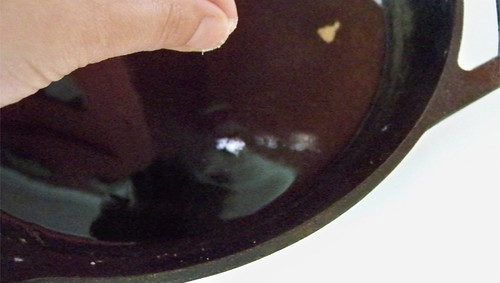
BCS: Heat 1/2 cup to 1 cup vegetable oil in a heavy skillet.  You can tell if the oil is hot enough for frying when a pinch of flour dropped into it fizzes rapidly.
Deep-Fried Dinner

Slide a few chicken pieces in, working in batches.
Deep-Fried Dinner

Cook for about 6-8 minutes, rotating halfway through, until the chicken is golden brown.  Remove the cooked chicken to the rack in the oven.
Deep-Fried Dinner

This was a very spatter-y process, so I wore long sleeves and kept my face averted from the pan.  My hands kept getting burned from little splashes of oil.  In the end I pulled on a pair of work gloves to protect them and worked happily after that.
Deep-Fried Dinner

Make sure to let that oil cool before you move it anywhere.

OR: In a large, wide saucepan, heat up 5 cups vegetable oil.  I know, that’s a lot of oil.
Deep-Fried Dinner

Use a candy or deep-fry thermometer and continuously adjust the temperature of your element to keep the oil at 375°F.  If it gets too cold, it won’t cook the onions all the way through, and if it gets too hot, well … let’s not think about that.
Deep-Fried Dinner

What was interesting was the cool pattern the oil made while it heated.
Deep-Fried Dinner

Take a ring of onion out of the buttermilk and dip it in the flour, then into the beer batter.  Shake off the excess.
Deep-Fried Dinner

Slide the ring carefully into the hot oil.  Cook in small batches, rotating halfway through, for about 5 minutes.  Remove to the other rack in the oven to drain and keep warm.  This method of frying was wayyyyy less spatter-y, if you were interested to know.
Deep-Fried Dinner

We had a lot more onions left to cook after we had cooked as many as we thought we could eat.  We figured they would keep until tomorrow and we would try again.
Deep-Fried Dinner

BCS: When everything is cooked and you are ready to go, take the chicken strips out of the oven and toss them in the hot sauce.  These will be served with the blue cheese dip we made earlier.
Deep-Fried Dinner

OR: For the onions we had a nice tzatziki dip as well as a chipotle mayo.
Deep-Fried Dinner

All told, it was pretty epic.
Deep-Fried Dinner

Bran Muffins

The Pie LOVES bran muffins.  I have never truly understood this addiction but nonetheless he persists.

Get all your ingredients out before you start.

This is a modified recipe from the Joy of Cooking (1996 edition).

Position a rack in the centre of your oven and preheat it to 400°F.  Grease 2 standard 12-muffin pans or line with paper baking cups.  I prefer to use baking cups when it comes to bran muffins because they’re extra sticky due to the honey, molasses, and sugar they contain.  It just makes cleanup easier.

Leave the bran to soak for 15 minutes.

In a large bowl (I used the bowl of my KitchenAid mixer, which I adore), combine 1 2/3 cups wheat bran with 1 cup boiling water and let stand for 15 minutes.

In another bowl (or a measuring cup, which I find is easier because it has a handle), whisk together 1 3/4 cups whole wheat flour, 1/2 cup all purpose flour, 2 1/2 teaspoons baking soda, and 1/2 teaspoon salt.

Into the bran mixture, whisk 3/4 cup honey, 1/3 cup light molasses (I used dark, because I prefer the taste), 6 tablespoons vegetable oil (I used 2 tablespoons vegetable oil and then 1/4 cup of plain Balkan style yogurt instead), 1/4 cup packed brown sugar (again, I prefer the darker stuff), and 1 teaspoon grated orange zest (which I didn’t have, so it’s not in these muffins).  I also added in 1 teaspoon pure vanilla extract because I generally add vanilla to everything.

I mixed all the wet ingredients together first.

Whisk in (well if you’re using a mixer, then mix in) 2 large eggs, then stir in 1 1/3 cups raisins (I would up this next time to 2 full cups).

Stir in the raisins. Use lots.

Fold in the flour mixture until just moistened.  The batter should be lumpy but still soupy.  Spoon the batter into the muffin pans and bake until a toothpick inserted in the centre comes out clean, about 15-18 minutes.

I'm not very good at being tidy with muffins.

Let cool for 2-3 minutes then use a fork to gently pry the muffins out of the pan.  Serve hot or cool on a rack for eating the next day.

Mmmmuffins . . .