Rice Pilaf with Tomatoes

Pilaf with Tomatoes 14

I’ve been on a pilaf kick recently, ever since I had one at the Savoy last week and I can’t even deal with how good it was.  They’re really easy to make, too, just a few extra steps more than plain Jane rice.  Why not? This version serves 6 comfortably, with leftovers.

Pilaf with Tomatoes 1

I had half a 28oz can of diced tomatoes in the fridge as well as some shallots left over from probably Christmas so I figured I’d do something to use them up and take advantage of my overstock of Trader Joe’s Wild Rice Medley.

Pilaf with Tomatoes 3

I chopped up a handful of mushrooms and shallots and set those aside.

Pilaf with Tomatoes 2

Then I dumped a hunk of butter and some olive oil into a skillet and let that melt on medium-high heat.

Pilaf with Tomatoes 4

When it was all melted and foamy I tipped in 2 cups wild rice medley (you can use whichever rice you wish, of course).  I had a bit of black rice hanging around as well so I chucked that in too.

Pilaf with Tomatoes 5

Stir that around until it gets all coated with butter.  You’re basically toasting it here, so you want it to get a bit brown and smoky.

Pilaf with Tomatoes 7

Now you can add in your vegetables and stir them around a bit.

Pilaf with Tomatoes 8

I left the tomatoes until last because I wanted the onions and mushrooms to soften a bit.

Pilaf with Tomatoes 9

Now you add your stock.  Any stock you like.  Just make sure that it works according to your rice’s cooking directions.  This rice requires 2 1/2 cups liquid for every cup of rice.  I had 4 cups broth in my little carton here, plus a cup of liquid in the tomatoes.

Pilaf with Tomatoes 10

Give that a stir, then cover it and let it simmer for the allotted time given in the cooking directions (with mine it was 40 minutes).  I stirred mine occasionally, but only because I’m paranoid about burning rice.  I’m really good at burning rice.

Pilaf with Tomatoes 11

When it’s cooked take the lid off and remove it from the heat and let it sit for about ten minutes.

Pilaf with Tomatoes 12

We served ours next to a bed of greens and topped with a pan-seared half chicken breast.  It was lovely!

Pilaf with Tomatoes 16

Roasted Tomato and Red Pepper Soup

Roasted Tomato and Red Pepper Soup 17

This warm bowl of rosy goodness reminds me a bit of my winged red soup from ages ago (which I may try to recreate in the future) and it’s just as easy.  I made a heckuva lot of this, mostly to freeze for Krystopf and Atlas for after the baby comes, so feel free to cut this recipe into thirds for more reasonable servings.

Roasted Tomato and Red Pepper Soup 1

You’re going to need 3 heads garlic;

Roasted Tomato and Red Pepper Soup 2

3 red onions;

Roasted Tomato and Red Pepper Soup 4

24 ripe roma tomatoes;

Roasted Tomato and Red Pepper Soup 3

and about 18 large red peppers.

Roasted Tomato and Red Pepper Soup 5

Preheat your oven to 450°F.  Peel the garlic and cut each clove in half.  Chop up the onions as well and chuck them in a roasting pan (I divided them between three roasting pans).

Roasted Tomato and Red Pepper Soup 6

Chop up the tomatoes and red peppers and put them in the pans as well.

Roasted Tomato and Red Pepper Soup 7

Drizzle with olive oil, dust with salt and pepper, and toss to coat.

Roasted Tomato and Red Pepper Soup 8

Roast the vegetables for 25-35 minutes, or until they are soft and starting to char.

Roasted Tomato and Red Pepper Soup 12

Meanwhile, bring a pot with about 2 litres stock (chicken, vegetable, whatever) to a boil.

Roasted Tomato and Red Pepper Soup 10

When the vegetables are ready, chuck them in the broth and give it a good stir.  Add several dashes of Tabasco Sauce and remove it from the heat.

Roasted Tomato and Red Pepper Soup 14

Have a go at it with an immersion blender and then season with salt, pepper, and more Tabasco as desired.  Serve hot (or cold).  The flavour intensifies over a couple of days and it freezes great.

Roasted Tomato and Red Pepper Soup 15

Butternut Bisque

Butternut Bisque

I’m not the biggest soup fan (I prefer to drink my hot liquids), but I’m starting to acquire a taste for them.  I’m especially fond of blended soups (because then it’s like a savoury pudding and I’m less likely to burn my tongue on the hot broth).  This one comes from Martha Stewart and is a good match for a nice late-summer lunch or a good accompaniment to a fall comfort meal.  It’s quick and easy, which I like in a soup.  You can also freeze it and enjoy it at any time.

First, do your chopping.  In this case, chop up 1 medium onion, 2 cloves garlic, and 1 large butternut squash.  Peel the squash, cut it open and remove the seeds, and then hack it into smallish cubes.

Butternut Bisque

Then, get your spices ready to go.  You’ll need 1/2 teaspoon dried thyme, 1/4 teaspoon ground cinnamon, and 1/4 teaspoon cayenne pepper.  Also, not shown, is a pinch or two of coarse sea salt.  Feel free to add more or less, according to your own taste.  It’s only soup, after all.

Butternut Bisque

Melt about 3 tablespoons butter into the bottom of a large saucepan.  Add in the onion, garlic, and the spices and cook until the onion is tender and translucent, about 7 minutes.

Butternut Bisque

Dump in the squash cubes, as well as about 15oz chicken broth and 1 cup half-and-half (you could use plain milk if you wanted to be healthier, but do you really want to do that?), and then about 3 cups water.  Bring that whole thing to a boil and reduce it to a simmer for about 20 minutes.  Your squash should be squishy at this point.  You should be able to squish your squash with the back of a spoon.

Butternut Bisque

Remove the pot from the heat and use your immersion blender to squish — er, purée — your squash and onions and all that stuff.

Butternut Bisque

Serve with a dollop of sour cream and a sprinkling of cayenne, if desired.

Butternut Bisque

Wingin’ it Wednesday: Comfort Ramen

Wingin' It Wednesdays: Comfort Ramen

The week before we left for Vancouver, the Pie, poor thing, got tonsillitis.  After the fever went down and he’d rested a bit (read: slept all day and all night for two days), he still had a raging sore throat and came home from the doctor’s with an enormous jar of amoxycillin pills (sorry folks, when you’re grown up, they don’t give you the banana-flavoured liquid anymore).

To tempt his appetite (hard to be hungry when every swallow is like eating razors), I made him all sorts of his favourite soft foods, and this was one of them.  Ramen is the sort of thing we eat when one of us is out for the evening and the other doesn’t want to be bothered with really cooking.

Wingin' It Wednesdays: Comfort Ramen

Of course, the ramen as it comes in packages with salty broth and dried noodles cooked in coconut or palm kernel oil is an unhealthy choice, and I haven’t yet learned to make it from scratch.  So we try to add a few things to it in the hopes that it will be nutritionally redeemed — somewhat.

Wingin' It Wednesdays: Comfort Ramen

This means that there’s a bit of prep work involved in making what is normally an almost instant meal, but it’s totally worth it.  Just remember that any vegetable or meat or anything you put in the ramen must be fully cooked or sliced super dooper thin, because it will only be in the boiling water for a very short time.

Wingin' It Wednesdays: Comfort Ramen

Accordingly, tonight I thinly sliced up a small onion, an Italian sausage, and about six mushrooms.

Wingin' It Wednesdays: Comfort Ramen

I’m trying to get more protein in small packages into the Pie’s stomach (when you’re a large man and you’re barely eating, you tend to get very tired), so I’m also adding two eggs to this mix.  Beat those up and let them wait in a bowl until you’re ready.  Other things that work well in ramen are things like thinly sliced roast beef, green onions, pre-cooked baby shrimp, chopped hard-boiled eggs, red peppers, alfalfa sprouts, spinach … anything small, pretty much, will work.

Wingin' It Wednesdays: Comfort Ramen

So the first thing I do when cooking packaged ramen is I measure the water into a pot and I add the powdered broth.  I like to give it a chance to simmer a bit.  I also add a healthy dollop of minced garlic.

Wingin' It Wednesdays: Comfort Ramen

When the water is boiling, I slide in the blocks of noodles and cook them for about a minute.

Wingin' It Wednesdays: Comfort Ramen

Then I pour in the vegetables and sausage and give them a stir (cooking chopsticks are very handy here, but a regular pasta spoon will work as well), and let that cook for another minute.

Wingin' It Wednesdays: Comfort Ramen

Wingin' It Wednesdays: Comfort Ramen

Then carefully pour your egg in, in a thin stream, so it cooks and forms strings on the surface of the soup.  Give that a stir as well, and then you’re ready to serve.

Wingin' It Wednesdays: Comfort Ramen

Garnish with fresh herbs if you like, or chili flakes or whatever floats your boat.  Smooth and simple!

Wingin' It Wednesdays: Comfort Ramen

Wingin’ It Wednesday: Red Soup, Green Soup

Red Soup Green Soup

It’s been so busy here since Victoria Day that we haven’t had a chance to really do a lot of cooking for cooking’s sake.  As a result, when I cleaned out our refrigerator this weekend in preparation for my parents’ arrival tomorrow (!), I found a sizable amount of very sad-looking produce.  When I bought it, it looked sad, as most Newfoundland produce does, and two weeks in my crisper made it sadder still.  Sad vegetables are just begging to be chucked in sauces, roasted, layered in a casserole, or made into soup.  So I made soup.

Red Soup Green Soup

I had red vegetables and green vegetables, and so I decided to make two different soups.

Each one started with onions and garlic, obviously.

Red Soup Green Soup

The red soup was carrots, red peppers, mushrooms, and cherry tomatoes.

Red Soup Green Soup

And I scooped out the seeds of the tomatoes.  Well, some of them. I got bored quickly.

Red Soup Green Soup

Chop that up, chuck it in a pot with some broth, some chipotle seasoning, and chinese five spice, then blend it up and you’ve got a savoury soup with a bit of kick.

Red Soup Green Soup

The green soup had fennel, celery, cucumbers, broccoli, leeks, and cabbage.

Red Soup Green Soup

To even out the flavours I added dill, mustard powder, salt, and a dash of cumin.  Blended up, it’s cool as the cucumbers inside it.

Red Soup Green Soup

Then I stored them all in plastic containers and froze them for future enjoyment!

Red Soup Green Soup

Spicy Spring Carrot Soup

Happy Easter!

Spicy Spring Carrot Soup

It’s spring.  Well, I shouldn’t say that.  It’s spring in some parts of Canada.  Here in Newfoundland we are still clearing up snow from our blizzard last week.  In most parts of the country the markets are full to bursting with new spring vegetables: tender carrots, tiny potatoes, fresh peas.  Here in St. John’s it’s time to clean out the dregs of our winter supply, and most produce around here is either flaccid or unripe.  So we make soup.

This soup will be served as a starter at our Easter dinner on Sunday.  If a soup could be considered to be light and fluffy, it would be this one.  In fact (and I may have texted this to the Pie when I made it), I bet if you put the Easter Bunny in a blender and heated him up he would taste a lot like this soup: sweet, a little bit spicy, a hint of ginger, and chock-full of carrots.

Spicy Spring Carrot Soup
This recipe is simple, and takes very little time.

I have here 2 bunches of “new” carrots (which in reality were bendy and dried-out), 4 Bosc pears (which I unsuccessfully tried to ripen for three days), a handful of mildly hot peppers, and 2 onions.

Spicy Spring Carrot Soup

Chop those puppies up and toss them in a pot.  Add a whole carton of chicken broth (about 4 cups, or a litre), and top the rest up with water.

Spicy Spring Carrot Soup

Chuck in as well a few teaspoons of minced ginger (two will probably do it, as the minced stuff is wicked strong) and a healthy dollop of dijon mustard.

Spicy Spring Carrot Soup

Add in a few tablespoons of sweet chili sauce as well.

Spicy Spring Carrot Soup

Simmer that like crazy until all the vegetables are tender.

Spicy Spring Carrot Soup

Remove it from the heat and use an immersion blender (or a regular blender) to turn it all into an orange pulp.

Spicy Spring Carrot Soup

If you’ve picked a really hot pepper for your soup, you might want to serve it with a dollop of sour cream, or maybe some green onions for garnish.  It’s also lovely just as it is.  You can freeze it easily and bring it out whenever you need a taste of spring.

Spicy Spring Carrot Soup

Tofu Feature Month: Mapo Tofu

Mapo Tofu

I FINALLY found silken tofu in St. John’s.  I’ve been looking for it for what feels like forever.  In celebration of my recent discovery, and the Pie’s insistence that he needs to slim down in time for Kristopf’s wedding next July, I have decided to honour the long-standing request of my friend Danger K and start finding new ways to cook with tofu.  You might know Danger K: she recently got married (on our wedding anniversary, no less), and she and her husband planned a big fancy wedding by begging, bartering, and borrowing everything they could.  Their expenses out of pocket?  About two hundred bucks.  You can read about the process on their blog, Project Priceless.  So they’re a little bit famous back in Ottawa.  And I can say that I knew her when.  We went to high school together.  In fact, she had a huge crush on one of my brothers (DON’T DENY IT DANGER K I HAVE PROOF).  Not that I’m going to hold that against her or anything.

Mapo Tofu

So.  Cooking with tofu.

My previous experiences cooking with tofu (not in eating it, just cooking it) focused mainly on tossing cubes of it into Broccofu, Peanut Butter Spaghetti, or the occasional stir-fry.  There’s nothing wrong with that, but’s not using tofu in all its myriad manifestations.  This fall, the Pie and I aim to change our ways, and this recipe is the beginning.  September will be a sort of Tofu Feature Month.

Mapo doufu (mapo tofu) is a traditional spicy dish from the Sichuan province of China and involves sautéing tofu pieces in a suspension of a paste made of beans and chilis.  What I found particularly interesting about this dish is that I normally think of tofu as a protein-replacement for meat, but this recipe calls for a combination of tofu AND beef or pork.  Very unique (for me, at least).

Mapo Tofu

A note on substitutions:  this recipe calls for chili bean paste, a spicy gooey mixture of fermented soy beans and chilis (I’m thinking like a super-hot miso).  I didn’t have such a thing, so I used black bean paste instead with the chilis, which is why my sauce isn’t that signature reddish colour.  The recipe also requires the use of rice wine, which, not being a wine-drinker, I also don’t have, so we used rice wine vinegar instead.  Finally, the recipe I used made little sense and required some serious moderation, so I haven’t linked you to it.   I wasn’t a huge fan.

Start by making up enough rice for two people.

Mapo Tofu

Drain and pat dry one block soft tofu (I used extra-firm silken tofu because I wanted to see what it was like).  Cut it into 1″ cubes.

Mapo Tofu

Slice up 4-5 green onions and save about 1/4 of the green tips (sliced) for garnish.

Mapo Tofu

In a skillet or wok over medium heat, heat 2 tablespoons vegetable oil and sauté 4oz ground beef or pork until cooked.  Drain and set aside.

In the same pan, heat 1 tablespoon vegetable oil.  Add 1 teaspoon minced ginger, the green onion that isn’t what you saved for garnish, 2 whole dried chilis, and 1 teaspoon ground peppercorns (Sichuan if you’ve got ’em).  Cook that for about a minute.

Mapo Tofu

Add the ground meat back in, as well as 3 tablespoons chili bean paste, 2 teaspoons minced garlic, 1 tablespoon soy sauce, 1 tablespoon rice wine, and 2 teaspoons brown sugar.  Cook that for another minute or so, just so everything can get acquainted.

Mapo Tofu

Add in the cubed tofu as well as 1/4 cup vegetable stock (or beef, or pork) and let that simmer for 15 minutes.   Stir occasionally, but don’t let the tofu fall apart.

Mapo Tofu

When it’s nearing done, dissolve 1 tablespoon corn starch in a little bit of water and pour that in as well.  Stir gently until it thickens.

Mapo Tofu

Serve over rice and garnish with the remaining green onions.  SPICY!

Mapo Tofu

Sausage Risotto with Broccoli and Mushrooms

I really like risotto.  In fact, it’s one of my favourite starchy sides.  So why has it been ages (over a year) since I last made it?  Hard to say.  It’s not like it’s hard to make risotto.

The Pie really likes sausages, and they’re cheap here, so we eat them often.  I am not such a huge fan.  On this particular night, I decided that if I had to slice through another meat-and-two-veg meal with slippery hot sausages as the main attraction I might throw something at my husband.  And I like him, so I wanted to avoid such a situation.

The basic principle of risotto making is the constant adding of more and more liquid, stirring as you go.  This brings out the naturally creamy nature of the arborio rice.  If you find a recipe that tells you to add cream to your risotto while it’s cooking, then the authors don’t know how to cook it right.  The creaminess comes by itself, and don’t let anybody tell you anything different.

The traditional method for making risotto involves adding one part white wine to the mix, then three parts water, gradually.  Today we are going to use straight chicken broth instead.

Squeeze the meat out of 3 hot Italian sausages and plop that in a pan.

Slice up about 8oz mushrooms of your choosing.  You can chuck those in the pan with the sausages.  I suppose if you wanted to do it right you would saute each of those things separately, but when do I ever follow the rules?

Dice 1 whole onion and put that in a saucepan with a dab of olive oil.  Set that to sautéing, stirring occasionally, until the onion pieces are translucent.

While that is cooking, sauté the mushrooms and sausage as well.  Break up the sausage with a spatula as it cooks, until you just have little sausage-y bits. 

Drain off any juices and fat and keep warm.  We also had about 2 cups frozen steamed broccoli hanging around, so I popped that in the pan as well to thaw.

Pour 1 cup arborio rice into the onions.

Add 1 cup hot chicken broth (low sodium) to the rice and onions and cook on high heat, stirring often, until the liquid is absorbed.

Add a further 3 cups hot chicken broth, one at a time, stirring in each one until fully absorbed.  The whole process should take about 20 minutes and leave you with a lovely creamy rice.

Season the risotto with salt and pepper.  Stir in about 2 tablespoons butter and 1/2 cup grated romano cheese.

Dump in your sausage/mushroom/broccoli mixture and stir well.

Serve hot, garnished with more grated romano.  Makes great leftovers.

Sausage Stuffed Turkey with Gravy

For years, my health-food nazi, roughage-eating parents bought only free-range organic turkeys.  And I hated them: so dry, tasteless, and without any juices with which to make gravy.  Turkey without gravy is a travesty in my family, so my parents gave up about three years ago and started buying the unstuffed Butterball turkeys.  Shocking, I know.  But the difference has been night and day.  I actually kind of like turkey now.  Which is good, seeing as I always seem to be the one who stuffs it, roasts it, and then makes the gravy.

So let’s do that today, shall we?

First we’re going to do some gravy pre-preparation.  Take the neck and giblets from your turkey and plop them in a pot with some garlic and enough chicken broth to mostly cover them.  Simmer that for an hour or so, then take out the giblets and neck (feed the giblets to your dog if you have one, or purée them and add them back to your broth), and set the broth aside.

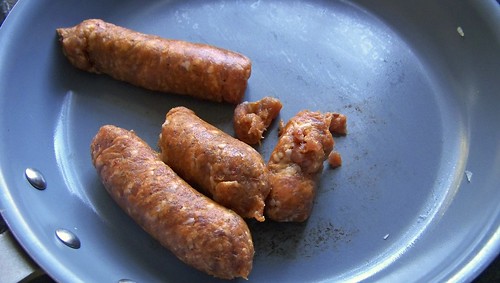
Now for the stuffing.  Take three sausages of your choice (I prefer a spicy Italian), remove the casings, and squish the contents into a pan with some olive oil and garlic.

Add in a diced onion.

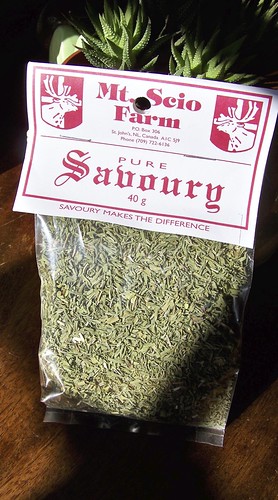
Pour in a generous amount of savoury.  I love my Newfoundland savoury.  The Pie brought this along specially for this stuffing when he came to Ottawa for his Thanksgiving visit.

Add in two chopped apples as well.

Sauté that stuff until the sausage is broken up and cooked through and all the other ingredients have had a chance to get to know each other.

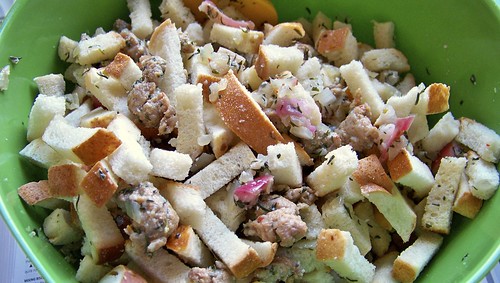
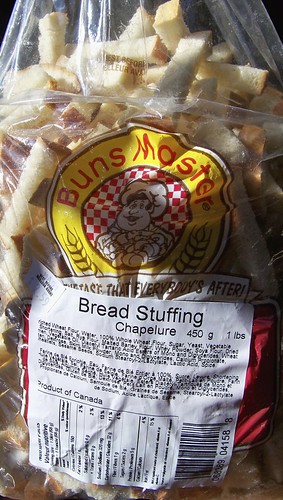
Plop it in a bowl and allow it to cool a bit.  Add in some large dried bread crumbs.  

You can make these yourself by cubing bread slices and baking them at 200°F until stale, but we had enough to do so we bought them pre-made (I can’t do everything by myself, now, can I?).

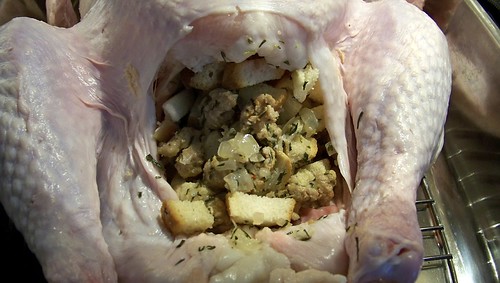
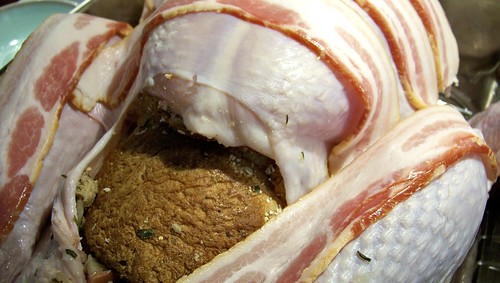
Stir that mess up and shove as much of it as you can into the cavity of your turkey.  You can make removal easier later by lining the inside of the cavity with cheesecloth, but I didn’t have any on this day.

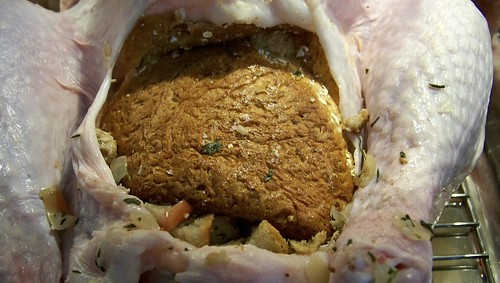
Close the opening with a slice of bread.  This will keep the stuffing near the opening from drying out and burning.  It’s a bread shield.

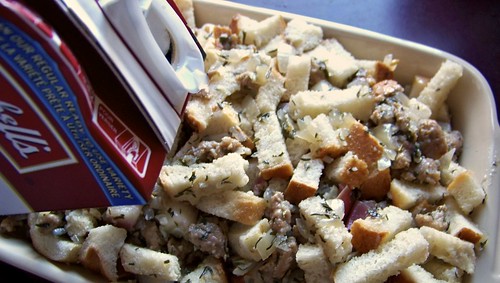
Put the remaining stuffing in a greased casserole dish and douse liberally with chicken stock.

Drape your turkey lovingly with a few strips of bacon.  This will keep the skin from drying out and it will save you from having to baste the darned thing while you’re entertaining, as the fat from the bacon will drip down gradually and keep everything moist.  You can truss your turkey if you wish, but with big poultry I prefer to leave it all hanging out there to ensure even cooking.  I don’t cover it with foil either.  Well, not until much later.  You’ll see.

Chuck your turkey into the oven at 325°F and roast the sucker.  Your cooking time will vary with the size of your bird, but for some reason I find no matter the size, mine always cooks in between three and four hours.  Keep a close eye on your thermometer.  The turkey is cooked when the thigh temperature is 180°F.  Check the stuffing inside the turkey, as well — it should be around 165°F for safety’s sake.

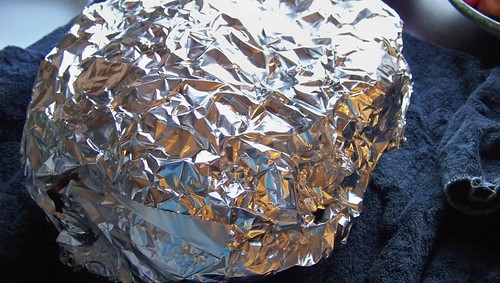
If you plan it right your turkey should probably be done about an hour or so before it’s ready to serve.  Clear a space on your counter and lay out two or three old towels.  In the centre overlap a couple of pieces of aluminum foil.  Once the turkey is done, remove it (with the aid of a poultry lifter) to your improvised platform.  Pull up the edges of aluminum foil and add more to cover it all around tightly.

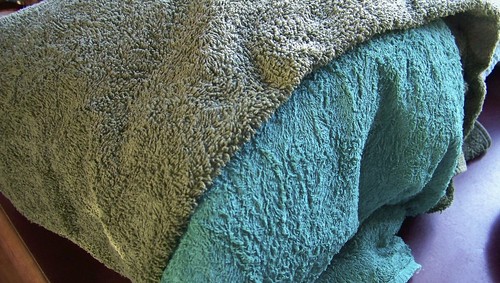
Pull up the towels and add more on top, wrapping it with care and tucking under the edges.  Resting the turkey like this will keep it hot for a couple of hours, and will ensure that none of the juices get lost.

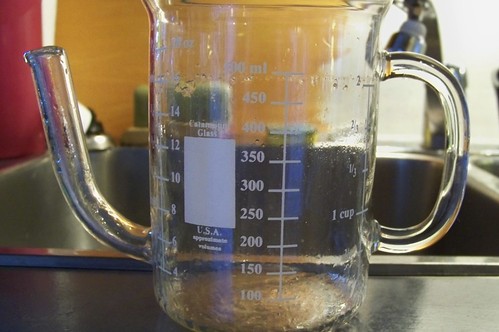
Now that you have your turkey pan free, carefully scrape all the juices and bits of stuff into a fat separator.  Let the liquid settle and drain off as much fat as you can.

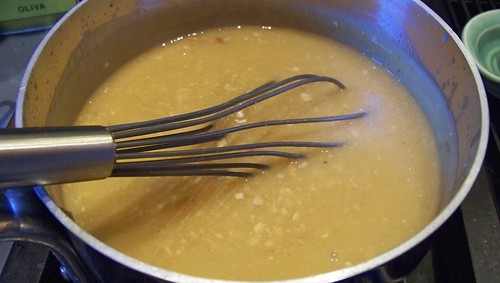
Pour whatever juices and solid pieces you get into the pot with your reserved chicken broth from the giblet boiling.  Bring the mixture to a boil, then lower the heat to a simmer.  Scoop out a little bit of broth and make a slurry with some flour, then whisk it back into the gravy and keep stirring until the mixture thickens.  You can remove it from the heat, cover it, and let it cool while you do other things.  You can always heat it up again later.

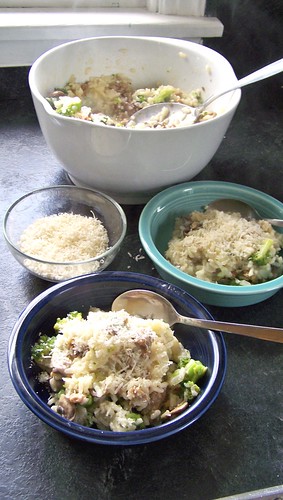
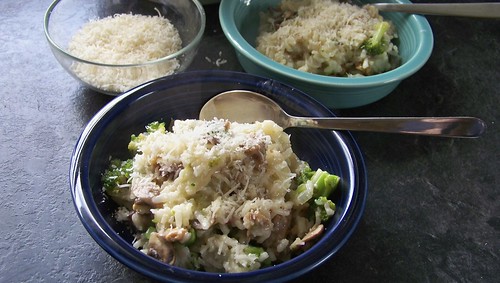
Your extra stuffing can be roasted, covered with aluminum foil, at 350°F (or higher, depending on whatever else you are cooking at the time) for about half an hour, until the bread crumbs are crusty and brown.  Everything in it is pre-cooked so you needn’t worry about temperature in your casserole dish.  Just cook it until it looks good.

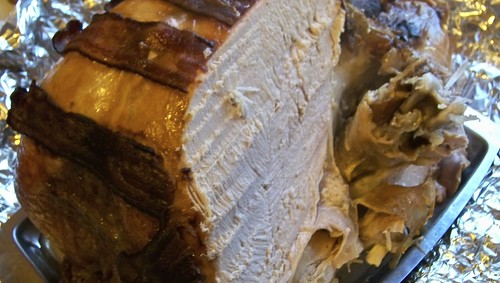
You can unwrap and carve your turkey at any point that’s convenient to you.

Reheat your gravy, pour it into gravy boats and serve over your hot stuffing and turkey!

Newfie Miso

I have been craving miso soup for forever and a half.

From what I’ve read, miso soup is characterized by a stock of dashi, which is composed of dried fish and/or seaweed and/or mushrooms, into which softened miso, or fermented soybean paste, is suspended.

The rest of the ingredients are up to you, really.  Traditionally the ingredients are limited to two or three items, chosen for their contrast: items that float versus items that sink, contrasting colours, textures, shapes, and flavours.   But you can put in whatever you want.
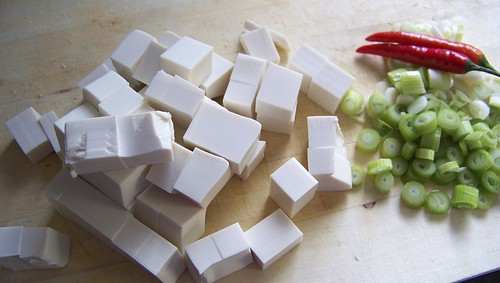
I had a fun time at the Magic Wok Grocery this afternoon and I went a little crazy with possible ingredients. In this case, though, I wanted to limit myself, so I picked out preserved turnip (rather salty and crunchy), which I cut into slivers:Kai-lan, or Chinese broccoli, which is both sweeter and more sour than regular broccoli, if that makes any sense.  It’s called ‘broccoli’ for that little vestigial flower thing at the top.Also it’s nice and crisp.  I chopped it into small pieces and sort of julienned the stalks:
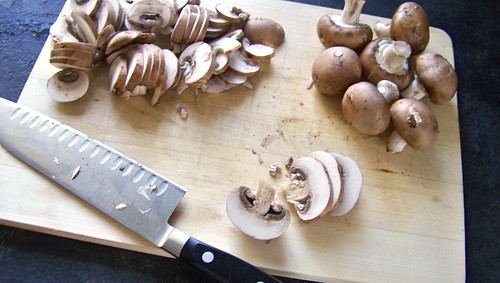
Dried mushrooms.  Nuff said about those.  I bought all sorts of weird fungus, but I decided to take it easy on my first try and went with a western medley:A nice dark soba (buckwheat noodles) which I broke in half for easier eating:Dashi is non-existent here, so I decided to McGuyver up my own.  I used a combination of powdered vegetable stock and dulse flakes.  It’s the dulse that makes this recipe into a Newfoundland recipe, as the stuff is harvested right off the coast here.  The dried mushrooms I added to the stock early so that their essences could mingle as well.

Here is what I did.  I’ll try to quantify things for you, though I mostly just went with “some” and “a little”.

Start with about 4 cups water.  Add in 2 heaping tablespoons powdered vegetable stock and bring to a boil.Reduce heat, plop in about 3/4 cup dried mushrooms and 2 tablespoons dulse flakes and allow to simmer for 20-30 minutes.  This is so your mushrooms can absorb all the water they need.Add 1/4 cup slivered preserved turnip.  It gets less salty once it’s in the soup.About ten minutes before serving, chuck in a small bunch of soba.Five minutes before serving, add in about 1 1/2 cups chopped kai-lan.Dissolve about 1 1/2 tablespoons miso (I used the hatchi variation) in the broth (it’s easier to do this if you scoop out some of the broth and mash it into that first) and serve hot.

Miso is meant to be made up fresh each time, but I hear that leftover soup is also good cold.  I  could be wrong but I’m taking it for lunch tomorrow so we shall see.