Snakes and Soda Bombs

In our house, all the drains in all the sinks are screwy. The sinks are slightly tilted in the wrong direction or the bottoms of them are flat so the water doesn’t actually LEAVE the sink. And I suspect that most of the drains were partially clogged when we moved in, because getting water out of them has always taken a while. Now that we’ve been here over a year (and will shortly be leaving as quickly as possible), we’ve added our own mix of dog hair and muck to our drains and the two in our bathroom, the tub and sink respectively, need some TLC.

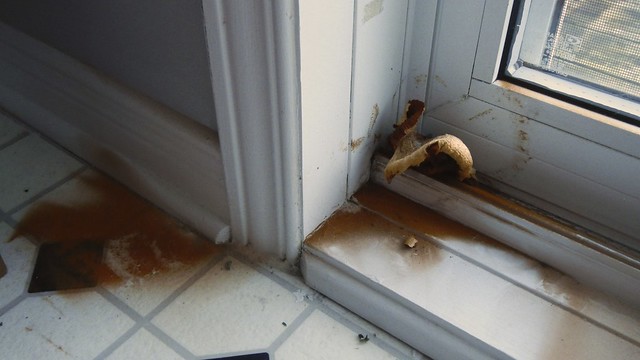
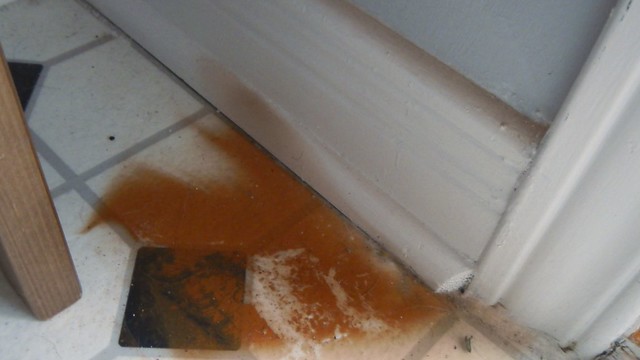
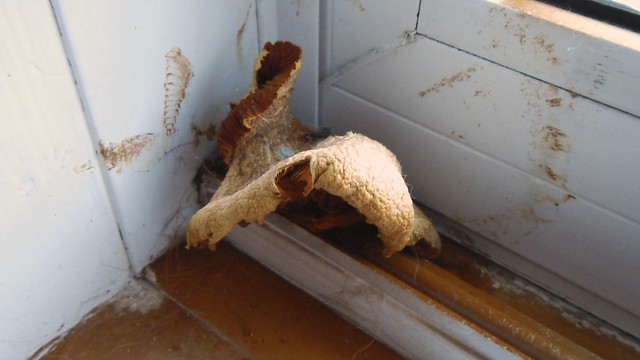
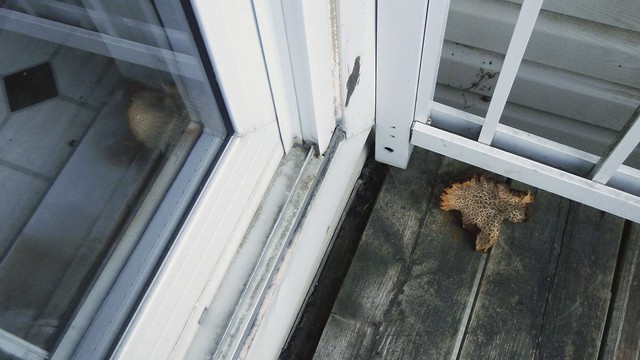
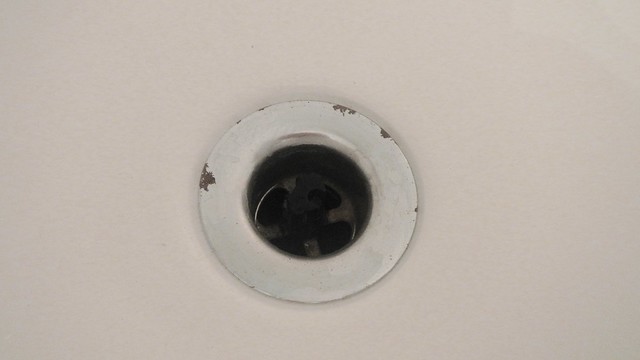
Remember when I cleaned our dishwasher and it was one of the more disgusting things I’ve ever done? Well this is way more gross. These pictures are going to be graphic so feel free to skip this post if you think you might lose your stomach contents. If it makes you feel better I gagged often while actually doing this thing. This is my bathtub drain. You can see the gunk surrounding it because it’s not draining fast enough to wash everything down so little bits of dirt get stuck, and nothing dries, so I get that lovely orange mildew line. Yummy. The pop-up plug thing that goes with the tub never worked so we pulled it off and bought a regular rubber plug. It’s somewhere around the house …

DSCN8734

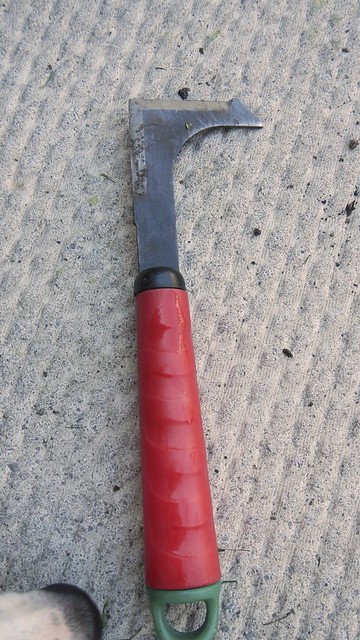
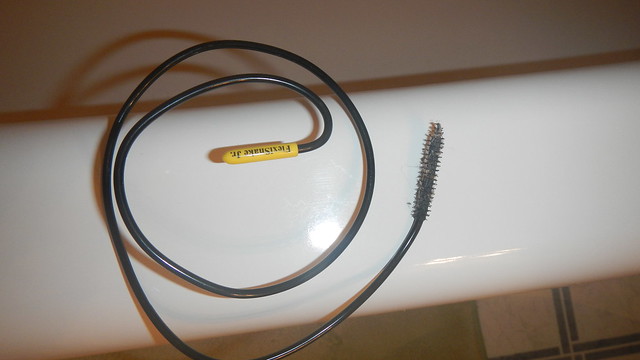
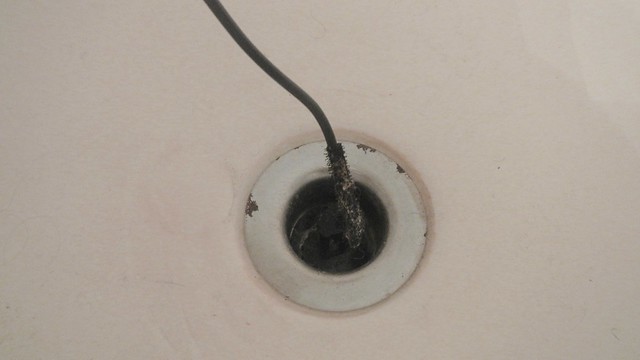
When you’re first cleaning out a drain, before you reach for chemicals or solvents, grab one of these. This is a drain snake. It’s just a wee one. If you have some more serious drain issues than a bit of dog hair then you might want something more complex, but this one does the trick when you’re trying to navigate around funny-shaped plug bits jammed in your drain.

DSCN8733

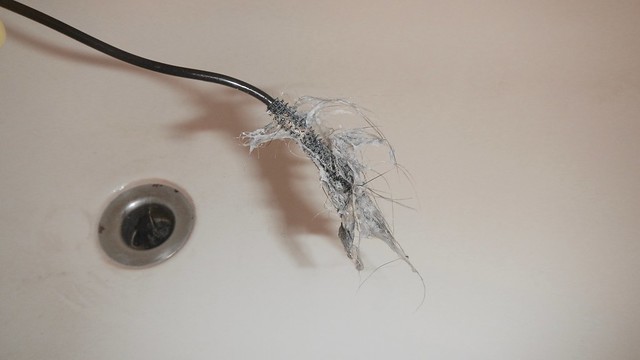
So you take the snake, and you shove the brushy end down into the drain and scoop it around until you feel you’ve caught a bunch of stuff.

DSCN8735

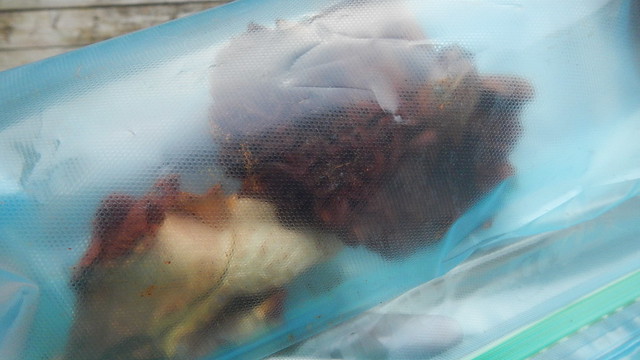
Bring it up and clean it off. Try not to throw up. I would recommend wearing gloves. Because bleugh.

DSCN8736

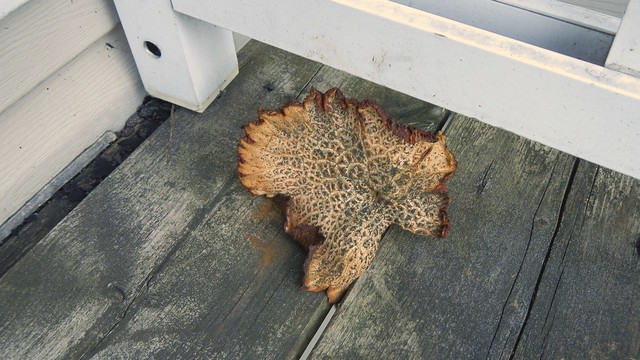
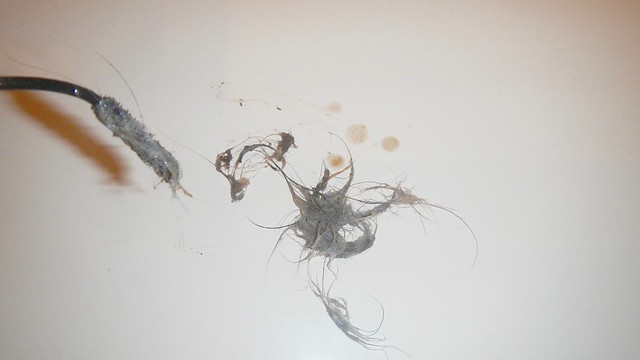
This is all the gross hair I pulled out of the drain. Holy ew.

DSCN8737

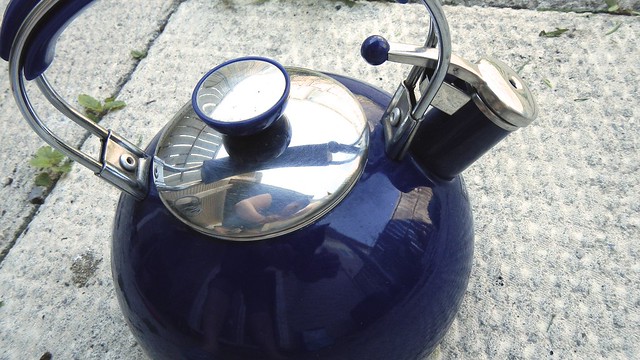
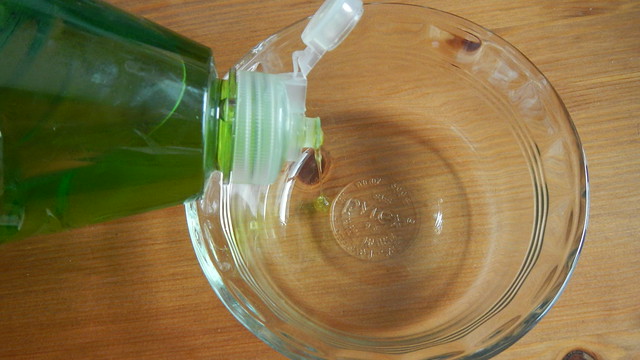
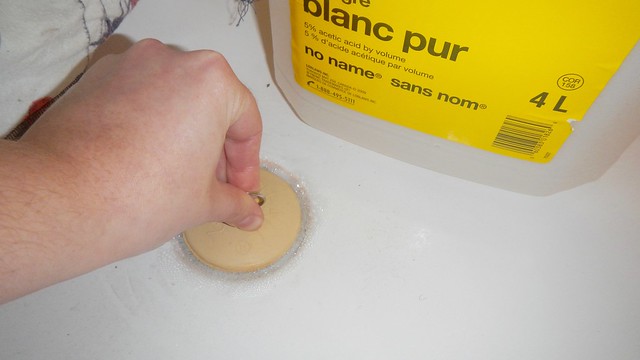
Next, to make extra sure you’ve got everything in there, put a kettle of water on to boil and grab some vinegar and baking soda. Block off any other vents or drains that are attached to the one you’re trying to clear using tape or a rag.

DSCN8738

Tip about 1/2 cup of the baking soda down the drain.

DSCN8739

Then add in 1/2 cup of the vinegar and jam the plug down. Leave that for however long it takes your kettle to boil. I found it made a very satisfying noise throughout the house as it gurgled through the pipes. The chemical reaction that’s going on is breaking down all the fats and oils and stuff that cause that sludgy goo and getting rid of them.

DSCN8740

When the kettle is ready, empty it down the drain to flush all the now loose bits away.

DSCN8742

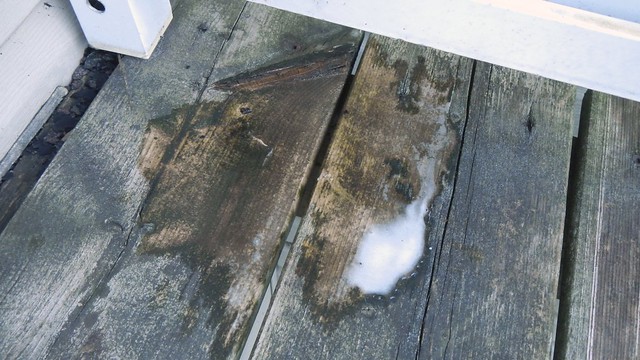
And the drain is now as good as new – or at least, as good as the day we moved in. Maybe slightly better. Who knows?

DSCN8744

My scary sink is a whole ‘nother kettle of stanky fish, because it has that stupid pop-up plug thing going on and I can’t get in there with even my wee snake. What I need to do is take the little pop-up thing out and do all sorts of horrible things. It will involve much swearing and probably some assistance from the Pie (because we make a good plumbing team). And you don’t need to see that (because I know it’s jammed with like a year of the Pie’s beard hair and that is GROSS). But if you have the same problem, I found an amazing video that lays out what to do much better than I ever could. You can access it on YouTube here.

DSCN8745

Update on the Weed War

Weed War Update 3

Happy Monday! I just wanted to update you on my madcap science experiment from last week.

Weed War Update 1

The weeds in the rest of the garden have returned after a solid week of rain, but the ones in the patio stone cracks have yet to show.

Weed War Update 4

Sure, there are one or two little ones, but I think those are ones I missed in my initial attack so I’m going to do it again and then I think they will be gone for good!

Weed War Update 2

Waging the Weed War

Weed War 3

This is the first of two posts about my garden this year, so if you’re not into gardening tune back in on Friday when I teach you how to make a frittata in less than five minutes.

If you’re still here, let me tell you now that I am not a natural gardener. I’ve made a few attempts at horticulture, but they rarely work out. That said, if the Pie and I want to take our eventual business of home ownership seriously, we both want an outside space that is a pleasure to visit, so I’ve been practicing my gardening skills in all our rentals up to this point. I might actually be getting somewhere now.

Weed War 2

But gardening isn’t all fun and games (well it’s rarely those things). There’s a lot of grunt work, and most of that involves WEEDING. My issue with weeding is that most of the time I try to plant things from seed and then I end up weeding out that which I planted. Whoops. Then dandelions happen. Whoops again. Don’t get me wrong, though, I do adore dandelions.

Dandelion Forest
Our back yard in St. John’s …

In our current house, we have a weed forest coming through the cracks in our patio stones.

Weed War 1

I spend a chunk of my gardening time hauling the weeds out for compost (I tried to take a picture of the compost bag but Gren decided to get in the way.

Weed War 4

I have this handy crack weeder that I got from Lee Valley (Gren’s nose again), and it’s useful for pulling the weeds out of the cracks, but they always come back.

Weed War 5

I keep hearing, however, that if you boil a kettle with half vinegar and half water …

Weed War 6

… and then sprinkle a little bit of salt in the cracks where the weeds are growing before drizzling boiling hot vinegar water into the cracks …

Weed War 7

… that the weeds die and don’t come back. So I will keep you posted on if this works.

Weed War 8

Home Made Watercolour Paints

Watercolours 23

This is a great gift for the artist in your family, young or old, or a neat thing to have on hand for any young visitors over the holiday season. They can be made with materials you probably have in your cupboards, which makes for a cost-conscious addition to your holiday crafting.

Watercolours 25

And because it’s all easy-peasy and non-toxic, I’m sure that kids will enjoy making their own colours – provided you don’t mind a little mess! This is a rather time consuming project, with all the stirring of tiny pots of colour, so if you do it with smaller children be prepared to finish the job once they get bored.

Watercolours 19

In terms of hardware, you’re going to need two plastic ice cube trays. I picked these up in the clearance section of Target. You can also use silicone trays, and then pop the solidified paint out to use somewhere else. You will also need some disposable stir sticks (one, or one side, for each colour).

Watercolours 3

And lots of food colouring. You can use both liquid and gel paste for this. I also added some metallic powder pigment to the mix.

Watercolours 2

Now grab a couple measuring cups. Scoop up 1 cup baking soda, and plop it in large (~4-cup) measuring cup or bowl with a pouring spout.

Watercolours 4

Pour in 3/4 cup white vinegar.

Watercolours 6

Keep stirring until all the fizzies are gone.

Watercolours 7

Next dribble in 2 tablespoons lily white corn syrup (the darker stuff will discolour the paint).

Watercolours 8

Then dump in 1 cup corn starch.

Watercolours 9

Mixy-mixy. You want this as smooth as possible, as it will settle quickly.

Watercolours 10

With everything mixed up, distribute the white liquid evenly amongst your trays. I found the given recipe to fill each section a little more than 3/4 full, but it depends on the size of your trays.

Watercolours 11

Now start colouring! Dip the end of a stir stick into your colour and drop a little bit into the tray.

Watercolours 12

Stir, stir stir!

Watercolours 13

I added a bit more because this was my black one, after all, and I wanted it to be dark. Again, make sure to scrape up the bottom as you stir, because all the powders are starting to settle.

Watercolours 14

With the gel paste colour, as you can see here with my red and brown, you will get little solid pieces that float while you stir. Don’t worry about them. Stir in as much as you can, then leave them alone for a few minutes and let the liquid get into the colour. They’ll dissolve if you go and stir them again a little bit later. I promise.

Watercolours 15

Watercolours 16

The liquid food colouring was much easier to mix in. Don’t forget you can easily create your own colours!

Watercolours 17

I did find that some of the colours kind of settled and separated, so I ended up re-stirring them a few times. I needn’t have worried, however: as the water in the liquid evaporates they will all come back together again.

Watercolours 18

I cleaned up the edges of the trays with a damp cloth after the mixes were starting to settle and dry. It was super quick. I ended up leaving these alone for a whole week just to ensure they were dry all the way through, but you may find you have dry paint within a couple of days.

Watercolours 20

To test the paints I created a colour guide. I had fun with the names.

Watercolours 22

I’m actually really pleased with how the metallic ones turned out. All I did was add the plain metallic powder to the liquid, without any other pigment.

Watercolours 24

Watercolours 26

And added some brushes to complete the gift.

Watercolours 21

Shoo, Fly. Don’t bother me.

Another consequence of being away for the week, in addition to my friendly mushroom collection, is that we were inundated with fruit flies.  This is despite me scouring the kitchen before we left, scrubbing everything and emptying the compost and the garbage and cleaning them out. Nothing was left on the counters.

Shoo Fly 7

And they’re everywhere: flying into our faces as we sit in the office, harassing Gren as he lazes about on the couch …

IMAG1348-1
GRATUITOUS CORGI PHOTO

When I was a kid and we were living in Victoria, all of a sudden one fall we were completely inundated with fruit flies. My mother tried EVERYTHING: traps, glue, tape, swatting, pesticides … nothing worked. Eventually she began to take enormous satisfaction in sucking up clouds of them with the vacuum cleaner. The culprit was eventually revealed to be a banana hidden in Ando’s closet. Yuck. I didn’t want this situation to turn into that situation. So, after hiding all produce in the safe confines of the refrigerator, I made up some traps for them in the hopes that they will mostly die and go away. There are lots of different fly traps you can make at home, but they all have the same basic concept: something sweet to attract them, some method of preventing them from leaving, and then a liquid to drown them. Or you poison them by other means.Shoo Fly 1

Fruit flies are also known as vinegar flies, because they are attracted to the sweetness of wines and juices, and of cider and rice vinegars. So my trap involved filling a bowl with enough rice vinegar to drown a fruit fly. You can also use juice or wine for this. Then you add a drop of dish soap to the mix to break the surface tension so the flies can’t get away.

Shoo Fly 2

Then you make a cover. You can fashion a paper cone with the narrow end pointing towards the vinegar so that the flies get funneled in but can’t escape, or you can use plastic wrap. Poke lots of holes in the plastic wrap, each one about fruit fly sized.

Shoo Fly 3

Shoo Fly 4

I also read that apparently fruit flies are like teeny tiny asthmatics. Because they’re so small, they need to breathe nice clean air. Particles like smoke get stuck in them and kill them. So incense is a pretty good killer of fruit flies. I shoved a few sticks into my house plants (because fruit flies like to hang out there when they’re not cavorting in the kitchen). After a few seconds I saw a fruit fly do a death spiral in the column of smoke and then keel over on the table below. NEAT.

Shoo Fly 5


This is the kitchen vinegar trap after about two hours. SCIENCE.

Shoo Fly 6

Mysterious Mushrooms

Mushroom Mushroom 1

Two days after we came back from our week in NYC, I pulled aside the back of the curtain hanging at our balcony door and discovered a giant pile of orange dust. Everywhere.

Mushroom Mushroom 5

A MUSHROOM was growing on the inside track of my balcony door.

Mushroom Mushroom 2

And I looked outside and there was its twin, growing happily between two of the boards on the deck.

Mushroom Mushroom 3

Inside mushroom, outside mushroom.

Mushroom Mushroom 4

I hazmatted up and sprayed everything inside and out with bleach, which turned the orange spores pitch black. Gross. I took down the curtains, too, and washed them with vinegar.

Mushroom Mushroom 7

Post bleach inside.

Mushroom Mushroom 8

Post bleach outside.

Mushroom Mushroom 9

The thing is, the day before we left, we finally had eavestroughing installed on our roof, which meant that now we didn’t have water pouring at a million pounds per second onto the planking of our (now rotting) deck. So because it was now protected, I figure it gave the fungus a chance to show itself. I’m less clear on how it got INSIDE the house, though I suspect the seal on the door isn’t that great, seeing as I’m forever cleaning up water spots on the interior of the one downstairs.

Mushroom Mushroom 10

Just in case this ends up being alien spawn or the portent of the next apocalypse-bringing plague, let the record show that I’m keeping the mushrooms in a Ziploc bag in my garage in case the CDC or NASA needs them later.

Mushroom Mushroom 11

Tie-Dyed Eggs

Tie Dyed Eggs 47

Cait and I decided to get up to shenanigans on Monday night and so this is what we did: we tie-dyed Easter eggs.  Not “tie” like TIEd into knots (though you do that), but “tie” as in, dyed using a neckTIE.  Yes. Neat, huh?

Tie Dyed Eggs 51

So what you need to do is go through your tie collection or go to your local thrift store and pick up some silk ties (I used 8 ties).

Tie Dyed Eggs 1

There will be a tag on the skinny end of the tie that will tell you if it’s silk or not.  You can also do this with silk scarves, but I couldn’t find any at the thrift store that were 100% silk.

Tie Dyed Eggs 5

Having done this project now, I’m going to tell you to look for ties that are made of printed or painted silk, like this:

Tie Dyed Eggs 53

And to avoid jacquard-like woven silks, like these:

Tie Dyed Eggs 52

I’ll show you why later on.

Tie Dyed Eggs 3

Then you will need to dismantle the ties, removing the satin lining and the foam or fabric insert.  Ties are not sewn in a particularly sturdy manner, so it won’t take you long.

Tie Dyed Eggs 6

Tie Dyed Eggs 7

Tie Dyed Eggs 8

Tie Dyed Eggs 9

Now you need some eggs.  We used 2 dozen white eggs.  You don’t have to use white ones, but the colour will transfer best to white.  With 24 eggs and 8 ties, we planned to have 3 eggs of each pattern.

Tie Dyed Eggs 18

Cut a segment off your tie that will wrap completely around your egg.

Tie Dyed Eggs 19

Wrap the fabric tightly around the egg (you can do it at any angle, but just remember that the smoothest side of the fabric is the part of the egg where the print will be the best) and fasten the tail with a rubber band. Make sure to do it so the “right side” of the fabric is touching the shell of the egg. I kept messing this up and Cait kept yelling at me. She’s tiny but mean.

Tie Dyed Eggs 20

Do this with all your eggs.  We adjusted the angle at which we tied on the fabric, because we were going to display our eggs all higgledy-piggledy in a bowl.  If you’re going to display your eggs in cups or something organized, you might want to consider tying them all the same way.

Tie Dyed Eggs 21

This is one of the jacquard ties.  Much harder to get the fabric close to the egg.

Tie Dyed Eggs 22

After explaining to Cait that the egg was one of the structurally strongest shapes in the world, I promptly put my thumb through it.

Tie Dyed Eggs 23

Because we were now out of white eggs, we replaced it with a brown one as a scientific experiment. It’s actually frightening that one of our most oft-uttered phrases to each other is “For SCIENCE!”

Tie Dyed Eggs 24

Once you’ve got all your eggs wrapped in tie scraps, you need to find some white or plain pastel cotton or muslin or similar scrap fabric.  Old pillowcases work pretty well.

Tie Dyed Eggs 25

Cut the fabric into slightly larger pieces than you cut the ties.  Wrap the muslin around the egg and fasten it with another elastic over the previous fabric tail.

Tie Dyed Eggs 26

This is definitely a time consuming job.

Tie Dyed Eggs 27

We were, however, entertained by our rubber bands.  I picked up a bag at Dollarama, and I guess they got the rejects from various other manufacturers.

Tie Dyed Eggs 28

Plop your eggs in a large pot and cover with water so they’ve got about 2″ of water above them.  Add in a cup or two of white vinegar, depending on how many eggs you’re doing.  For 24 eggs we used 2 cups white vinegar.

Tie Dyed Eggs 29

Bring that to a boil and let simmer for 20 minutes.  When it’s done, scoop out the eggs into a bowl of cool water so they chill out faster.

Tie Dyed Eggs 30

Carefully unwrap the eggs and store them in the fridge if you’re planning on eating them.   They tend to look a little sharper if you rub them with a little bit of vegetable oil to get a nice shine.

Tie Dyed Eggs 31

Here are the eggs, next to their various tie patterns.  You can see that the jacquard ties (at the end) didn’t come out half as bright as we thought.

egg08

egg07

egg01

egg06

egg03

egg02

egg05

egg04

And here is the brown egg!

Tie Dyed Eggs 32

I think it looks really neat with the red.  Here it is next to its white counterpart, for comparison.

Tie Dyed Eggs 33

Tie Dyed Eggs 42

Pretending it’s Spring with a Feather Bouquet

Feather Bouquet 45

So.  If you’re anywhere in the world that has been experiencing winter this year, you know that it pretty much has universally sucked.  In Ottawa, and Canada in general, we just got wind that winter isn’t ending anytime soon.  In fact, the forecast is so depressing that our country’s senior government meteorologist has gone into hiding.  I kid you not.

Feather Bouquet 42

So I’m doing what I do every year and going into denial.  I’m going to pretend it’s spring with a pretty fake bouquet in my front hall.

Feather Bouquet 47

I picked up a bag of feathers from Value Village for $1.99 about two weeks ago.  Inside the bag were four packages of craft feathers from White Rose, which was a craft supply store similar to Michael’s that went out of business when I was a teenager.

Feather Bouquet 1

Three packs of white chicken feathers and one pack of dyed chicken/other bird feathers.

Feather Bouquet 2

Also, holy smokes feathers are staticky.

Feather Bouquet 3

I didn’t want an all white bouquet with accents of brown, so I decided to dye the feathers to suit my mood.  I’ll leave the ones that are already coloured for something else.

Feather Bouquet 4

Find a dye-proof container (usually a glass bowl), and drop in 4 cups hot water, 2 teaspoons white vinegar, and lots of food colouring in the colour of your choice.  I went with red, purple, and orange.

Feather Bouquet 9

Jam those feathers in and squish them down.  You want to bedraggle them as much as possible.  You can un-bedraggle (undraggle?) them later once they’re dried.

Feather Bouquet 11

Leave them in the dye baths for 5 to 15 minutes.  The longer you leave them in, the darker they will get.

Feather Bouquet 12

Feather Bouquet 13

Feather Bouquet 14

Feather Bouquet 15

I picked plastic bins for my dye batches because I could cover them when I left them unsupervised.  I suspect if you have small grabby children this might come in handy.

Feather Bouquet 16

Pull the feathers out of the dye baths and set them to dry for several hours on a paper towel.  Just a warning that until the feathers are completely dry, they will still stain things with food colouring, so be careful where you set them.

Feather Bouquet 17

I thought that the orange batch was doing better than the other two, and I later found out why.  In the orange batch, you can see that I only have two of these long feathers with the rounded tips.  All the other ones have the flat tips.

Feather Bouquet 18

In the red/pink, the proportion of long round ones is higher.  For some reason these round ones are more waterproof (I’m sure someone who knows more about feathers knows why but I don’t really care).

Feather Bouquet 20

The purple batch had the most round feathers of them all, and so came out the palest overall.

Feather Bouquet 22

But I wanted variety, so variety I got. And I also dyed my fingers quite well.

Feather Bouquet 21

Once they’re dry you can fluff them out again.

Feather Bouquet 24

Then I took a spool of thread and got to winding the feathers together at the stems, one by one, starting with the smaller ones in the centre.

Feather Bouquet 27

Feather Bouquet 26

I added larger and larger ones as I kept going, eventually tying off the “bloom” with lots of thread left over.

Feather Bouquet 28

Feather Bouquet 29

One down, several more to go …

Feather Bouquet 30

This is definitely a job you will want to do while watching or listening to something else.

Feather Bouquet 32

Feather Bouquet 34

When I finished, I took a branch I found in the park and used the loose thread to wind the feather bundle to the thread.

Feather Bouquet 36

All finished.

Feather Bouquet 46

The Pie thinks the pink ones turned out the best, with the colour gradient, but I’m partial to the orange ones.

Feather Bouquet 44

Feather Bouquet 43

Cleaning Your Washing Machine

Washing the Washer 2

This is something you should do as often as you clean your dishwasher.  But of course I know that you’re probably not going to do it any time soon.  The last time I cleaned my dishwasher was when I made that post about it.  I’ll probably do it again before we move, but that’s it.  My washing machine?  Well, I can state for the record that I have never cleaned it.  Our old one was installed during the previous tenants’ reign in our apartment and I don’t think they cleaned it either.  And then it died, so we inherited the one from the downstairs apartment, which is of equal age and has also been equally abused.  Plus, the machine is literally right next to my front door, which means it gets all sorts of outside gunk stuck to it/in it, let alone the crap that comes out of my clothes (mostly dog hair, if we’re being honest).

Washing the Washer 3

Anyway, because we’re moving I figured I’d give it a bit of a scrub so the next set of tenants won’t have to deal with my leftover dirt.  Prepare to be shocked at the sheer grossness of my machine.  Just remember that I have a short hairy dog and the machine is next to a door to the outside on a busy, sooty street, so it’s not entirely my fault.  I’m not that bad of a person, really.

Apartment Therapy, of course, has great instructions on how to clean a top-loading washing machine, so I’m going to follow their lead on this one.  All you need is four simple items: baking soda, white vinegar (or bleach, if you prefer), a soft flannel cloth or microfibre cloth, and an old toothbrush.

Washing the Washer 1

Set the washer to fill at the largest volume, the longest setting, and the hottest water, and turn it on with the lid open. Pour in 1L (~1 quart, 4 cups) white vinegar.

Washing the Washer 4

While it’s filling, pop off any of the attachments that can easily be removed. On this machine, that’s the bleach cup.  Wipe off all the surfaces you can reach.

Washing the Washer 6

Chuck the attachments into the washer to soak.

Washing the Washer 8

The machine will continue to fill, and things will get pretty steamy. While that’s on the go, take your soft cloth, dip it in the vinegary water, and start wiping down everything you can still reach with the washer lid still open. For me that meant wiping down the interior of my dryer too, which is directly above. Rinse your cloth often in the washer water to prevent transferring lint to other surfaces.

Washing the Washer 10

Use the toothbrush to scrub harder-to-reach areas, like these dryer door holes.

Washing the Washer 11

And between the washer and dryer.

Washing the Washer 9

And don’t forget the crannies under the lid itself. Sorry for the steamy picture.

Washing the Washer 12

When the machine has filled completely it will stop. Haul out whatever you chucked in there and scrub it down.

Washing the Washer 14

Add 1 cup baking soda to the water.

Washing the Washer 15

Close the lid and let that fizzy water agitate itself for about a minute (wipe down the lid while you wait). Then open the lid again and leave that water to sit there for an hour. I know, a whole hour. But I’m sure you have other things to clean in the meantime.

Washing the Washer 16

When the hour is up, close the lid and let the machine complete its cycle. Use your soft cloth to wipe down the interior of the drum to remove any residue left behind, and run the cycle again with just water this time to flush out anything else.

Washing the Washer 17

And now it’s clean. Way to go!  Final tip: If you leave the lid open to allow the washer to dry between uses you can avoid mould and mildew build up too!

Washing the Washer 18

Eggs Benny, Two Ways

Eggs Benny Two Ways 23

Two weeks ago the Pie and I decided to head downtown for a late Saturday breakfast and we ended up at the Bagel Cafe, which is consistently voted as having the best breakfast in town almost every year.  We’d never been before, so it was an interesting experience — the place is pretty cozy so I wouldn’t recommend going in a big group — but the menu was massive and I had the best breakfast I have ever had.  It was eggs Benedict served with a sliver of smoked salmon and a dreamy, creamy Hollandaise, but instead of the standard English muffin, this poached beauty was perched atop a genuine Newfoundland cod fish cake.  It was truly one of the more divine things I have eaten in recent memory.

And I can’t stop thinking about it.  So I had to recreate it.  I mean, who did I think I was?  This, then, is what I did the following weekend.

So first, for the man I married who refuses to eat fish, I whipped up another batch of English muffins.  And then I learned that he has never had eggs Benedict before.  I was shocked.  I order them pretty much every time we go out for breakfast, but it never occurred to me to find out if he had ever done the same.  And then I made the fish cakes, which conveniently store well in the refrigerator.

Eggs Benny Two Ways 3

For the Hollandaise, you want to get your whisking arm limbered up.  Set a large pot of water to simmer on your stove and find a metal bowl that fits snugly over the opening but that does not touch the water (if you’re poaching eggs you probably have a large pot of water already on the simmer so this makes things easy).  While that’s heating up melt as well 10 tablespoons unsalted butter and set that somewhere convenient.

Eggs Benny Two Ways 4

Into the metal bowl goes 3 egg yolks and 1 tablespoon lemon juice.  Whisk that until it’s frothy.  

Eggs Benny Two Ways 5

Set the bowl over the pot and keep whisking.  Lift the bowl away from the heat every once in a while to make sure that it doesn’t get too hot and curdle.

Eggs Benny Two Ways 6

Keep whisking until you produce a thick creamy substance that forms strings when you lift the whisk away.  This is called a sabayon, and that’s basically the structure of your Hollandaise base right there.

Eggs Benny Two Ways 7

Away from the heat, and whisking all the while, trickle in your nice hot melted butter and mix until fully incorporated.

Eggs Benny Two Ways 8

Season with salt and pepper.

Eggs Benny Two Ways 9

And maybe a little Tabasco sauce.  Taste it and season again accordingly.

Eggs Benny Two Ways 10

Keep the Hollandaise warm (but not hot) while the rest of your chaotic morning is going on.  I did this by putting it a bowl of hot water.  This is enough sauce for 4-6 eggs, by the way.

Eggs Benny Two Ways 11

You should also be toasting your English muffins (if you’re using them) and frying up your fish cakes (which you should be eating because they’re awesome).  And if you’re using peameal bacon, fry that up as well.

Eggs Benny Two Ways 13

Eggs Benny Two Ways 15

Now everything else is a matter of timing.  Everyone has their own methods for poaching eggs, and how long they take will depend on the size of the egg, how many you are cooking, water temperature, blah blah blah.  Gordon Ramsay had a neat tip, though: swirl the water into a vortex before sliding in your egg.  The circular direction of the water will ensure that all those little tendrils of egg will end up stuck to the egg itself, making the finished product nice and round.  I also tried the Julia Child method here, where you poke a small hole in the fat end of the egg with a pin.

Eggs Benny Two Ways 2

Then you get your water simmering and you dunk each egg for 10-15 seconds and then you haul them out.  This pre-cooks the whites a little bit so the egg stays in shape a bit better.

Eggs Benny Two Ways 12

THEN you add a bit of vinegar to the water.

Eggs Benny Two Ways 17

And crack your eggs into the barely simmering stuff, one by one. Let them do their thing for 3-4 minutes, depending on how hard you like ’em poached. When they were done I plopped them in a bowl of hot water to stay warm while I set everything up.  This also washes the vinegar off the eggs. Drain them on a clean towel before you put them on your muffins or they’ll get soggy.

Eggs Benny Two Ways 20

Smear a dab of Hollandaise on your toasted muffin, layer on a piece of peameal bacon, follow that with the egg and more Hollandaise and a sprinkle of parsley or chives and salt and pepper.

Eggs Benny Two Ways 18

Eggs Benny Two Ways 22

Alternately, plop a dollop of sauce on your crispy fish cake, ladle on the egg, more sauce, and a flake of smoked salmon.

Eggs Benny Two Ways 19

Eggs Benny Two Ways 21

Eat it while it’s hot!

Eggs Benny Two Ways 24