Busy Board

Busy Boards 9

I didn’t take as many photos of this as I should have, but it kind of came together in fits and starts when I could work on it and I may have forgotten my camera a few times. In any case, this is a great gift for the toddlers in your life, and it’s very simple to make: grab a board, paint it up, add bits of hardware and you’re set. It’s all the stuff that small children are fascinated with around the house in one convenient spot where they can play with it safely.

So I started with a wide pine board, which I cut in half. I made one for Rosa and one for Gen. Zod for Christmas.

Busy Boards 1

Drilled screw holes at all the corners so it could be mounted on the wall for added security.

Busy Boards 2

I later put felt at the corners as well so it could also lay flat on the floor without damaging anything.

Busy Boards 11

Sanded and spray painted it.

Busy Boards 3

Added stripes to make it look like a construction sign.

Busy Boards 4

Busy Boards 5

Busy Boards 6

They didn’t come out perfectly, but if you’ve ever seen the types of signs the construction workers make around here this is a freaking masterpiece in comparison.

Busy Boards 7

Then I gathered an assortment of hardware: slide bolt (also known as a barrel bolt), casters from my old computer desk, a padlock, spring door bumper (the kind that makes farty noises when you twang it), a hinge from a door and a security chain. I discovered that if you screw one side of a hinge too tightly to its surface the hinge won’t turn (or won’t be moveable by a toddler in any case), so make sure to adjust that accordingly if you use one.

Busy Boards 10

Then I just painted around them with some craft paint for visual interest and added a little caution sign at the top. Now it’s a toddler trap, because they can’t stay away!

Busy Boards 8

A Fan of Summer

I did this a couple weeks ago, one sultry summer afternoon when I had nothing better to do than watch the Pie play The Last of Us and poke the dog while I sort of read a novel.  I was even running out of things to pack, and the fact that most of our stuff was now in boxes meant that I was scrambling for DIY post ideas for you guys that I could do with the materials at hand. I was pretty sure you were tired of lessons on how to clean things.  And I know I’m tired of gelatin.  The Pie is on a gelatin strike.  He may divorce me if I make anything else.

Fan of Summer 1

So I stared at the electric table fan that was pushing a desultory breeze through the window at the dog.  I’d inherited the thing a decade or so ago when my grandmother and grandfather downsized, and I have memories of playing with it at their place as a kid (which was why I took it).  So there’s a good chance that it’s as old as, if not older than, I am.  And that kind of makes it vintage, right?  But it’s also rather boring to look at, and over the years the plastic has discoloured and gotten grubby.

“I’m gonna paint that fan,” I announced.

“Are you now?” the Pie responded by rote as he murdered spore-infected citizens.  He’s pretty used to me spouting random words at him and has a variety of canned phrases he uses in reply.  The dog said nothing but spared me a mildly apprehensive glance.  Neither of them bother to ask me “why” anymore.  There’s not really any point.

“Yep,” I nodded, warming to the subject. “I’m going to paint it all retro-style … with a rainbow.”

“With a rainbow.”  When the Pie isn’t actually listening to me his brain will simply repeat the last things that went into his ears in a survival-mode attempt to imitate what he’s like when he’s paying attention.  For the record, I’ve cottoned on to this ploy now.  Only took me ten years.

“Mm-hm.  I’m gonna DO it.”  I sat quietly for a few moments while the Pie threw a bottle to distract a hostile gunman and Gren began to snore over my shoulder.  “I’m gonna do it tuh-DAY.”

So I grabbed my as-yet-unsealed box of craft paints, stirred myself up a tequila sunrise (I didn’t want to waste the orange juice sitting in the fridge after all), and got started.

Fan of Summer 3

First, everything that can come off the fan has gotta come off, so you can clean thirty-plus years’ worth of gunk out of the inner workings.  And despite the fact that I dust this sucker regularly, a summer of construction work outside means that the thing is full-on FILTHY.  Um, I don’t want to need to say this, but please make sure the fan is turned off and unplugged before you start dis-assembly.

Fan of Summer 4

Then I began to paint.  I knew it was going to take a few coats to get a nice opaqueness to it, but that was fine, I had time. Just a warning, if you decide to do this, that craft paint painted on smooth plastic WILL chip. If you wanted to use spray paint instead, use something designed to work on smooth surfaces, and make sure to tape off anything you don’t want covered.

Fan of Summer 5

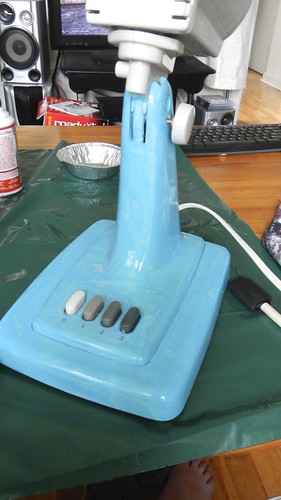
I thought a nice retro seafoam turquoise-y colour would be appropriate.

Fan of Summer 6

I decided to paint the fan blades in primary colours, so when they spun they would make a rainbow.

Fan of Summer 7

Fan of Summer 9

While the fan blades dried I worked on my second coat of the fan.  You can see it’s already starting to cover better.  I’m not that concerned with brush strokes showing, because really, who looks that closely at a table fan?  I painted the adjustment knob primary blue, mostly because I wanted to.

Fan of Summer 8

Then it was time to paint the grilles (or whatever it’s called).  I used Rustoleum in copper.  First I taped off the centre panel on the front grille because I was going to paint that a primary blue, just like the adjustment knob.  Then I painted.

Fan of Summer 10

Boy, it’s so easy to miss spokes when you’re using spray paint.  I went over the whole thing, inside and out, twice, just to cover any lingering white spots.

Fan of Summer 13

And pulled off the taped off area.

Fan of Summer 14

First coat of blue.

Fan of Summer 15

While that dried I put the rest of the fan back together.  Here’s the back grille.

Fan of Summer 11

Then the finished fan blades with their hardware that I painted black.

Fan of Summer 12

If you turn it on, it looks so cool!

Fan of Summer 16

This one makes me think of the “beachball” my computer shows me when I’m waiting for something to load.

Fan of Summer 18

Then with the front grille in place.  Now that I’ve done it in the primary blue I’m second-guessing myself.  I think I might paint it turquoise later.  We shall see.

Fan of Summer 20

Anyway, before and after:

Fan of Summer 19

Fan of Summer 2

Three-Dimensional Name Plate

3D Name Plate 26

I was perusing Not Martha a while back and she was talking about a company called graypants, which specializes in products made from recycled cardboard.  While that is totally cool and I am behind that all the way (someday I will make/buy these gorgeous scraplights), what struck me about this in particular was graypants’ company sign.  It was the company name, carved out of several sheets of stacked cardboard.  My first thought was that is so nifty.  My second thought was I can do that.

3D Name Plate 11

So I did.  With my nieces’ names.  I get these sheets of cardboard stuffed into some of my book orders at work as packing material, so they were a good (and lightweight and small, thereby mailable) surface to work on.

3D Name Plate 6

First I picked fonts to work with.  They had to be easy enough to cut out of cardboard, but also with enough difference in them to sort of semi-express my nieces’ very different personalities.  Hard to do in a font.

3D Name Plate 1

I printed the names, in their respective fonts, out and from that created a stencil on card stock for each. This was easily done by flipping the name over and tracing it in pencil on the back.

3D Name Plate 2

And then flipping it onto the card stock and tracing it again on the front.

3D Name Plate 3

Which left a faint pencil outline for me to cut.

3D Name Plate 4

3D Name Plate 5

Then I got to work.  Tracing the outline of the name twice onto each cardboard sheet, I carefully cut it out with an Xacto knife and some very small scissors.

3D Name Plate 7

3D Name Plate 8

This is definitely the most time-consuming part of the whole thing, and is tricky if you’re working with large or dull scissors.  I regretted my choice of that G early in the game, but kept going because it looked good.

3D Name Plate 9

I made each name ten layers thick, and glued the layers of each letter together with Mod Podge, which I think is my new favourite substance.

3D Name Plate 10

3D Name Plate 14

Then I took some acrylic craft paint and coloured in the sides of the thing, just for visual interest.

3D Name Plate 18

And then I painted the surface of the letters in a slightly different colour, mostly to hide my accidents when I failed to colour inside the lines.

3D Name Plate 20

Then I glued all the letters to each other, in the way that they best fit in terms of a glue-to-surface ratio. I used hot glue to stick the letters to each other, just for security.

3D Name Plate 21

I left off hanging materials, because I’m not sure what the girls will want to do with them and so I wanted to give them some leeway.

3D Name Plate 23

But I think they turned out rather well. The girls can put them on their bedroom door, their wall, or their desk — whatever they want!

3D Name Plate 25

Oddities in String Art: Arr, Sweet Arr, and the Howling Wolf

String Art 27

Okay so I’m definitely behind the trend on this one, but it looks like so much fun that I had to try it out.  When I asked Stef what he and the Stone would like me to make for them for Christmas, he suggested some form of decoration for their home.  And as Stef is my favourite pirate, I made him a skull and crossbones. For a little bit of contrast I used gray crochet thread on the crossbones part, so you could differentiate it from the rest of the skull.  Then I thought it would be cute to add a cross-stitched platitude to the bottom in a nice bright red.  Instead of Home Sweet Home, I thought that “Arr, Sweet Arr” would be more apropos.

String Art 28

String Art 25

These beautiful copper carpet tacks belonged to my great-grandfather (who never threw anything away) and they look fantastic against the wood.  You can use any kind of nail you like, provided it has a decent-sized head.

String Art 6

For the People Downstairs, whose last name is lupine-related, I made a slightly cheesy wolf howling at the moon.  To get the template, I simply drew a large circle and then freehanded the wolf silhouette.  It took a couple tries, because I am not the artist my mother is, but it ain’t bad. It only kind of looks like a corgi.  But that’s cool too.  I used a more delicate white thread to pick up the slightly more elaborate pattern.

String Art 29

String Art 26

Because of my latent inability to cut anything in a straight line, the Pie was kind enough to do the sawing for me, as I had to cut this piece of craft board (which I bought from Kent) into smaller pieces.  The wolf piece is 12″ x 12″, and the pirate piece is 12″ x 16″.

String Art 1

Spray paint the boards the colour of your choice.  Black is a good go-to background.

String Art 2

You can see how there’s a mottled texture to my paint — I ran out of one can of spray paint partway through, and like a good little soldier I sat there and drained all the air out of the can so it could be properly disposed of.  Because it was occasionally spitting paint at me while doing this, I figured I’d do it while pointing it at my painted surface.  And thus the weird texture.  But I’m going to roll with it. It adds character.

String Art 3

While that is drying, work on your design.  On a piece of paper, sketch out the outline of the shape you want.  Mine are obviously pretty simplistic, due to my lack of artistic skill (I’m the only one in the family who can’t draw, go figure), but you don’t want to get too complicated when it comes to string. Basic and slightly embellished shapes are probably your best bet.

String Art 4

Temporarily tape the design to your board, and carefully hammer in nails along the lines you’ve drawn, spacing them out evenly.  My board is only 1/4″ thick so I had to be careful not to hammer them in too far.

String Art 7

I found a pair of pliers kept me from hitting my fingers.

String Art 11

Once you’ve got all the nails in you can rip off and recycle the paper.

String Art 14

String Art 16

Now, with your thread or wool or string or whatever you’re using, tie a knot around one of the nails and start weaving the thread around the nails, back and forth across the space you want to fill.  Don’t worry too much about a pattern (unless that’s what you’re going for).  Stop when you’ve filled it as much as you want to.  It’s a pretty fluid thing.

String Art 18

String Art 20

String Art 22

And there you have it.  I screwed hanging hardware into the back and that is that.

String Art 23

String Art 24

Distractions: Easy Finger Paints

Finger Paint 13

It’s Christmas Eve.  If you have small children, I’m sure your nerves are frayed with their over-excitement.  We’re having enough trouble dealing with just Rusty today, and he’s over thirty.

Finger Paint 15

Why not whip up this quick distraction tool (from Easie Peasie, what a great name) for the young (and old) to keep them busy for a while.  It’s worth the mess, I think.

Finger Paint 9

In a small saucepan, combine 3 tablespoons sugar, 1/2 teaspoon salt, 1/2 cup corn starch, and 2 cups water.

Finger Paint 1

Heat, whisking often, until the mixture starts to thicken.  It happens all at once, so make sure you’re paying attention.

Finger Paint 2

BAM.

Finger Paint 3

If you keep going it will turn into plastic, so make sure it’s still stir-able when you take it off the heat.

Finger Paint 4

Remove from the heat and pour it into individual containers.

Finger Paint 6

Use food colouring to create the desired colours.

Finger Paint 7

Stir those colours in well.  Make sure you scrape the bottom and sides to get it all mixed in.

Finger Paint 8

I went with the classic rainbow.

Finger Paint 10

Keep the paints sealed and out of direct sunlight.  Give them a bit of a stir before using, because there will be a bit of a dry skin on top.

Finger Paint 11

When I was young my dad refinished our back room, where the laundry machines were, and the door to the backyard.  While it was empty, my mother chucked in a huge roll of craft paper and a pile of finger paints and I would spend hours back there, making a mess.  I’m handing these (along with a roll of craft paper) over to the Incredibly Little Hulk and Il Principe when they get back from Kansas so I’m sure I will be soon seeing some very painty little boys.

Finger Paint 14

Rainbow-Dipped Wooden Spoons

Rainbow Wooden Spoons 27

This is a great and quick gift for people who are just starting out in a new home.  When I saw it over at A Pretty Cool Life I knew I had to do it.  And maybe even jazz up my own wooden spoons while I was at it, though at present I only own two. You can never have too many spoons (especially when you’re entertaining and all is chaos), and these bright and shiny ones are a great accent for any kitchen.

Rainbow Wooden Spoons 24

So you need some spoons, wooden ones. The Pie and I picked these up at Winners for a reasonable price. We did two sets, six spoons each. And you need some craft paint. We had six spoons, so we picked up six colours. We went with Martha Stewart Crafts™ Multi-Surface Satin Acrylic Paint.  It had a nice finish, was easy to apply, and is guaranteed to be non-toxic and food safe.  And if you let it cure for 21 days, then you can pop these babies in the dishwasher with no worries.

Rainbow Wooden Spoons 1

I gave the spoons a quick sand with some fine-grade sandpaper to get some of the splinters and rough edges off.  Then I measured to see where I wanted the paint to go.  These self-healing cutting mats also make great ruler-like work surfaces.

Rainbow Wooden Spoons 2

Then I used masking tape along the line I measured and pressed it down securely to make sure the paint wouldn’t bleed under.

Rainbow Wooden Spoons 3

These are my own wooden spoons here.  I originally wanted to do a set of stripes forming a rainbow on each handle, with them being the reverse of each other, so I blocked off 1″ increments for my stripes, figuring I could do a few colours at a time.  Conveniently, my masking tape is also 1″ thick.

Rainbow Wooden Spoons 4

I wedged the spoons in plastic cups with some rocks in the bottom for stability.  This way they can dry properly without touching anything else.

Rainbow Wooden Spoons 5

Then I set up my palette in an old pie pan.  Re-use, re-use, re-use!

Rainbow Wooden Spoons 6

Then I painted.  It was easy.  Leave an hour between coats to make sure it dries properly.  I ended up doing three coats on the spoons I was giving away, though I only did one coat on my own spoons.

Rainbow Wooden Spoons 7

When I took the tape off my own spoons in order to mask off the already painted sections, I decided I liked the stripes just as they were.

Rainbow Wooden Spoons 8

And if you put the spoons together it forms a rainbow!

Rainbow Wooden Spoons 10

And of course the other spoons are raring to go, just waiting for their requisite 21 days of curing.

Rainbow Wooden Spoons 13

If you have a glass utensil holder, you can put them handle-side-down.

Rainbow Wooden Spoons 19

Or if not, have them handle-side-up.

Rainbow Wooden Spoons 21

Either way, they’re a cheery addition to my kitchen.  Can I keep them?

Rainbow Wooden Spoons 23

His & Hers Key Hooks

His & Hers Key Hooks

I love making useful things out of other things.  Especially when you can personalize it so you know that no one else has anything quite like it. This monogrammed key hook is a gift for a friend of mine.

The wood I found in the garage.  I needed to saw off the crooked end to make it straighter.  Little did I know that I am incapable of sawing things in a straight line.  So it’s just as crooked, but in the other direction.  But now it’s QUAINTLY crooked.  On PURPOSE.

His & Hers Key Hooks

The vintage-style brass initials, as well as the little crow with verdigris, I got from Dime Store Emporium’s Etsy shop.  What a neat place!

His & Hers Key Hooks

This aluminum plate I found on the street.  Conveniently it had been pre-weathered and pre-antiqued by the tires of passing cars.

His & Hers Key Hooks

These hooks I got at Wal-Mart.  Not everything can have such glorious beginnings.

His & Hers Key Hooks

Now you want to lay everything out beforehand, just to prove that you have a plan.  Having a plan is good when you don’t have any spare parts leftover if you should happen to mess it up.

His & Hers Key Hooks

After I’d cut the wood and sanded it baby-bottom smooth, I added hanging hardware, right off the bat.  I wanted to make sure that I wouldn’t damage or disturb any of the front stuff, which was why I did it first.

His & Hers Key Hooks

Then I wanted to stain it.  I had the option of three colours of Distress Stain, and one of India ink.

His & Hers Key Hooks

I thought I’d try the stains out first on another piece of wood, to see how they looked.  This was a good idea.  See?  I’m planning ahead again, not just winging it, which seems to lead to trouble sometimes.

His & Hers Key Hooks

I ended up going with the blue stain, and just doing the face of the wood.  Let that dry.

His & Hers Key Hooks

Then I used black acrylic paint around the edges.  Let that dry.

His & Hers Key Hooks

Then I screwed on the hooks. I had to use my world’s oldest drill to get the holes started for me, though.

His & Hers Key Hooks

But the screws went on and looked really good.

His & Hers Key Hooks

Then it was a simple matter to whip out the glue gun and hot glue the metal pieces into place.

His & Hers Key Hooks

And it turned out better than I thought it would, which is always a bonus.

His & Hers Key Hooks

Clapboard Coffee Stirrer Wall Art

DSCN3547

I saw this little tutorial over at Make and Do Girl and thought I would give it a try.  You can buy fancy versions of this on Etsy for hundreds of dollars, but I thought I could probably produce nearly the same thing for a lot cheaper. And of course, as is usually the case, I was right.

All you need for this is a frame, some paint, a paint brush, a sturdy pair of scissors (despite the wire snips in this picture, I found a set of poultry shears did the trick quite well), glue of some kind (I ended up using Elmer’s School Glue), and a bunch of wee sticks, like coffee stirrers.

Stir Stick Art

While I’m sure, if you are a regular inhabitant of Starbucks or Bridgehead or one of those places, you may amass a large collection of stir sticks over time, I preferred to get mine all at once and bought several packages at Michael’s, which is also where I bought the frame.  You can also use popsicle sticks for this, but then you have to compensate for the rounded edges.

Stir Stick Art

The first thing I did was paint my frames black, using some acrylic paint.  At first I only did the edges of the frame, but I noticed that the frame showed through the gaps in the stir sticks when I glued them down so I ended up painting the whole frame, even the part that is relatively hidden behind sticks.

Stir Stick Art

Then you need to pick a colour palette.  I had a set of Crayola watercolours that I was going to use, because I wanted the wood to show through the paint.  You can of course use any paint you want.  I made two pieces, so for the first palette I picked a series of greens and yellows, and then the second I went with oranges, reds, and then purples and grays.  Obviously if your frames are small, you should probably go with a smaller number of colours.  My frames were pretty long so I went with 7 or 8 different colours.

Stir Stick Art

Now you gotta paint them there sticks.  I laid mine out along the frame just to get an idea of how many I needed (in the end I had a handful of painted ones leftover so this turned out to be a good idea).

Stir Stick Art

Then you paint.  This took me quite a while as I had to do each stick individually and paint it twice (due to the character of my paint). If you use acrylic or something thicker you could just paint them in a batch, or dip them en masse in ink or a dye … whatever works for you. This is all you.

Stir Stick Art

Then you start laying them out.  I measured the sticks to fit in the frame and cut them accordingly.

Stir Stick Art

Then I cut those pieces up so that I could fit them together like patchwork.

Stir Stick Art

Then you start gluing.  And gluing.  And gluing …

Stir Stick Art

Despite these sticks all coming in a package together, they weren’t by any stretch of the imagination the same.  Some had slight curves, or were cut on an angle, and that made putting them together a little bit more of a challenge.  Because there were gaps between sticks at some points, I chose to apply glue individually to each stick rather than just put a blanket of it down on the frame.  It took longer, but I think it was a neater job in the end.

Stir Stick Art

When I got to the end, my final sticks were a little too wide to fit in the frame, so I just took a piece of sandpaper and filed them down a bit until they fit snugly.

Stir Stick Art

My orange and purple job turned out a little slanty, because some of the sticks I used were really angled, but I kind of like how it messes with your eye that way.

DSCN3539

DSCN3546

And these frames came with hanging hardware on both the short and the long sides, so you can hang them either vertically or horizontally.

DSCN3541

I made these originally as gifts, but they look so good on my mantle that I’m thinking of keeping them. They would make a good frame for my giant squid, once I figure out where to hang him …

DSCN3550

Drawing on the Furniture

On one of our various moves, my brother-in-law Rusty scratched the headboard of our bed.  Big time.  You can see it here.

Drawing on Furniture

Fortunately, until recently we had been using a box spring on our bed, which pushed the mattress up and concealed the scratch from view. Now, however, in preparation for our new memory foam mattress that will be arriving any day now, we have ditched the box spring (it’s gone into my office to make it into a guest room) and are using slats.  This makes the mattress wayyyy lower on the bed, and now, If I haven’t plumped the pillows up, you can see the scratch.

Drawing on Furniture

I’m not sure exactly what the finish is on our bed.  It’s something that’s not quite a veneer, not quite just paint.  Either way, I came up with an easy solution.  It turns out that Crayola’s black coloured pencil is the exact colour of our bed.  How convenient.

Drawing on Furniture

So I just coloured in the scratch.  It was that simple.  I mean the scratch is still there, because it’s pretty deep and shows up quite strongly in relief, but it’s a bit less obvious.  I also took the pencil around the bed and coloured in all the chips and nicks from the past seven years.  It worked beautifully.

Drawing on Furniture

If you have wood finish, why not try it with some brown coloured pencils?  I have heard as well that rubbing a walnut over wood scratches helps to hide them.  Try it!

Drawing on Furniture

Filing Facelift

Happy 400th post!

Filing Facelift

After I finished reorganizing the library at work I ended up with about two dozen of those cardboard magazine files that I no longer needed at the office.  I thought I could use a few in my home office, to keep my teaching stuff separate from my thesis stuff, and the Pie could always use some organizational aids.

Filing Facelift

The problem is, of course, that these are old, ugly, and UGLY.  So they needed a bit of a facelift.

First I took the suckers outside and used a can of spray-paint on them in an attempt to make them less ugly.

Filing Facelift

Unfortunately they were SO ugly that I went through an entire can of paint and the ugliness shone through still.  I did, however, forget to wear gloves and thus my hands (and my rings) became encrusted with paint.

Filing Facelift

Luckily a bit of vinegar, baking soda, and a pipe cleaner got them shiny again.

Filing Facelift

Can’t say as much for my hands though.

Filing Facelift

Anyway, I also had a can of spray gesso, and so I went with that, and it worked a lot better.  I only focused on the front part of the holder, the part you were going to see, so I didn’t feel I was wasting it on surfaces I wasn’t planning on showing.

Filing Facelift

Then I painted.  I stuck four together, upside-down so the angle was a good one for working, and got going with some acrylic craft paint.

Filing Facelift

A few vines and some grass.

Filing Facelift

Fun with rubber stamps.

Filing Facelift

More rubber stamps.

Filing Facelift

And the finished product, on my shelf.  Okay, it’s not my best effort, but I’ve been a little preoccupied recently and it’s better than what was there before.

Filing Facelift

Here are two little ‘uns that are going to play host to all of the Pie’s fighting games.  When I get more paint I’m going to do the Street Fighter logo across them to make him happy.

Filing Facelift

You can also use wrapping paper or wallpaper or even fabric to jazz up your holders.  Just trace the outline of the box onto the paper or fabric.

Filing Facelift

Cut it out.

Filing Facelift

Grab yourself some double-sided tape and slap it on. I am a huge fan of double-sided tape. I put that *%#! on everything.

Filing Facelift

You might have to trim the edges a bit afterwards but it’s easy peasy.

Filing Facelift