I love this cake. The Pie and I have made it a few times now and it’s always a big hit. If you like angel food cake, this will be your new favourite incarnation of it. The gluten-free factor raises this cake to all new levels of melt-in-your-mouth goodness. I highly recommend it, although you do go through an entire carton of eggs every time you make it. While you’re trying it, you should also check out the Gluten-Free Homemaker, where I got the recipe.
Preheat your oven to 350°F and grab yourself a nice old tube pan. The plain aluminum ones are always the best for this kind of stuff. DO NOT GREASE IT. I’m pretty sure that greasing an angel food cake pan will start the apocalypse, but I’m too afraid to test out that theory.
Separate 12 eggs. Save the yolks for something awesome (like custard), and plop the whites into the bowl of an electric mixer.
Add to that 1 1/2 teaspoons cream of tartar and 2 teaspoons vanilla and leave that to warm up a little. Room temperature whites will foam up more than cold ones.
In a small bowl, sift together your flour ingredients. I adapted mine recipe here a bit just for availability’s sake. So, put together 1 1/3 cup icing sugar, 1/4 cup cornstarch, 1/2 cup tapioca starch, and 1/4 cup rice flour. Add to that 1 teaspoon xanthan gum and 1/4 teaspoon salt. Set that aside for the nonce.
Start your mixer and begin to froth up your egg whites. When you get to this level of foaminess, you can start adding in, a little bit at a time, 1 cup granulated sugar.
Keep going until the egg foam forms stiff peaks and the stuff can support the weight of the mixer attachment.
Gently fold in the flour mixture a bit at a time. It will not want to mix in. Be patient, and very gentle.
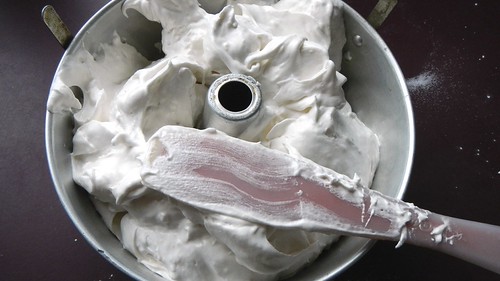
Smooth your batter into your tube pan.
Make sure to level the top as best you can.
Bake for 35 minutes, until the top is golden brown and dry-looking. You’ll see some cracks, too — that’s good. Invert the pan on its legs or on the neck of a sturdy bottle and let that cool completely.
When you’re ready, carefully wiggle the cake out of the pan with the aid of a knife.
The best way (in my opinion) to top an angel food cake is with some vanilla-flavoured whipped cream and fresh berries, which is what you see here.
A few berries became a lot of berries, but the more the merrier!
I had eight egg yolks leftover from a previous recipe and I was originally going to make Momofuku’s crack pie (because the Pie had requested the same). But then I realized that the recipe makes TWO pies, and I don’t really like the dish itself — it’s just too sweet for me. No way can I work through one of those pies, let alone two. So I decided to make Smitten Kitchen’s Poppy Seed Lemon Cake instead. Not to be mistaken for lemon poppy seed cake, this crumbly confection has a mere hint of citrus and a heckuva lot of crunchy seeds.
So if you want to go this route, get to it! Preheat your oven to 325°F and then generously butter and flour a 8″ fluted Bundt or tube pan.
Go ahead and butter the dull side of a 10″ piece of tin foil while you’re at it (helpful hint for North American readers, at least: foil comes in 12″ wide rolls, so if you tear off a near-perfect square you should be all right).
Melt 2 sticks unsalted butter (1 cup, or 1/2lb) and set that aside to cool a bit.
Scrub 2 large lemons and grate the zest from them.
Now, in the bowl of your electric mixer, plop 1 whole egg, 8 egg yolks, and 2/3 cup granulated sugar.
Beat that up on medium-high speed for about 8 minutes (I’m not even joking). Watch how the mixture transforms to this pale and fluffy amazingness. Beat in the lemon zest.
Sift on top of that 1/2 cup all-purpose flour, 1/2 cup corn starch, and a pinch of salt.
Use a rubber spatula to fold that in. The corn starch will make the spatula catch against the edges of the bowl but you must persist.
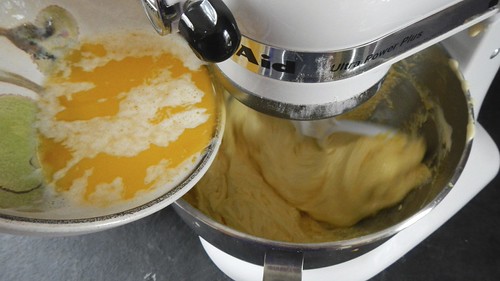
Put the mixer on medium speed and trickle in the butter.
And then add in 1/2 cup poppy seeds. I know, it’s a lot of poppy seeds. Don’t worry, it’s not going to get you high.
Pour that into your prepared pan.
Use the buttered tin foil to tightly seal the top of the pan (this keeps the cake from drying out and allows its own steam to make it a little fluffier).
Bake that sucker for 45 minutes, until the cake begins to pull away from the sides of the pan and a skewer inserted in the centre comes out clean. Take the foil off and let the pan cool on a wire rack for about 15 minutes.
Then invert the pan and let the cake fall out. If you buttered the pan enough this won’t be a problem, but if it sticks, use a butter knife to gently pry it away from the sides of the pan.
Let the cake cool for at least 30 minutes before serving (or it will fall apart on you). Dust the top with icing sugar as decoration.
Now, I didn’t feel right wasting the juice of those 2 lemons, so I heated up the juice, together with about 3 tablespoons of sugar, to make a wee glaze to go on top, to boost the lemony-ness of the cake, for those who were interested.
Angel food is one of my favourite cakes, always has been, even since I was a child. My mother would rarely make it because without a stand mixer it’s kind of a pain in the ass. With my lovely Kitchenaid this whole shebang is a breeze.
This is one recipe where I follow the rules to the letter. You really can’t mess with the science of this cake. Angel food is basically an enormous meringue with flour and sugar suspended in it, so you have to be pretty rigid with how you make it. You also absolutely NEED a tube pan or bundt pan to make angel food cake. The batter won’t cook evenly without that empty space in the middle. Trust me, I’ve tried it. Bad things happen. Tube pans are generally better to use than bundt pans simply because the tube on the pan is generally taller than the rest of the pan to allow you to invert it, or the pan comes with legs on the top that let you do the same thing.
I got this recipe a few years ago from Cooking for Engineers, and I think it’s fantastic. It’s a good way to fancy up an easy cake. The only change I made to this recipe was to double the amount of stewed strawberries, as the last time I made it I didn’t feel like I had enough.
Preheat your oven to 375°F.
In a bowl, whisk together 1 1/2 cups cake flour or all purpose flour and 1/3 cup granulated sugar. Then sift that stuff together with a sifter. I like the handheld squeezy sifters because they make my life easier and they’re fun. You want to sift your solids a couple times to make sure the sugar and flour are fully incorporated.
Now you need the whites of 12 eggs (about 1 1/2 cups). You can either separate them yourself or buy them in a carton – the choice is yours. Just make sure that if you separate them yourself you don’t get any yolks mixed in with the whites – whites don’t get all that fluffy when there is fat mixed in. We’ll figure out something to do with the yolks another time, but until then you can wrap them tightly and put them in the freezer. Bring the whites to room temperature. You can do this quickly by putting the bowl of whites inside another bowl of warm water. Room temperature whites will make a bigger foam than cold whites. FACT.
Put your whites in your mixer and let ‘er rip. When the whites begin to look frothy, add in 1/4 tsp salt and 1 1/2 tsp cream of tartar.
When the whites have formed soft peaks, whisk in 1 1/2 tsp vanilla and then whisk in 1 1/3 cups granulated sugar, a little bit at a time.
Soft peaked meringue
When the whites have formed stiff peaks (ones that don’t droop), stop yer mixin’ and take the bowl out the mixer.
Stiff peaked meringue
Sift the flour mixture onto a thin layer on top of the whites, a bit at a time, and fold in gently with a wide spatula. Be very gentle so you don’t disturb the millions of little bubbles. Keep adding layers of flour until you’re out of stuff to sift, and keep folding until it’s all in there.
Fold gently - don't disturb the foam!
Gently scoop the mixture into a spotlessly clean and un-greased tube pan (grease + meringues = not so good). Level the top with a spatula and ease it into the oven for 35 minutes, until the top is a lovely golden brown.
Remove the cake from the oven and immediately invert the pan. I like the old wine bottle trick, where you invert the pan and stand it on the neck of a full bottle of wine. Inverting the pan prevents the very fragile cake from collapsing on itself as it cools, and putting it on a wine bottle allows for sufficient air flow underneath to speed the cooling process. Don’t touch the cake for a couple of hours until it is completely cool. Not to fret – the cake will not fall out on its own – you didn’t grease the pan, remember?
The old wine bottle trick
While the cake is baking/cooling, you can make your strawberry goo. You can also do this the day before, which is handy if you’re having a dinner party.
In a pot, combine 1/3 cup granulated sugar, 1/2 cup water, 1 tbsp lemon juice, and 8 oz frozen strawberries. Now, the last time I made this recipe I didn’t have enough strawberries, so I decided to up the amount. Therefore, I dumped in an entire package of frozen strawberries, which was 600g, or about 21 oz. This was a goodly amount for my purposes, but it does end up leaving you with a lot of extra glaze. I froze my extra glaze for some invention at a later date.
Anyway, stir your pot mixture to dissolve the sugar while you bring it to a boil, then reduce to a simmer and cook for about ten minutes. I don’t recommend covering the pot and walking away. Bad things happen. My house still smells like burnt sugar. Keep an eye on that sucker.
The strawberries should be super gooshy at this point. Remove the pot from the heat and strain your solids from your liquids by pouring the mixture through a sieve into a measuring cup. Make sure to get as much liquid as possible from your solids and set them aside.
Mmmmetric . . .
Return the liquid to the pot and bring it to a simmer again. Whisk 1 tbsp corn starch into 3 tbsp water and pour the suspension into the syrup. Bring the syrup to a boil again, stirring often. This will activate the starch and cause the syrup to thicken. When it does, remove it from the heat. Set the syrup aside to cool, then refrigerate for a while until cold.
Cooling the goo.
Now back to the cake. Once it is completely cool you can set it upright again. Run a thin knife between the cake and the pan to loosen it. Make sure to run the knife around the tube as well. If your tube pan has a separating bottom, you can now just lift out the bottom panel and run your knife around that to free the cake. If not, jimmying the knife around and jiggling the cake itself generally helps to get it out of the pan.
Knife that sucker.
Put the cake on a clean surface, and using a long serrated knife, cut the cake equally in half horizontally. Try to keep your lines straight.
Cut it in half horizontally.
Remove the top half of the cake and set it aside. In the bottom half, use a spoon or your fingers to scoop a shallow trough in the cake all the way around, like a wee moat. You can eat the bits that you scoop out, mmmm. Fill the moat with your strawberry solids, all the way around.
Fill the trough with solid goo. I mean strawberries.
Put the top half of the cake back on and pretend that you never cut it at all.
Take your chilled glaze and, using a spatula, silicone brush, spoon, or whatever is easiest, coat the entire cake, even in the little hole, with the glaze.
Blazing Glaze!
Put the glazed cake aside until you are ready to serve it. A little bit of time also allows the glaze to set a bit. Right before serving, whip yourself up some cream, about 1 1/2 to 2 cups whipping cream, with 1 tbsp granulated sugar and 1 tsp vanilla. Over-whip the cream a bit so it’s stiffer and maintains its shape.
Slather the whipped cream all over the cake, even in the hole in the middle, until it’s evenly covered. You can go for the smooth-looking approach by using a long knife, or you can go crazy with whorls and cowlicks and whatever. I like to dump about 2-3 cups of fresh sliced strawberries all over the top and into the hole before serving. Oh man, oh man . . .
Slather with whipped cream and strawberries right before serving.
Cover left-over cake (hah, as if that’s even possible) with plastic wrap and refrigerate for up to a week, if it lasts that long.
Wrap the cake with plastic wrap and it will keep for a few days, though it will sag a bit.


 Angel food is one of my favourite cakes, always has been, even since I was a child. My mother would rarely make it because without a stand mixer it’s kind of a pain in the ass. With my lovely Kitchenaid this whole shebang is a breeze.


 Gently scoop the mixture into a spotlessly clean and un-greased tube pan (grease + meringues = not so good). Level the top with a spatula and ease it into the oven for 35 minutes, until the top is a lovely golden brown.


