

Beware: this is a very long post!
Because I love my husband and because I support his weird video game addiction (I did make him a cake after all), I agreed to make up some t-shirts for an upcoming tournament in my hometown of Dartmouth, Nova Scotia, in May.

Screen printing in a studio is awesome and you can do all sorts of fun stuff. And fortunately nowadays (unlike when my mother was an arts student), the materials you use won’t kill you. Which means you can do this stuff at home, too!
DESIGN
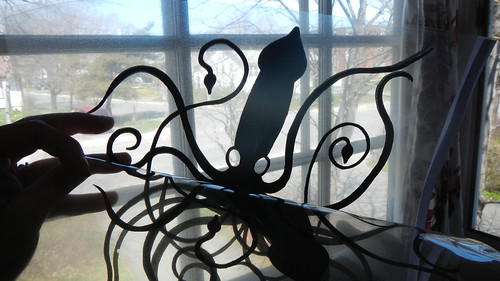
First you need a design. For our first attempts, we decided to work with something simple: a giant squid for myself. Because I love giant squid.


After several attempts, I had something I liked. I didn’t notice, however, that I’d put an extra tentacle on the thing.

But after photoshopping it looked pretty good. Pick something simple with high contrast.

Then copy it onto a transparency — this way you won’t have to cut it out. If you have a strongly black and white design you could just print it out in black on white paper and cut it out.

Now, the first time we tried this it didn’t work (I will show you that later), because the transparency printings weren’t as opaque as they should have been.
Having learned from that, we printed our images in triplicate, and lined them up. You can see in the photos below how the opacity increases with each layer.


After carefully lining them up, tape them together with a bit of clear tape.

PREPARING YOUR SCREENS
And now for your screen. We ended up buying a kit from Urchin downtown to get us started, but we also made a few of our own screens.

This is the Speedball screen that came with the kit. This is the squeegee side, where you will burn your image and spread your ink.

Here is the print side, which will be going flush against your fabric.

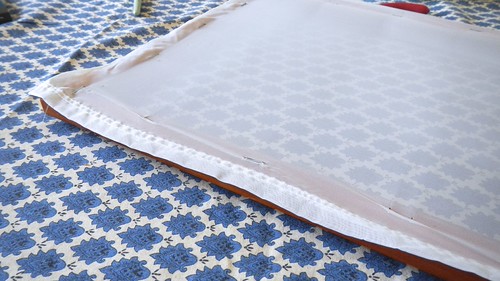
To make your own screen, you need frames and screening. Here I have some sheer polyester that I picked up from Value Village. It’s denser than, say, pantyhose, which means that the details will come out much more finely, but it’s also hole-y enough that you can squeegee paint through it, which is kind of key.

And I have these picture frames, also from Value Village. Take out the glass and the picture and everything and you can staple your fabric onto your frame using a staple gun.

Pull it relatively tight — not so much that it buckles or tears around the staples, but tight enough that there are no wrinkles and you could run a squeegee up and down it with no worries.


Give your finished screen a scrub with warm water and a bit of dish soap and leave it to dry.

Use tape to line around the outside of the frame on the screen so paint won’t go all over everything and make a mess. I used hockey tape because it’s pretty waterproof and sticks well to fabric, but I’m sure there’s some specific tape you should really be using.

Do it again on the inside of the frame as well.

Oh yeah, and you need a squeegee. If you don’t have one, you can get away with using a piece of stiff cardboard. Who came up with the word SQUEEGEE anyway? It’s fantastic.

Okay so we’re almost set here. Do you have photoemulsion? You should get some — it’s kind of key. It’s a weird greenish stuff that will turn hard and waterproof under UV light. I got the Speedball stuff that comes with the kit. Make sure you follow the instructions on the back, as they’re all different. Normally it comes in two parts: the dark green Diazo sensitizer, which comes in a wee bottle and you add water to it:

And the blue photo emulsion base, to which you add the Diazo sensitizer. Once this is mixed, you can keep it in your fridge for several months. So you see here that it is green, indicating its mixedness.


Spread the emulsion carefully and in a thin, even layer all over your screen, on the FRONT side, and the back side. Use the squeegee to get a nice thin layer all over. The first time we did it we spread it on too thick and as it dried it dripped. Gross.


Quickly place the emulsified frame in a completely dark room. Lay it horizontally to dry for a few hours. Don’t let any light touch it. A nice big closet or a well-sealed box is a good place. Ideally you should set the screen bottom side down while you dry (not what is shown in this picture, because we did it wrong the first time), so you will need to prop the screen up so the wet side doesn’t touch your closet.

EXPOSING YOUR IMAGE
When you’re ready to burn the image onto your screen, you have to work quickly. Some people like to expose their images inside, under high-wattage light bulbs, but we did ours on the cheap and exposed them outside on a sunny day. Worked like a charm.
You’ll need your image (cut out from opaque paper or printed on transparency) and a sheet of glass that will fit inside the confines of your screen. And a dark towel or thick piece of dark fabric for wrapping your frame in while in transport.
In the dark (we shut the curtains to our bedroom and I stood almost IN the closet while the Pie held the door mostly shut), lay your image on the inside of your frame (on the squeegee side, and orient it the way you want it to look when it’s printed (as in, you don’t need to mirror this). Lay the sheet of glass on top so the image is fully covered and flattened down.
Now wrap the frame up in your dark towel so that the print side of the screen is resting on the towel, face down, and the rest is wrapped up around it. Take it out in the sun and lay it in a flat, sunny spot. Unwrap the towel so that the frame is resting completely on the dark surface (you want it flush so that there’s no chance of any reflection hitting the photo emulsion on the bottom and exposing it by accident). You can see that the dried photo emulsion starts out green.

And then in a few minutes turns a nice bluish. We left ours out for about ten minutes. Then you need to wrap it back up in the towel like a burrito and take it back inside.

Now you need a source of high pressure warm water, like a sink sprayer or a shower head, and a nylon scrubbing brush (like a dish brush).
Working quickly, remove the wrapping, glass, and image from your frame and put it under the spray. Use the scrub brush on the parts where your image is to get the unexposed photo emulsion off. Scrub both sides vigorously until it comes clean.

If you exposed it correctly, the contrast between the blue exposed photo emulsion and the stuff you hid under your image will be quite good and the unexposed stuff will come right off. If you didn’t have an opaque enough image, then the contrast will not be good and the photo emulsion will not come off, and will in fact continue to expose as you work.

You can see this failed attempt only had a few spots that were truly opaque and so that was all that came off.

But this one worked pretty well, save for a bit around one tentacle that didn’t expose properly. But I can live with that.


After you’ve gotten all the unexposed photo emulsion off, let the screen dry in the sun for a bit (this will also cure the remaining photo emulsion).

And here’s one that the Pie did for his video games. He is using drawing fluid to fill in some pinholes in his exposed screen.

PRINTING
Make sure that you’ve washed and dried any fabric you are planning to print on first, to get rid of sizing and make sure that it has shrunk all it’s going to shrink. I picked up this handful of t-shirts at Old Navy and Michaels for cheap.

Protect your work surface and wear an apron — fabric ink is permanent, after all. If you’re printing clothing, put a piece of cardboard inside the t-shirt so that if ink comes through the fabric it won’t stain the other side.

Lay out your shirt flat and place the screen where you want it to go. For our initial test we used a piece of scrap cotton. Pour a line of ink on one side of the screen, on top of the emulsion.

Hold your squeegee at a 45° angle and using even pressure, pull the ink across the surface of your screen. It helps if you have another pair of hands holding down the screen frame while you do this. Do a second pass in the other direction. Experiment with the pressure you put on and the number of passes you do until you are satisfied with how the ink looks on your fabric.

Ease the frame off the fabric on an angle (so that one side is still touching the surface if you need to put it back down) and set the fabric to dry.

On our second pass I tried a blend of two different colours.

I tried to repaint the missing tentacle. It didn’t go well.

My two shirts, one in greenish-gray and the other in silver.

The silver wasn’t as opaque as I’d like it, but it’s still nice.

And the Pie’s two shirts.

When we did the yellow one we forgot to re-fill the pinholes and you can see they came out onto the fabric.

When the paint is fully dry (give it an hour or two), place your shirt on an ironing board and, with a sheet of paper between your design and the iron (no steam!), run the iron on hot over the design for a few minutes. This will “fix” the image and protect it from frequent washings.

Modeling. Sorry for the selfies.


Silver on blue …
Gray on orange …
Tada!
SCREEN CLEANUP
Unless you want to use those screens again, you’ll need to get the photo emulsion off as soon as possible. I used the ScreenClean stuff that came with my kit, but you can also use 1 cup of washing soda dissolved in a gallon of warm water.
Use a paint brush to apply the cleaner to both sides of the screen and scrub briskly with a nylon brush.

Apply the cleaner again with the paintbrush to both sides and leave it to sit for about 5 minutes.

Run under a forceful stream of hot water and scrub again until all the emulsion and cleaner has washed away.
Wow, that was a lot to take in. I hope it was easy enough to follow. If not, please let me know!
PEOPLE WHO DID IT DIFFERENTLY:
Here are some of the links to the other sites I checked out to learn how do this stuff:
How to Screen Print! Silkscreening at home – The Art of Doing Stuff
Screen Printing: Cheap, Dirty, and at Home – Instructables
Top Ten Worst Screen Printing Mistakes – Adventures in DIY Screen Printing
DIY Screen Printing – I Love to Create
Cheap screenprinting tutorial – Craftgrrl
How to Silk Screen Posters and Shirts – No Media Kings


