Izod’s Bookcase

Izod's Bookshelf 7

I had a totally different plan for this, but when it turned out that it was completely unfeasible, this one worked out really well instead.  When I first found out that Atlas was pregnant, I decided that the baby would get as a first Christmas gift from me a collection of my favourite children’s books.  I’ve been picking them up second-hand at various thrift shops, and I aim to continue to do so whenever I find one that is right.  But so far, I have a pretty good collection of Roald Dahl, some Doctor Doolittle, the Narnia series, and a few of the classics.

I bought the bookshelf at IKEA.  I wanted to re-vamp a thrifted one but I couldn’t find an appropriate one and this one was inexpensive and the exact size I wanted.

Izod's Bookshelf 1

I took off the back panel of the bookshelf and set it up against some nice blue fabric, which I cut to size.

Izod's Bookshelf 2

Then I glued it onto the back with hot glue.

Izod's Bookshelf 3

Because the fabric made the panel thicker, I used a craft knife to widen the slots on the back of the bookshelf.

Izod's Bookshelf 4

So now it fit, and it’s all in place.

Izod's Bookshelf 5

I’d originally planned a nice stencil here, with contact paper and spray paint, but I discovered that if you use spray paint on contact paper it peels back from the design and doesn’t work.  So I ended up free-handing Izod’s name here with craft paint and it worked out really well.

Izod's Bookshelf 6

And it’s all finished.  I hope he has many adventures with some of my favourite stories!

Izod's Bookshelf 8

Victorian-esque Hanging Mirror … from Toilet Paper Rolls

Victorian Mirror 31

Okay so I’m not really setting any trends these days when it comes to weird stuff I make that I find on the internet.  I must be getting old.  Or it might be that I seem to never be sitting in front of my computer anymore.  In any case, I made this thing, and you can see things like it all over the internet.  But this one is mine.  And I like it.  So the basic ingredients you need for this are toilet paper/paper towel rolls (how many?  MANY.), a mirror, and something to mount your mirror in.  In this case, I had a 10″ round mirror so I stuffed it in a 10″ embroidery hoop.   You’ll also need scissors and pencils and rulers and glue and paint and something to stick to the whole shebob so it hangs.  Sorry for the technical language.

Victorian Mirror 3

Geez, where to begin?  Okay, start with your paper rolls, which you have been assiduously collecting for a month or two.  Or three.

Victorian Mirror 1

Pull all the paper bits off them, of course. This is how many I had. I didn’t end up using them all, but I figured from the outset it would be useful to cut them all in case I needed them later.

Victorian Mirror 5

Then I measured the depth of my embroidery hoop, which was about 1/2″ inch.

Victorian Mirror 6

So then I cut all the paper rolls into 1/2″ segments, to match.

Victorian Mirror 8

Now, I discovered that the mirror didn’t fit in the embroidery hoop if the inner hoop was still in place …

Victorian Mirror 9

So I took it out and tightened the outer hoop and that was fine.

Victorian Mirror 10

I set the hoop (minus the mirror) on my work surface, and then started thinking about a plan. There are many different patterns you can make with those little paper cat’s eyes.

Victorian Mirror 11

Victorian Mirror 12

But I figured the best way was to lay it out around the hoop and see what it looked like. This was one incarnation. I may do that one again sometime.

Victorian Mirror 13

Then it all started to come together. I had a design in mind similar to those overly ornate Victorian embellishments, so that’s kind of what came out.

Victorian Mirror 14

Victorian Mirror 15

I figured I would freehand the rest. So then I started gluing, using a hot glue gun.

Victorian Mirror 16

But at the top, I had that screw to contend with.

Victorian Mirror 17

So with some poking of holes and cutting of slits and things I got it all worked out.

Victorian Mirror 18

Then you just kind of keep going.

Victorian Mirror 19

Victorian Mirror 21

When I was satisfied with the number of pieces of paper I’d glued together, I tested out the size and weight. Remember that adding a glass mirror to your design will make it significantly heavier.

Victorian Mirror 22

Then I painted. I bought a craft spray paint that was supposedly designed specifically for wood and paper. It turned out to be a different colour than advertised, and it seemed to just get absorbed into the paper and wood, but that was fine. I finished it off with a spritz of glitter and some sealant and there it is.

Victorian Mirror 23

Back onto the work surface, face down.

Victorian Mirror 24

I set some erasers inside the hoop to hold the mirror at the height I wanted it.

Victorian Mirror 25

I bought this mirror from Value Village years ago and I think it was one of those display mirrors for crystal collections, so it already had this nice felt backing on it. I did two tracks of glue around the border and then extra-glued on a piece of hanging hardware.

Victorian Mirror 27

It’s cloudy today but you get the idea. I’m quite pleased with it.

Victorian Mirror 30

Bay Leaf Wreath

Bay Leaf Wreath 26

It’s getting to be that sort of holiday season, isn’t it?  I have a post coming up for you about some decorations on the cheap that I did last year, but in the interim, if you’ve got a bit more time, why don’t you make yourself a new wreath?

For some reason, at some point my mother bought an enormous bag of bulk bay leaves.  And she has used probably three of them in the past five years.  And even dried bay leaves don’t hold their flavour for five years.  Rather than throw them out, however, I thought I would make a seasonally-appropriate wreath with them instead.

Bay Leaf Wreath 3

Normally when I’m making a wreath I buy a cheap ugly pre-made one from a second-hand store and then I take it apart. This time I bought a styrofoam wreath form from Michaels instead. I was SHOCKED at how expensive they are! This 11″ one cost me a whopping TWELVE DOLLARS. For a piece of styrofoam. Next time I’ll cut my own out of computer packaging or something, thank you very much … Fortunately I also found a bag of assorted jingle bells at Value Village for two dollars so that saved me. And of course I had my trusty glue gun on hand.

Bay Leaf Wreath 1

The first thing I did was spray the wreath form all over silver with spray paint. Which was when I learned that even craft spray paint will dissolve styrofoam a little bit. Yikes.  I did this just in case there were any gaps in my leaves.  I wanted the whole thing to be silver.

Bay Leaf Wreath 8

I wanted my jingle bells to stand in as pseudo-berries, so I wanted to spray them red. However, I wanted them to be a frosty red, so I only sprayed one side of each one with red spray paint. If you wanted to spray all sides of each jingle bell I would recommend threading them on a long string so you can get all sides evenly.

Bay Leaf Wreath 7

Next I sorted out my bay leaves (pitching the broken ones) and sketched out a rough plan.

Bay Leaf Wreath 9

Then I started gluing. I used smaller leaves on the outside and inside edges of the wreath, so they would fit better.

Bay Leaf Wreath 11

Once I finished gluing on the leaves in the centre of the wreath, I started shoving random leaves in here and there, to fill in gaps but also to make the whole thing look a little less perfect.

Bay Leaf Wreath 12

So that’s with all the leaves glued on. If my bay leaves had been fresher I would have left this as-is for a nice festive green, but of course mine were past their prime and thus looked a little sickly.

Bay Leaf Wreath 13

This is my idea for how the bells were going to fit on. I was just going to group them in little batches and glue them on.

Bay Leaf Wreath 14

So after I sprayed the wreath silver again to cover up all the green bits, I got my bells ready to go.

Bay Leaf Wreath 15

To my dismay, however, I discovered that hot glue doesn’t stick to spray-painted bay leaves.

Bay Leaf Wreath 17

In fact it just peels the paint right off.

Bay Leaf Wreath 19

New plan. I grabbed my old spool of fishing twine and got to work with it.

Bay Leaf Wreath 20

I strung a handful of assorted bells on a loop of twine and tied the twine in a knot to keep them tight.

Bay Leaf Wreath 21

Then I simply tied the twine around the wreath form, weaving it under what leaves I could to hide it for the most part.

Bay Leaf Wreath 22

Then on the back I added a spot of glue to each twine loop to hold it in place.

Bay Leaf Wreath 23

And glued a nice blue ribbon on the top.

Bay Leaf Wreath 18

And then I hung it up. TADA!

Bay Leaf Wreath 27

Frosty Striped Vases and Pom Pom Flowers

Striped Vases 23

Neon seems to be the big thing these days.  While I’m not the hugest fan of neon colours (having grown up in the 80s and 90s when it was overused and used badly), I do like what designers are doing with it as an accessory colour.  I like the pop of these striped vases here, and the ombre finish of these ones here.  So I thought I would try out the effect of the rubber bands and the ombre, but with a different colour more suited to the taste and decor of the person to whom I am giving the things.

Striped Vases 1

I cut a bunch of glass bottles I had lying around down to size and ground down the sharp edges (for my tutorial on cutting glass see here). You can of course use any glass you have lying around, vases, tumblers, stuff you pick up from the thrift store.

Striped Vases 2

Before I really got into it, I thought I might do a test, first, on a piece of glass I wasn’t intending to use.  I have learned from many, many, MANY mistakes to always test a new effect first.  And you know what?  I hated it.  From a distance, I guess it was okay, but up close you could see all the places where the paint had bled under the rubber bands and/or peeled off as the elastic was peeled off.  I checked around the internet and it seems that others have had this problem as well, so I gave it up for lost.

Striped Vases 4

I am, however, still a fan of the IDEA of the rubber bands, at least, and I’ve become quite proficient at frosting glass.  I still have a jar of Velvet Etch left over from last Christmas’s present run, and while I don’t like it as much as Armor Etch, it’ll do perfectly for this project where I just want a light touch.

Striped Vases 9

So.  Take your glass.  Take a bunch of rubber bands, of different widths, and slap them on your vases, however which way you would like.  Mine are rather haphazard, which will go well with the fact that this etching cream likes to leave huge swaths of unfrosted glass behind.

Striped Vases 6

Then, wearing goggles, gloves, and a ventilator, slather on that etching cream (for my tutorial on etching glass see here).

Striped Vases 10

Leave the stuff on for the appropriate time, and then carefully rinse it off, making sure that your rinse water is mixed with some form of base (like baking soda) to neutralize the acid before it eats your sink.  Exercise caution when pulling off the rubber bands, as they tend to spit bits of acid at you if you snap them off too quickly.  Slow and steady wins the race here.

Striped Vases 12

Striped Vases 24

Now you can stop there, and just enjoy your vases as they are.  Or you could add a touch of whimsy so your receiver can put them to use right away: add flowers.  Fresh flowers are pretty expensive in these parts, and in the winter months it’s unlikely that they’re going to be locally sourced, so most of the people I know hem and haw over the idea of wasting money on a fresh bunch of flowers that will last only a few days and has come from who knows where.  Silk flowers are all right, but I find they get dusty really quickly.  But if you take flowers to the abstract, and make them from paper or fabric, I think they have a bit more pizazz.

Striped Vases 18

These ones I made from pom-poms.  Now, there’s a bunch of ways to make pom-poms floating around the internet.  The most popular method for trendy crafters seems to be the practice of wrapping the yarn around your fingers a million times and then simply tying that bundle together in the middle.  While that is certainly the quickest way, I find you end up having to cut off a large amount of excess yarn in order to make your pom-pom anything close to spherical.  The pom-pom method I used when making my touque-tastic tea cozy may take a while, but it’s worth it in the end.  What comes out of it is almost perfect from the get-go, and you can be happy with just a little bit of trimming.

Striped Vases 14

I modified the method a bit, in that I cut a slit in my paper double-donut and then folded back the edges of the slit.  This way you can run your winding yarn through the slit rather than having to feed it through an increasingly smaller hole.  Of course, you can’t keep winding around and around on this one; once you reach the edge of the slit you have to turn around and go back in the other direction but the results are more or less the same.

Striped Vases 29

These pom-poms I made from various tail ends of wool I had lying around.  Some I made really tight, some loose, and I wasn’t too careful about trimming them too precisely, because I wanted them to look natural (or as natural as flowers made from pom-poms can be). That one in the front left looks kind of like a wool celosia (brain flower).  Or we’ve just made a visit to Whoville and Dr. Seuss sent us home with a bouquet.

Striped Vases 26

Then you just need to find yourself some twigs that are to your liking.  If you feel around in your pom-pom you can usually feel the loop of yarn holding everything together.  If you give your stick a careful shove and get it inside this loop, the tension should hold it there.  If you’re worried about it falling, add a dab of hot glue.  The bonus of not gluing, however, is once you tire of the arrangement you can pull the pom-poms off and use them for something else.

Striped Vases 15

Then you arrange your “flowers” any way you like.  Like all in one big vase:

Striped Vases 16

Or in three small ones.  Whatever floats your boat.

Striped Vases 20

The T-Shirt Ring

T-Shirt Ring Etc. 20

This is a cute little last-minute stocking stuffer idea from Homemade Ginger.  You can do it with either hot glue or a needle and thread, and make all sorts of nifty floral accents.

What you need is an old cotton t-shirt, or any other jersey material.  The Pie wore this shirt for Hallowe’en.  He dressed as Peter Parker, the alter ego for his hero Spider-Man, so he just needed to paint the collar of a red shirt to look like he was hiding a Spider-Man costume under his street clothes.  So while he painted the top, I’m just going to use the bottom.

T-Shirt Ring Etc. 1

You’re going to cut the hem off the bottom, and cut several circles out of the main fabric.  You’ll also need a circle of felt, about the same size as your circles.  If you’re making a ring you’ll want the circle to be relatively small, whereas if you were making a brooch then the circle will be a bit bigger.

T-Shirt Ring Etc. 2

Take a pencil or toothpick or the end of a paintbrush and jab it into the centre of one of your fabric circles.  Scrunch it up around the paintbrush or whatever.  Put a dab of hot glue on the tip of that.

T-Shirt Ring Etc. 9

Stick the circle onto the circle of felt.

T-Shirt Ring Etc. 10

Repeat, sticking the circles close together, until you’ve filled up the felt.

T-Shirt Ring Etc. 11

T-Shirt Ring Etc. 12

T-Shirt Ring Etc. 13

Trim the result with scissors for tidiness.

T-Shirt Ring Etc. 16

To make a bracelet, measure your finger with the t-shirt hem and cut off an appropriately long piece, with a bit of overlap.

T-Shirt Ring Etc. 4

Glue the overlap down, then attach it, with the seam side hidden, to the felt.

T-Shirt Ring Etc. 5

For a ring, simply make the hem loop a little smaller.

T-Shirt Ring Etc. 7

For a brooch, and if you don’t have any of those handy jewelry backing pieces around, take a safety pin, cut two slits in another circle of felt, and slide it through so the working pieces are exposed.

T-Shirt Ring Etc. 3

Glue that to the other piece of felt.

T-Shirt Ring Etc. 15

That’s it.  Easy and fun.

T-Shirt Ring Etc. 19

Uncharted 3 Upcycled Jewelry Cabinet

Last year for Christmas, Rusty gave the Pie the collector’s edition of Uncharted 3: Drake’s Deception.  That’s a videogame, for those of you who don’t know.

DSCN3486

Anyway, the collector’s edition came in this huge sort of armoire/chest thing, and contained, in addition to the game itself, a 12″ figurine of Drake, the main character, together with a reproduction of his necklace, a thong wrapped around a ring supposedly belonging to the explorer Francis Drake.  It was pretty cool.  And once I saw the chest, I knew that we couldn’t throw it away, because it was so well made it would HAVE to be useful for something.  I lugged it home from Ottawa, as carry-on on the plane.  It made me grumpy at the time.  I like my leg room.

DSCN3488

So I’ve been staring at it for the better part of the last year, trying to figure out what to do with it.  With its magnetically-sealing door and its little flocked drawers, it pretty much cries out to be a case for some form of treasure, possibly a jewelry box.  In the end, that’s what I decided to do with it.

I’m going to make a sweeping assumption about my readership here and say that you probably don’t have a collector’s edition of Uncharted 3 lying around your house, so that you can easily reproduce what I’m about to show you.  If you do, then by all means, go for it.  But if you don’t, let this give you some inspiration to upcycle or recycle some other, pretty box, into something both functional and stylish.  For example, in my closet at my parents’ house I have stashed a wooden packing crate that held the wine my cousin Lindz brought us as a wedding present.  Some day I’m going to turn it into something epic.

But back to matters at hand.  For all its structural integrity, this box is still essentially made out of cardboard, so I have to be very careful in my assemblage and dis-assemblage of it not to mess it up.  And in order to decorate it properly (enough so it looks better than my usual half-assed attempts and I can give it to someone at Christmas), I am going to have to use every ounce of my limited artistic skills and patience.

First I’m going to outline my plan for you and then we can see how well I managed to carry it out.

At first I considered removing the decorative feet and top of the box and flipping it onto its back.  It would make the box easier to store, but it would negate the usefulness of those wee drawers.  So upright it was going to be.

DSCN3490

Then I was going to remove the feet and top anyway, just for cleaner lines, but then it occurred to me that I could use the top to hide evidence of my construction, so I should leave it on.  And if I was going to leave the top on, I should probably leave the feet on.  So the structural appearance of this cabinet would remain the same as it was.

DSCN3489

Now, my plan was to screw some small hooks into the “ceiling” of the cabinet, from which one could hang necklaces.  I would put a dab of hot glue on the screw end when it came out the top, and then hide the evidence by putting the top of the cabinet back on.

For earrings, I would remove this mesh piece of cardboard from the door and replace it with a larger piece of metal wire mesh, carefully glued in place.  I would have to make sure that there was room for the door to close with it in place.

And of course I would paint the whole thing.  I’m thinking a sage green, with lighter green and ivory elements, and perhaps a touch of black (because the flocking inside the drawers is black).  So that’s the plan, as it stands.

And, like my idol Hannibal from the A-Team is wont to say, “I love it when a plan comes together.”

First, the disassembly.  Using a box knife, I carefully cut off the top of the chest.

DSCN3493

And I did my best to peel off the filigreed game pouch from the inside of the door.  It was a rough job but I wasn’t too concerned, as that would be covered over later with the earring holder.

DSCN3492

I pulled out the drawers as well.

DSCN3495

Now for the messing-about. Part of my plan included putting little hooks inside both drawers to hang bracelets and other smaller things, just to keep them from getting in the way.

DSCN3500

I wasn’t planning on using the adhesive that they came with. I was going to use hot glue. I also cut off the little end bits of plastic left over from when I broke them off their holder.

DSCN3502

Then I painted them. I made them black so they would hide against the flocking inside the drawers.  It took a couple coats of acrylic to fully hide the white.

DSCN3503

I cut down the front of each drawer so that you could see inside more easily.

DSCN3510

Then I started to paint everything. I was working with acrylic on a smooth surface so it took a few coats to make sure everything stuck. I had considered lightly sanding the cardboard before I began but I didn’t want to risk damaging it. So I just used a lot of paint.

DSCN3512

I used Mod Podge to glue a piece of paper over the rough bit on the door. I wasn’t too concerned about the wrinkles. The whole thing would be covered soon anyway.

DSCN3514

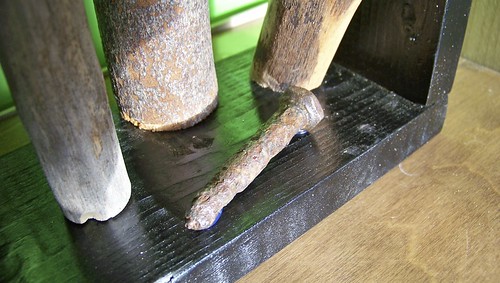
Screwing in the hooks for hanging necklaces turned out to be a snap. I just eyeballed where I thought they would go, and that ended up working out just fine.

DSCN3520

Some hefty daubs of hot glue ensured that they wouldn’t come sliding out again.

DSCN3525

This is how they look from the useful side.

DSCN3522

Then I cut a hole in the base of the top of the box, to accommodate the glued parts of the hooks. Then I just glued it in place and there we were.

DSCN3529

Now here’s where I hit my first (and really, my only) real snag. I had thought there would be enough room in the drawers for them to slide in and out even after painting. That, however, was not true. You can see here the damage done to the paint after I shoved a drawer back in and then had to wrestle it out again. Not good.

DSCN3515

But an easy fix, really. First, I glued the hooks in place inside the drawers.

DSCN3518

Then I cut down the front of the drawers even further.

DSCN3526

DSCN3531

Then I simply glued them in place inside their spaces, so you couldn’t pull them out anymore, but you could still access everything inside them.

DSCN3533

I had originally wanted some sort of wire mesh for the earring holder on the door, but I couldn’t find any that suited my purposes. I still had plenty of those wooden sticks leftover from my coffee stirrer wall art, however, and they would do just fine.

DSCN3551

I used hot glue to make a little lattice arrangement out of them, which I then painted silver. That nut you see there, which I also painted silver, is going to serve as the handle to open the cabinet.

DSCN3553

With the main structure of the cabinet completed and the initial painting done, it was time to consider the embellishments.

DSCN3554

I wanted to make a nice little border around the door to echo the shape of the box itself, but I wasn’t sure how the acrylic would take to having masking tape stuck to it. So I tested it on the back first, and left it there for a day.

DSCN3560

It seemed to be okay so I went ahead and masked out the front.

DSCN3572

Then I painted in two parallel lines, one in ivory, one in silver.

DSCN3583

I pulled the tape off before the lines were dry, to make sure that I wouldn’t pull off more paint than I wanted. I went a bit too fast at the end and lost a corner — the hazards of painting on a smooth surface, but nothing a touch-up wouldn’t fix.

DSCN3585

While waiting for the touch-ups to dry, I glued on the door knob.

DSCN3586

Then I stuck in the lattice.

DSCN3591

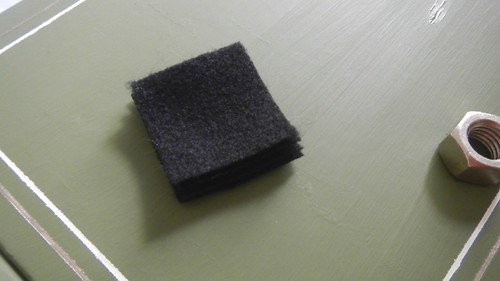
And also some felt squares to go on the feet.

DSCN3589

When it was all dry, I sprayed it with a couple coats of spray varnish. The stuff I used is designed to go on artists’ canvas, so it was ideal to go over the acrylic and dried really fast.

DSCN3609

And that’s it, it’s done.

DSCN3625

DSCN3627

I put some of my own jewelry in it so you can see how it will work. I don’t own any earrings so I hung the lattice with brooches instead.

DSCN3636

DSCN3639

DSCN3640

Those hooks hold up well.

DSCN3642

Plenty of room in the former drawers.

DSCN3644

And the doorknob holds strong.

DSCN3646

If I didn’t have too much jewelry to fit the thing I’d keep it for myself. I am so pleased with how well it worked out.

DSCN3645

And you can still see the copyright information on the bottom of the box, just so you remember its roots.

DSCN3648

And yes, it has occurred to me that now I have to lug it all the way back to Ottawa, carry-on on the plane and everything.  The price we pay to make our families happy …

For a dramatic juxtaposition of the before and after shots, look no further:

DSCN3486

DSCN3626

DSCN3488

DSCN3645

His & Hers Key Hooks

His & Hers Key Hooks

I love making useful things out of other things.  Especially when you can personalize it so you know that no one else has anything quite like it. This monogrammed key hook is a gift for a friend of mine.

The wood I found in the garage.  I needed to saw off the crooked end to make it straighter.  Little did I know that I am incapable of sawing things in a straight line.  So it’s just as crooked, but in the other direction.  But now it’s QUAINTLY crooked.  On PURPOSE.

His & Hers Key Hooks

The vintage-style brass initials, as well as the little crow with verdigris, I got from Dime Store Emporium’s Etsy shop.  What a neat place!

His & Hers Key Hooks

This aluminum plate I found on the street.  Conveniently it had been pre-weathered and pre-antiqued by the tires of passing cars.

His & Hers Key Hooks

These hooks I got at Wal-Mart.  Not everything can have such glorious beginnings.

His & Hers Key Hooks

Now you want to lay everything out beforehand, just to prove that you have a plan.  Having a plan is good when you don’t have any spare parts leftover if you should happen to mess it up.

His & Hers Key Hooks

After I’d cut the wood and sanded it baby-bottom smooth, I added hanging hardware, right off the bat.  I wanted to make sure that I wouldn’t damage or disturb any of the front stuff, which was why I did it first.

His & Hers Key Hooks

Then I wanted to stain it.  I had the option of three colours of Distress Stain, and one of India ink.

His & Hers Key Hooks

I thought I’d try the stains out first on another piece of wood, to see how they looked.  This was a good idea.  See?  I’m planning ahead again, not just winging it, which seems to lead to trouble sometimes.

His & Hers Key Hooks

I ended up going with the blue stain, and just doing the face of the wood.  Let that dry.

His & Hers Key Hooks

Then I used black acrylic paint around the edges.  Let that dry.

His & Hers Key Hooks

Then I screwed on the hooks. I had to use my world’s oldest drill to get the holes started for me, though.

His & Hers Key Hooks

But the screws went on and looked really good.

His & Hers Key Hooks

Then it was a simple matter to whip out the glue gun and hot glue the metal pieces into place.

His & Hers Key Hooks

And it turned out better than I thought it would, which is always a bonus.

His & Hers Key Hooks

Crayon Rainbows, on Canvas

Crayon Art

YARRRRRRR!  We be makin’ ARRRRRRRRT t’day, matey!  It’s also International Talk Like a Pirate Day for the Pastafarian religion, and I *may* have recently watched the first three Pirates of the Caribbean movies in a row.  Also, I live in Newfoundland, where people tend to talk like pirates on a daily basis.  It’s also the anniversary of the night the Pie and I went on our first date.  Eight years have gone by since that night, and so much has changed in our lives.  Crazy.  Tonight we are going to make ourselves a nice dinner and cozy up with our favourite orange, black and white wedding present, the inimitable Grenadier St. James.

Gren in Motion

In the meantime, however, why don’t you sit down and make yourself some pretty?

I saw a picture on Flickr of my cousin and his son making this particular project, and I thought it was so cool that I should try it on my own.  Then I discovered that this stuff is ALLLLL over the internet, especially Etsy, these days.  I’m no trendsetter, obviously.  Even so, I’m going to add to the plethora of posts about it, so that you can see it, Ali-style.

Crayon Art

Now, I’m being a real keener and starting my DIY Christmas gifts really, really early this year.  So I’ve pretty much taken over the dining room as my craft central, especially as now there is a large bed in my former office work space.

Crayon Art

For this project you will need some crayons (go with Crayola, it seems they melt the best), some glue (I used hot glue), a blank canvas (I used two small 5″ x 7″ ones, stacked, but you can use cardboard or wood or whatever you have on hand), and a hairdryer or other focused heat source.  I hear tell of people using paint strippers for this, but you really don’t need anything that hot.  Oh, and you’ll need newspaper or a drop cloth or something to protect the surrounding area from flying hot wax.

Crayon Art

For my first attempt at this, I thought I would go with a straight rainbow, before I got too fancy.  Plus I know someone who really loves rainbows, and this would make a nice little present.

Crayon Art

I started with the basic colours of the rainbow: red, orange, yellow, green, blue, indigo, and violet, and I laid them out on my canvas.

Crayon Art

Then I filled in the gaps with other colours in the spectrum.

Crayon Art

If Crayola has colours called things like this:

Crayon Art

Then why are they still naming colours like this?

Crayon Art

Then the question was, should I lay them out with their colour names facing up, or the Crayola logo facing up?  The Pie told me to go with the logo, because after everything is melted it will be easier to see than the smaller names.

Crayon Art

Then we glue.  I used hot glue on the crayon, and I only put it on the top half.  I wasn’t sure how it would deal with the melting wax, and I figured that most of the melting was going to go down on the lower half of the crayon.

Crayon Art

Then I used hockey tape to temporary secure my two canvases together.

Crayon Art

And I leaned it up against a shoebox (full of stuff, for weight) on top of my drop cloth and newspaper.

Crayon Art

Then I started in with the hairdryer, on its hottest and highest setting, focusing pretty closely on the bottom ends of the crayons.

Crayon Art

You can see how the wax tends to fly a bit.

Crayon Art

It took a while to get them started, but once they got going, they really got going.

Crayon Art

I liked how the wax crept around the sides of the canvas, and I wish I’d had a bigger one to work with.

Crayon Art

Let the wax cool and harden.

Crayon Art

Then you can hang it up, any which way you would like!

Crayon Art

Rack’ Em Up!

Rack 'Em Up!

This idea comes from Man-Made DIY, who, in turn, took inspiration from another designer. I love how the internet works.  I made a further spin-off of this when I made the jewelry stand for my niece.

This is a hat rack/coat rack/anything kind of rack made from fallen tree branches.  The wooden frame is made from old boards we scrounged out of our tipsy garage.  Don’t tell my landlord.

The branches came from fallen trees on that construction lot near our house.  You might remember that we cut down a bunch of saplings there in order to build our wattle fence (which I still haven’t finished, sorry).  These branches were ones that had already fallen due to hurricane-strength winds, or ones that were part of trees uprooted in the construction process.  So no trees were harmed in the making of this project.  Well, no trees were harmed by US, at least.

Rack 'Em Up!

We made two large racks, one for my dad and the other for Mrs. Nice.

First we cut up the planks we found in the garage, into 2 20″ lengths and 2 8″ lengths for each rack.

Rack 'Em Up!

With difficulty, we screwed them together.  The wood was pretty warped, so one one of the racks it came out a little crooked.

Rack 'Em Up!

Then we sprayed them black, because the wood wasn’t particularly interesting, visually.

Rack 'Em Up!

Then we cut lengths of branch to fit inside the rack frame.

Rack 'Em Up!

After sorting out what looked good where, we screwed those in as well.

Rack 'Em Up!

I later sprayed the top and bottom of the racks again to hide the screw marks.

Rack 'Em Up!

A finishing touch was a rusty bolt glued onto my dad’s.

Rack 'Em Up!

And some shells for Mrs. Nice.

Rack 'Em Up!

We left off hanging hardware because we weren’t sure where they were going to hang them.

Rack 'Em Up!

They look pretty good, all things considered.

Rack 'Em Up!

Functional, too.

Rack 'Em Up!

Packing Crate Jewelry Stand

Packing Case Jewelry Stand

This project was a spin-off of a spin-off of a spin-off (which I will be posting about later).  I figure at this point it counts as my own idea.  Especially since it turned out so well!

This is a Christmas present for my elder niece.  A little while ago, I gave her all my earrings, because I can’t wear them anymore.  So I figured I would build her something to store/display them, along with any other jewelry she has.

So for this project, I had everything I needed on hand, though I did purchase my very own hot glue gun for the event.  It was definitely much smaller, easier to hold, and less burn-y than the one my dad has.

Packing Case Jewelry Stand

You will need several straight-ish sticks, with protruding smaller branches.  It being windy season here in St. John’s, these were easy to find.  I also had a swatch of vintage-style lace that my mother gave me when I was studying at home last year.

And I found these segments of wood in the dilapidated shed in my backyard.  I’m pretty sure, due to their thickness and the fact that one of the pieces has part of “St. John’s” written on it, that it’s from some packing crate from some time ago.  I scrubbed off the cobwebs and left them to dry overnight.

Packing Case Jewelry Stand

Then I sanded off all the rough bits.

Packing Case Jewelry Stand

You will also need some nails or screws to keep your wood together.  I have this jar of copper clouting nails that belonged to my great-grandfather (you can tell, because he labelled it).  I like the colour of the bright nail heads, plus the thinness and the tapering of these particular nails means they won’t split the wood grain as much as a regular nail.  But they’re pretty much just large carpet tacks, so I have to keep in mind that they’re not that strong.

Packing Case Jewelry Stand

So first I hammered together the basic frame of the crate.  Now, I don’t have a vise, or any clamps.  So I’m using my knee.  Clever, I know.

Packing Case Jewelry Stand

I like the studded effect of many nails.

Packing Case Jewelry Stand

Cut the lace to the size of the frame.  The lace is how my niece will hang up her earrings, and will provide a nice background for the rest of the stuff.

Packing Case Jewelry Stand

Using hot glue, fasten the fabric to the frame on all sides.

Packing Case Jewelry Stand

Trim off the excess.

Packing Case Jewelry Stand

Add another line of glue and fold down the raw edge.

Packing Case Jewelry Stand

So here’s the front.

Packing Case Jewelry Stand

And the back.

Packing Case Jewelry Stand

Now I’m going to add a few more pieces of packing crate to the back, you know, to make it look a bit more like a packing crate.

Packing Case Jewelry Stand

Now to add the sticks.  Trim them to fit the inside of the frame and fix them in place with hot glue.

Packing Case Jewelry Stand

Keep going until you’re satisfied with how it looks. Here it is, in the setting sun.

Packing Case Jewelry Stand

And the back.

Packing Case Jewelry Stand

And with some of my jewelry on it.

Packing Case Jewelry Stand

A brooch stuck in the lace.

Packing Case Jewelry Stand

Even a wee branch for rings.

Packing Case Jewelry Stand

I hope she likes it!

Packing Case Jewelry Stand