

A little while ago you may recall that we did some MAD SCIENCE in the kitchen and created our own washing soda. Well, today, I’m gonna tell you what I made it for: skeletonizing leaves. I found some ancient leaves while walking in the park a few months ago, and they had been rotting for so long that only the skeleton of the veins remained. Two of them were complete enough that I took them home and stuck them in a book to keep.

Then I reasoned that, if you could buy leaf skeletons in craft stores (dyed all sorts of colours), that it must be relatively simple to speed up the natural decomposition process, right? Well, yes. And the internet came through. The easiest instructions I got came from The Idea Room, though I didn’t end up cooking my leaves for as long (because mine were much thinner, I think).

So anyway, here’s what you do. Step one: go outside (it’s okay, you can do it). Step two: pick up some leaves that you like. Greener ones are better the ones that have already changed colour, just because they’re less brittle and usually more complete. You will likely have some that you think will work perfectly and they fail in a spectacular manner. I tried this with some smoke bush leaves, a large hosta, and some grasses and they did not work at all. Elms, ashes, oaks and maples seemed to work out best for me, but those are the sorts of trees that grow in my area. If you’ve got some different climate going on in your neck of the woods, then feel free to experiment!

Take a large pot, and dump a handful of your leaves in the pot, so that they’re all lying flat (they can lie on top of each other, just not crumpled up).

Dump 3/4 cup of our handy dandy washing soda on top of that.

Dump 4 cups water on top of that. You’ll likely need more water as it evaporates, but if you’ve got a glass lid for your pot you can peek in and minimize steam loss that way.

Bring that pot to a boil and then reduce it to a simmer and just let ‘er rip for a while. Your leaves will undergo quite the transformation, from something like this:

through this sort of “tea-like” stage:

to this icky stage:

That’s about when you can consider most of your leaves as being done. For my leaves, with their relative thicknesses, it was between 45 minutes and 75 minutes. Use a large flat spatula or slotted spoon to carefully transfer your leaves, one at a time, into a flat dish filled with warm fresh water. You can see that this leaf has already started to come apart.

Be very careful as you transfer them because they are fragile and will do everything they can to tear on you.

Using a soft toothbrush or a very soft small paintbrush, give your leaf a little scrub to gently wipe away the leaf material from the skeleton. On some leaves, you’ll find this easier if the leaf’s surface is face up; on others, it will be easier when the leaf is upside down. Sometimes you’ll want to go with the “grain” of the veins, and other times you’ll want to do something different. There’s definitely a process of trial and error.

If you are doing more than one leaf, make sure you are comfy — this takes a while.

When your leaves are skeletonized to your preference (just remember that the longer you boil them the more fragile they will get), transfer them to a paper towel to dry. I would recommend weighting them as they dry as well. I didn’t do it for this one and you can see that it wrinkled when it dried out. It’s a simple matter, however, to re-wet them and bung them in a book for later.

So this is the large maple leaf I did with the washing soda. You can see that it’s not as complete a skeleton (there’s still some tissue remaining) as the one I picked up in the woods in our opening shot at top here.

Here’s the two next to each other:

This one, despite some tearing, turned out really neat, as I only brushed out one half of the leaf:

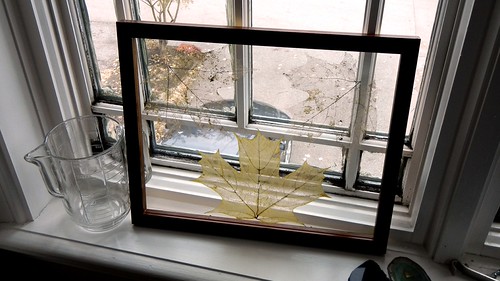
You can do whatever you want with your skeleton leaves. I saw a bunch of projects where artists had dried them into the shapes of bowls and other things, but I ran out of sucessful leaves before I had enough to make a bowl, so I decided to do the simple thing and just frame them. I got these floating frames from Michaels and DeSerres.


They make a great housewarming or host/hostess gift, or feel free to keep them for your own personal use.

 You can also bleach the leaves if you want them to be whiter, or you can dye them using food colouring. Really, the possibilities are endless. I’ve also seen them pasted to the outside of hurricane lanterns to act as luminaries, and used in scrapbooks. What would you do with them?

Love it. Somehow they remind me of delicate ghosts.
I love the idea of framing them.
LikeLike
I think when I get better at the process I’ll try something more adventurous!
LikeLike
I can’t wait to see your adventures 😉
LikeLike
That’s good – this will put pressure on me to actually DO it!
LikeLike
This is such a cool idea!
LikeLike
This is wicked awesome.
LikeLike
Nice idea!
LikeLike
Very cute!
LikeLike
I really like this.
LikeLike
Glad to hear it!
LikeLike
holy cow this is so sick!! I like the idea of putting them in a glass frame, that way light can shine through the skeleton. It all seems very time consuming but it definitely looks worth it! The half and half one looks so neat, I can’t believe there actually is a way to speed up the decomposing process of leaves with just washing soda. So cool!
LikeLike
Ain’t science GREAT?
LikeLike
These are absolutely beautiful! And the glass frame only makes it even better. Love it!
LikeLike
What a great idea. I must admit, I thought you were a bit bonkers and making “leaf tea” to drink. My kitty and I were eager to get to the bottom of the post to see if you drank it! (We’re both relieved.) They look great in the frame! I was considering an Anthropology major, by the way. I went with Behavioral Sciences instead (graduate next month- go me!) and I got a chuckle when I read, “Go outside, it’s alright, you can do it.” I feel like I’ve been chained to this laptop for months! (Finals this week.) I may try this, If I ever get time. :0)
LikeLike
Hahaha too funny!
LikeLike
Lovely! I’m gonna try this one 🙂 thanks much!!
-Yogini
LikeLike