

Neon seems to be the big thing these days. While I’m not the hugest fan of neon colours (having grown up in the 80s and 90s when it was overused and used badly), I do like what designers are doing with it as an accessory colour. I like the pop of these striped vases here, and the ombre finish of these ones here. So I thought I would try out the effect of the rubber bands and the ombre, but with a different colour more suited to the taste and decor of the person to whom I am giving the things.
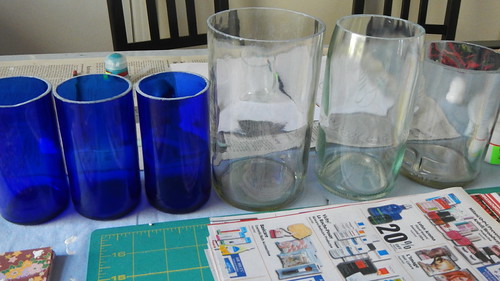
I cut a bunch of glass bottles I had lying around down to size and ground down the sharp edges (for my tutorial on cutting glass see here). You can of course use any glass you have lying around, vases, tumblers, stuff you pick up from the thrift store.

Before I really got into it, I thought I might do a test, first, on a piece of glass I wasn’t intending to use. I have learned from many, many, MANY mistakes to always test a new effect first. And you know what? I hated it. From a distance, I guess it was okay, but up close you could see all the places where the paint had bled under the rubber bands and/or peeled off as the elastic was peeled off. I checked around the internet and it seems that others have had this problem as well, so I gave it up for lost.

I am, however, still a fan of the IDEA of the rubber bands, at least, and I’ve become quite proficient at frosting glass. I still have a jar of Velvet Etch left over from last Christmas’s present run, and while I don’t like it as much as Armor Etch, it’ll do perfectly for this project where I just want a light touch.

So. Take your glass. Take a bunch of rubber bands, of different widths, and slap them on your vases, however which way you would like. Mine are rather haphazard, which will go well with the fact that this etching cream likes to leave huge swaths of unfrosted glass behind.

Then, wearing goggles, gloves, and a ventilator, slather on that etching cream (for my tutorial on etching glass see here).

Leave the stuff on for the appropriate time, and then carefully rinse it off, making sure that your rinse water is mixed with some form of base (like baking soda) to neutralize the acid before it eats your sink. Exercise caution when pulling off the rubber bands, as they tend to spit bits of acid at you if you snap them off too quickly. Slow and steady wins the race here.

Now you can stop there, and just enjoy your vases as they are. Or you could add a touch of whimsy so your receiver can put them to use right away: add flowers. Fresh flowers are pretty expensive in these parts, and in the winter months it’s unlikely that they’re going to be locally sourced, so most of the people I know hem and haw over the idea of wasting money on a fresh bunch of flowers that will last only a few days and has come from who knows where. Silk flowers are all right, but I find they get dusty really quickly. But if you take flowers to the abstract, and make them from paper or fabric, I think they have a bit more pizazz.

These ones I made from pom-poms. Now, there’s a bunch of ways to make pom-poms floating around the internet. The most popular method for trendy crafters seems to be the practice of wrapping the yarn around your fingers a million times and then simply tying that bundle together in the middle. While that is certainly the quickest way, I find you end up having to cut off a large amount of excess yarn in order to make your pom-pom anything close to spherical. The pom-pom method I used when making my touque-tastic tea cozy may take a while, but it’s worth it in the end. What comes out of it is almost perfect from the get-go, and you can be happy with just a little bit of trimming.

I modified the method a bit, in that I cut a slit in my paper double-donut and then folded back the edges of the slit. This way you can run your winding yarn through the slit rather than having to feed it through an increasingly smaller hole. Of course, you can’t keep winding around and around on this one; once you reach the edge of the slit you have to turn around and go back in the other direction but the results are more or less the same.

These pom-poms I made from various tail ends of wool I had lying around. Some I made really tight, some loose, and I wasn’t too careful about trimming them too precisely, because I wanted them to look natural (or as natural as flowers made from pom-poms can be). That one in the front left looks kind of like a wool celosia (brain flower). Or we’ve just made a visit to Whoville and Dr. Seuss sent us home with a bouquet.

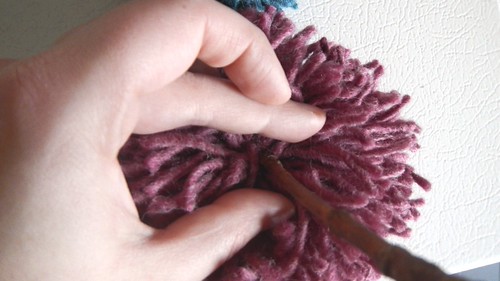
Then you just need to find yourself some twigs that are to your liking. If you feel around in your pom-pom you can usually feel the loop of yarn holding everything together. If you give your stick a careful shove and get it inside this loop, the tension should hold it there. If you’re worried about it falling, add a dab of hot glue. The bonus of not gluing, however, is once you tire of the arrangement you can pull the pom-poms off and use them for something else.
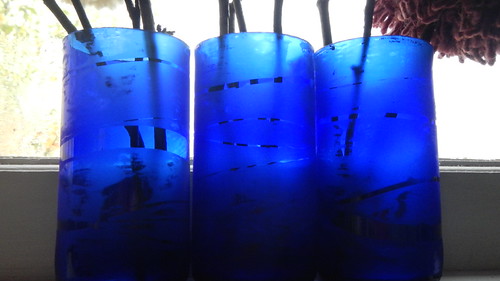
Then you arrange your “flowers” any way you like. Like all in one big vase:

Or in three small ones. Whatever floats your boat.


I am so inspired by this, but having just begun my Christmas preparation adventure, I will file it away for some other time! Love it. You are so talented and present things in the best way.
thanks and have a great holiday!
~ Nancy
LikeLike
they look like flowers from Horton Hears a Who(: I love them!
LikeLike
Haha, thanks!
LikeLike