

I saw this little tutorial over at Make and Do Girl and thought I would give it a try. You can buy fancy versions of this on Etsy for hundreds of dollars, but I thought I could probably produce nearly the same thing for a lot cheaper. And of course, as is usually the case, I was right.
All you need for this is a frame, some paint, a paint brush, a sturdy pair of scissors (despite the wire snips in this picture, I found a set of poultry shears did the trick quite well), glue of some kind (I ended up using Elmer’s School Glue), and a bunch of wee sticks, like coffee stirrers.

While I’m sure, if you are a regular inhabitant of Starbucks or Bridgehead or one of those places, you may amass a large collection of stir sticks over time, I preferred to get mine all at once and bought several packages at Michael’s, which is also where I bought the frame. You can also use popsicle sticks for this, but then you have to compensate for the rounded edges.

The first thing I did was paint my frames black, using some acrylic paint. At first I only did the edges of the frame, but I noticed that the frame showed through the gaps in the stir sticks when I glued them down so I ended up painting the whole frame, even the part that is relatively hidden behind sticks.

Then you need to pick a colour palette. I had a set of Crayola watercolours that I was going to use, because I wanted the wood to show through the paint. You can of course use any paint you want. I made two pieces, so for the first palette I picked a series of greens and yellows, and then the second I went with oranges, reds, and then purples and grays. Obviously if your frames are small, you should probably go with a smaller number of colours. My frames were pretty long so I went with 7 or 8 different colours.

Now you gotta paint them there sticks. I laid mine out along the frame just to get an idea of how many I needed (in the end I had a handful of painted ones leftover so this turned out to be a good idea).

Then you paint. This took me quite a while as I had to do each stick individually and paint it twice (due to the character of my paint). If you use acrylic or something thicker you could just paint them in a batch, or dip them en masse in ink or a dye … whatever works for you. This is all you.

Then you start laying them out. I measured the sticks to fit in the frame and cut them accordingly.

Then I cut those pieces up so that I could fit them together like patchwork.

Then you start gluing. And gluing. And gluing …

Despite these sticks all coming in a package together, they weren’t by any stretch of the imagination the same. Some had slight curves, or were cut on an angle, and that made putting them together a little bit more of a challenge. Because there were gaps between sticks at some points, I chose to apply glue individually to each stick rather than just put a blanket of it down on the frame. It took longer, but I think it was a neater job in the end.

When I got to the end, my final sticks were a little too wide to fit in the frame, so I just took a piece of sandpaper and filed them down a bit until they fit snugly.

My orange and purple job turned out a little slanty, because some of the sticks I used were really angled, but I kind of like how it messes with your eye that way.

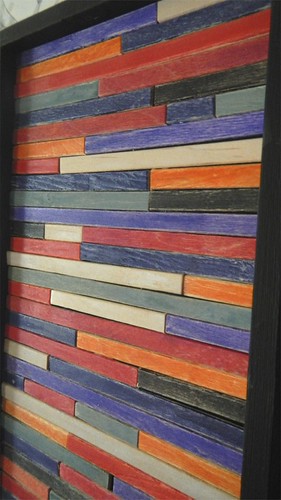
And these frames came with hanging hardware on both the short and the long sides, so you can hang them either vertically or horizontally.

I made these originally as gifts, but they look so good on my mantle that I’m thinking of keeping them. They would make a good frame for my giant squid, once I figure out where to hang him …


i love it!! i’m going to add this to my diy to do list 🙂
LikeLike
It’s a great thing to do while watching a movie or something, and a cheap way to give your walls some decoration that is tailored to your tastes. I think I might have to make *myself* one. Or two. Or three …
LikeLike
Love it Ali 🙂 I am so making one. Or maybe, four.
LikeLike
Thanks, me too!
LikeLike
I love it. I have been eating Popsicles all summer and wishing that there was something that I could do with the sticks. Cutting off the rounded edges would take care of the problem they present.
LikeLike
Not to mention that they’d be pre-stained for you!
LikeLike
Wow! So creative! I really admire what you’ve done 🙂
LikeLike
Thanks!
LikeLike
I am really looking forward to do this… and loved your version… can you please tell me the size of your frame… thank a lot
LikeLike
Hi Ninny, I’m not sure what the size was, because I gave it away! It was the standard frame from Michael’s, and I’m going to guess it was about 6″ x 18″ or something like that.
LikeLike
I wanted to create this at one of my craft nights but I looked at Michaels and Hobby Lobby and I can’t find a frame like this. Please help!
LikeLike
Maybe make one out of thin sheet board? It’s odd that they don’t have them at Michael’s. I’m pretty sure I saw some at Joann if you have any of those nearby …
LikeLike
Love love love!! Your pic views step by step made it look so simple.. I am going to try and get back to you again!! Loved you blog and following too!!!!!!
LikeLike
Fantastic! I can’t wait!
LikeLike
I just tried this the past weekend! Love it 🙂
LikeLike